To remove the flow restrictor from a shower head, first locate it inside the shower head. Then, use a pair of pliers to carefully extract it.
Flow restrictors are designed to conserve water by limiting the amount of water that flows through your shower head. While they help save water, they can also reduce your shower’s water pressure. If you prefer a stronger water flow, removing the flow restrictor can make a significant difference.
This guide will walk you through the steps needed to safely and effectively remove the flow restrictor from your shower head. By following these steps, you can enhance your shower experience without much hassle. Let’s get started!
Credit: www.reddit.com
Tools And Materials Needed
Removing the flow restrictor from your shower head can improve water pressure. Before starting, gather the tools and materials you’ll need. This will ensure a smooth and efficient process. Let’s dive into the essentials required for this task.
Required Tools
Having the right tools on hand is crucial. Here are the tools you’ll need:
- Adjustable wrench
- Pair of pliers
- Needle-nose pliers
- Teflon tape
- Rag or cloth
The adjustable wrench helps in loosening the shower head. Pliers, especially needle-nose pliers, are handy for removing the flow restrictor.
Necessary Materials
Gathering the necessary materials is equally important. These materials include:
- Replacement O-ring (if needed)
- Lubricant (optional)
The O-ring ensures a tight seal, preventing leaks. Lubricant can make the process smoother but is not always necessary.
Safety Precautions
Removing a flow restrictor from a shower head can improve water pressure. However, it is important to follow safety precautions. This ensures a safe and successful process.
Protective Gear
Wear safety goggles to protect your eyes from debris. Use gloves to shield your hands from sharp edges and hot water. A dust mask can prevent inhaling any particles.
Handling Tools Safely
Use a wrench or pliers carefully. Grip the tool firmly to avoid slipping. Keep tools dry to ensure a strong grip. Place tools away from water sources. This prevents electrical hazards and accidental slips.
Preliminary Steps
If you want to remove the flow restrictor from your shower head, follow these preliminary steps. These steps ensure safety and ease throughout the process. Let’s get started with the initial actions.
Turn Off The Water Supply
First, turn off the water supply. This step prevents any water from spraying while you work. Locate the main water valve. Turn it clockwise until it stops. This action ensures no water flows to the shower head.
Remove The Shower Head
Next, remove the shower head. Use a wrench to loosen it. Turn the wrench counterclockwise. Once loose, unscrew the shower head by hand. Place a towel or cloth under the shower head. This prevents any scratches or damage. Set the shower head aside carefully.
Locating The Flow Restrictor
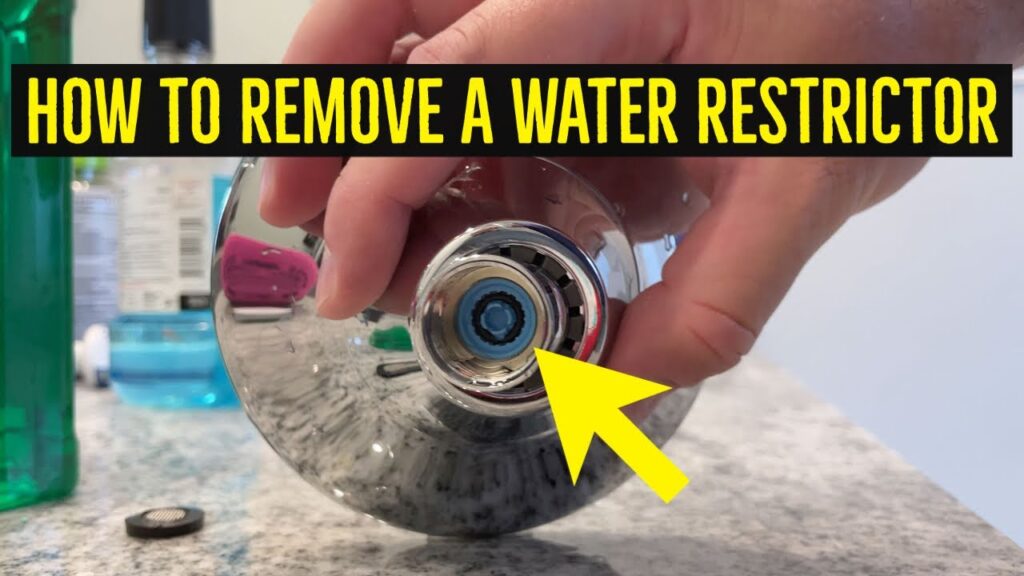
When your shower pressure starts to feel more like a drizzle, it might be time to remove the flow restrictor from your shower head. This little device is designed to conserve water, but it can also leave you longing for a more powerful shower. First, you need to locate the flow restrictor. Here’s how to do it:
Identify The Flow Restrictor
The flow restrictor is a small, plastic disk. It usually has a star-shaped metal center. It’s often a different color than the rest of the shower head components, making it easier to identify.
Before you start, grab a flashlight. Shine it into the shower head to spot the restrictor. If you see a plastic piece with holes, you’ve found it!
Common Locations
Flow restrictors are typically found in one of two places. They can be inside the shower head or at the base where it connects to the pipe.
If your shower head has a removable faceplate, the restrictor is often behind it. Unscrew the faceplate carefully to access it.
If not, check the base of the shower head. You might need to unscrew the entire unit from the pipe. Look inside the opening for the restrictor.
Have you ever wondered why your morning shower feels less refreshing? It could be the flow restrictor limiting your water flow. By knowing where to look, you can easily find and remove it for a more invigorating shower experience.
Removing The Flow Restrictor
Removing the flow restrictor from a shower head can improve water pressure. First, unscrew the shower head. Then, carefully extract the flow restrictor using a small tool.
Removing a flow restrictor from your shower head can make a significant difference in your shower experience. If you’ve ever felt that your shower lacks the power you desire, you might be dealing with a flow restrictor. These small devices are designed to limit the water flow to conserve water. However, if you’re looking for a stronger water stream, removing the flow restrictor is a straightforward process. Here’s how you can do it:Unscrew The Shower Head
First, you need to remove the shower head from the shower arm. Use a wrench to gently loosen the connection between the shower head and the arm. Wrap a cloth around the connection to prevent scratching the metal. This step requires a bit of patience; if the connection is tight, apply a little more force. Once loose, unscrew the shower head by hand. Place the shower head in a safe spot to avoid damage.Extract The Restrictor
Now that the shower head is off, look inside the opening where the shower arm was connected. You’ll see a small plastic disc—this is the flow restrictor. Using a pair of needle-nose pliers, carefully grip the edge of the restrictor. Gently pull it out; it might take a few tries to get a good grip. Check if there are any additional components like rubber gaskets or screens. Remove them carefully and set them aside. Reattach the shower head to the shower arm by screwing it back on. Tighten it with a wrench, using the cloth to protect the metal. Have you ever struggled with low water pressure and wondered if it’s worth the effort to remove the restrictor? By following these steps, you can easily find out if it makes a difference for you. Enjoy a more invigorating shower experience without the hassle of complex tools or professional help.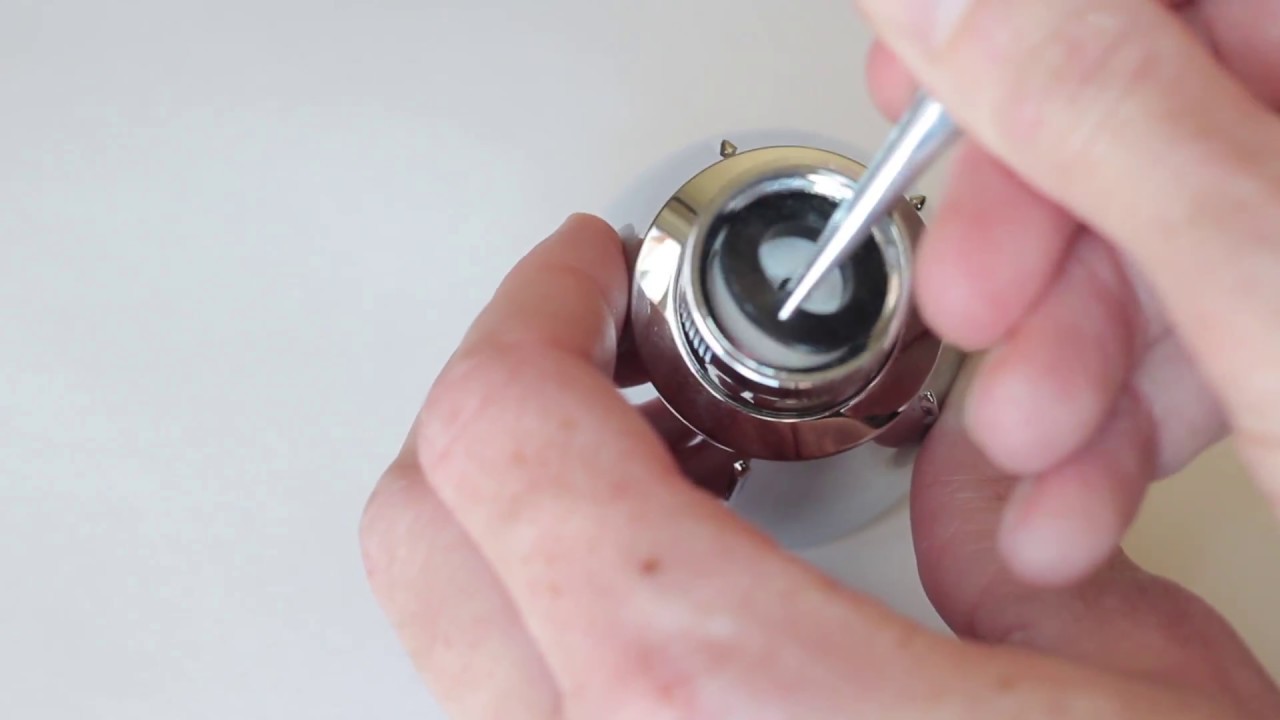
Credit: www.youtube.com
Cleaning The Shower Head
Cleaning the shower head is essential for maintaining water flow. A clean shower head ensures optimal performance and extends its lifespan. Follow these steps to remove mineral deposits and clean with vinegar.
Remove Mineral Deposits
Mineral deposits can clog your shower head. These deposits reduce water flow and pressure. First, detach the shower head from the pipe. Use a wrench if necessary. Check for visible buildup around the nozzles. Use a small brush to scrub off the deposits. An old toothbrush works well. Be gentle to avoid damage. Rinse the shower head under warm water. This helps remove loose particles. Inspect the nozzles again. Ensure all deposits are gone.
Clean With Vinegar
Vinegar is a natural cleaner. It dissolves mineral deposits and disinfects. Fill a plastic bag with white vinegar. Submerge the shower head in the bag. Secure the bag with a rubber band. Let it soak for at least an hour. For severe buildup, leave it overnight. Remove the bag and rinse the shower head. Use warm water to flush out residue. Reattach the shower head to the pipe. Turn on the water to check the flow. The vinegar should have cleared any blockages.
Reassembling The Shower Head
Now that you’ve successfully removed the flow restrictor, it’s time to reassemble the shower head. Reassembling your shower head is crucial to ensure a leak-free and efficient shower experience. Let’s dive into the steps needed to get everything back in place.
Reattach The Shower Head
Start by reattaching the shower head to the shower arm. Make sure to align the threads carefully to avoid cross-threading. Hand-tighten the shower head initially, ensuring it’s snug but not overly tight.
Consider using plumber’s tape to wrap around the threads of the shower arm. This tape helps create a watertight seal and can prevent leaks. Wrap the tape clockwise around the threads two to three times.
If your shower head came with a rubber washer, place it back inside the connection point. This washer also helps in creating a tight seal.
Ensure Proper Fit
After hand-tightening, use an adjustable wrench or pliers to give the shower head a final turn. Be gentle to avoid damaging the finish of the shower head. If possible, use a cloth to protect the metal surface.
Turn on the water to test for leaks. If you notice any water escaping around the connection, tighten the shower head a bit more. Don’t overdo it; you don’t want to crack the shower head or strip the threads.
Check the spray pattern to ensure it is even. Sometimes, reassembling can shift components slightly, affecting the water flow.
Have you ever reassembled something only to find out a piece was missing? Make sure to double-check all parts before wrapping up. This saves you from potential frustration and ensures a smooth shower experience.
What tips or tricks have you discovered while reassembling your shower head? Sharing your insights can help others avoid common pitfalls.
Testing The Water Flow
After removing the flow restrictor from your shower head, testing the water flow is vital. This ensures you achieved the desired increase in water pressure. It also helps identify any potential issues like leaks. Follow these steps to test the water flow effectively.
Turn On The Water Supply
First, turn on the water supply. This will allow you to see the changes in water pressure. It’s best to start with a low flow. Gradually increase it to avoid any sudden pressure bursts. Observe the water flow from the shower head closely.
Check For Leaks
Next, check for leaks. Look around the connection points. If you notice any water dripping, tighten the connections. Make sure the shower head is securely attached. Use a wrench if needed. A leak-free connection ensures optimal performance.

Credit: www.reddit.com
Frequently Asked Questions
Is It Okay To Remove A Flow Restrictor From A Shower Head?
Removing a flow restrictor from a shower head can increase water pressure. It may violate local water conservation laws. Check regulations before proceeding.
Do All Shower Heads Have Removable Restrictors?
Not all shower heads have removable restrictors. Check the product specifications or manual to see if yours does.
Is It Illegal To Remove A Shower Flow Restrictor?
Removing a shower flow restrictor is not illegal. However, it may violate local water conservation regulations. Check local laws before removing it.
What Do Shower Head Flow Restrictors Look Like?
Shower head flow restrictors are small, round, plastic or metal discs. They often have a mesh or small holes. They are usually located inside the shower head, near the connection point.
Conclusion
Removing the flow restrictor from your shower head can improve water pressure. Follow the steps carefully for a smooth process. Always use the right tools to avoid damage. Enjoy a more powerful shower experience. Remember to reassemble the shower head securely.
Regularly clean the shower head for best results. A better shower can enhance your daily routine. Happy showering!