
Installing a Maxxair vent cover is straightforward. Follow simple steps to complete the task.
A Maxxair vent cover helps protect your RV from rain, debris, and pests. It allows you to keep vents open, even in bad weather. This guide will show you how to install a Maxxair vent cover correctly. Understanding the installation process ensures you get the most out of your vent cover.
This task does not require special tools or expertise. So, even if you are new to DIY projects, you can handle this. Let’s get started and make your RV more comfortable and secure.
Credit: www.pplmotorhomes.com
Introduction To Maxxair Vent Covers
Maxxair Vent Covers are essential for RV owners who want to enjoy fresh air without worrying about rain, debris, or bugs getting inside. These covers are designed to fit over your existing roof vents, providing protection and allowing ventilation even in bad weather. Installing a Maxxair Vent Cover is a simple process that can significantly improve your RV experience.
Benefits Of Maxxair Vent Covers
Maxxair Vent Covers offer numerous benefits that make them a valuable addition to any RV. First, they allow you to keep your vents open even when it’s raining, ensuring continuous airflow and preventing moisture buildup inside your RV.
Another advantage is their durability. Made from high-quality materials, these covers withstand harsh weather conditions, extending the life of your roof vents. They also reduce the need for frequent vent maintenance.
Additionally, Maxxair Vent Covers help keep out leaves, twigs, and other debris, maintaining a clean and fresh interior. This is especially useful if you often park under trees or in dusty areas.
Why Install A Vent Cover
You might be wondering why you should invest in a vent cover for your RV. The main reason is to enhance comfort and convenience. By installing a Maxxair Vent Cover, you can keep your vents open without worrying about rain or pests entering your RV.
Another reason is to protect your investment. Roof vents can be expensive to repair or replace. A vent cover acts as a shield, protecting the vent and extending its lifespan. This saves you money in the long run.
Installing a vent cover is also a quick and easy DIY project. With just a few tools and some basic instructions, you can have your Maxxair Vent Cover installed in no time. It’s a small effort that makes a big difference.
Have you ever had to close your vent during a downpour and felt the air inside your RV become stuffy? Or dealt with cleaning out debris that found its way inside? A Maxxair Vent Cover can solve these problems and make your RV trips more enjoyable.
Ready to take the next step and install your Maxxair Vent Cover? Let’s get started!
Tools And Materials Needed
Installing a Maxxair Vent Cover is a great way to improve your RV’s ventilation. Before you begin, gather all the necessary tools and materials. This will make the installation process smoother and quicker.
Essential Tools
Having the right tools is crucial. Here is a list of essential tools you will need:
- Screwdriver: Both Phillips and flat-head types.
- Drill: A cordless drill works best.
- Measuring Tape: Accurate measurements ensure a good fit.
- Pencil: For marking positions on the roof.
- Socket Wrench: For tightening nuts and bolts.
Required Materials
Besides tools, you will need some materials to complete the installation:
- Maxxair Vent Cover: Choose a model that fits your vent.
- Screws and Bolts: Usually included with the vent cover.
- Sealant: Ensures a waterproof seal around the vent.
- Cleaning Cloth: Clean the area before installation.
- Protective Gloves: Protect your hands during the process.
Once you have everything ready, you can start installing your Maxxair Vent Cover.
Preparation Steps
Installing a Maxxair Vent Cover can improve the ventilation in your RV. Before you start, it is important to prepare properly. Preparation ensures a smooth installation process.
Choosing The Installation Location
Select the right spot for the vent cover. Look for a flat surface on your RV roof. Avoid areas with obstacles or other vents. Ensure the location allows airflow and easy access.
Cleaning The Area

Credit: our1chance.com
Removing The Old Vent Cover
Removing the old vent cover is an essential first step when installing a Maxxair Vent Cover. This process might seem daunting, but with some basic tools and a little patience, you can do it yourself. Let’s break it down into manageable steps to make the task easier.
Unscrewing The Old Cover
Start by locating the screws that secure the old vent cover. Typically, these screws are visible around the base of the vent cover. Use a screwdriver that fits the screws perfectly to avoid stripping them.
Once you have the right tool, begin unscrewing the screws one by one. Keep a small container nearby to collect the screws, so you don’t lose any. This step is straightforward but be careful not to apply too much force, which might damage the vent or the surrounding roof.
Cleaning The Surface
After removing the old vent cover, you’ll notice some dirt and debris around the area. Cleaning this surface is crucial for the new Maxxair Vent Cover to fit snugly and perform effectively. Use a brush or a cloth to wipe away loose dirt.
For stubborn grime, a mild detergent and water solution can help. Gently scrub the area and rinse it thoroughly. Ensure the surface is completely dry before proceeding with the installation of your new cover.
Have you ever found yourself halfway through a DIY project only to realize you missed a crucial step? Skipping the cleaning might seem insignificant, but it can lead to poor sealing and potential leaks. Taking a few extra minutes to clean ensures your new vent cover will last longer and perform better.
What other tips or tricks have you discovered while tackling home improvement projects? Share your experiences and let’s learn together!
Installing The Maxxair Vent Cover
Installing a Maxxair vent cover can improve your RV ventilation. This guide will help you install the cover step by step. Make sure you have all the required tools before starting. You will need a screwdriver, drill, and the vent cover kit.
Aligning The New Cover
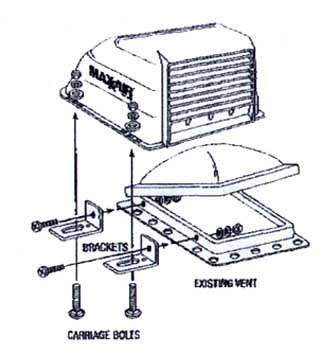
First, place the new vent cover over the existing vent. Make sure it aligns properly with the edges. Check that the brackets match the vent’s frame. Proper alignment ensures a secure fit.
Securing The Vent Cover
Next, use the screws provided in the kit. Insert them into the pre-drilled holes in the brackets. Tighten the screws using a screwdriver. Ensure each screw is snug, but do not over-tighten.
Finally, double-check all screws. Make sure the cover is firmly in place. Your Maxxair vent cover is now installed. Enjoy better ventilation in your RV.
Sealing The Edges
Sealing the edges of your Maxxair Vent Cover is crucial. This step ensures no water or debris enters your RV. A good seal keeps your interior dry and damage-free. Let’s dive into the process.
Applying Sealant
First, clean the edges of the vent cover. Remove any dirt or residue. Use a suitable cleaner for this purpose.
Next, select a high-quality sealant. Apply the sealant evenly around the edges. Make sure to cover all gaps and seams.
Use a caulking gun for better control. Smooth the sealant with a putty knife. This step ensures an even application.
Ensuring A Tight Seal
After applying the sealant, check the edges. Look for any missed spots or gaps. Add more sealant if necessary.
Press down on the edges to ensure contact. This helps the sealant adhere properly. Allow the sealant to dry completely.
Inspect the seal after drying. Ensure there are no cracks or voids. A thorough inspection guarantees a tight seal.
Testing The Installation
After installing your Maxxair Vent Cover, it’s crucial to test the installation. Proper testing ensures the vent cover functions correctly. This step helps avoid potential issues. Let’s break down the testing process into two key parts.
Checking For Leaks
First, check for leaks. Use a hose to spray water on the vent cover. Make sure to cover all areas. Then, inspect the inside of your RV. Look for any signs of water. If you find leaks, tighten the screws. Apply more sealant if needed.
Ensuring Proper Ventilation
Next, ensure proper ventilation. Turn on the vent fan. Check if air flows freely through the cover. If the airflow feels weak, there might be a blockage. Remove the cover and inspect it. Clean any debris that might be obstructing the airflow.
Remember, testing the installation is key. It ensures your Maxxair Vent Cover works efficiently. Keep your RV comfortable and well-ventilated.

Credit: www.youtube.com
Maintenance Tips
Maintaining your Maxxair Vent Cover ensures it functions well for years. Regular maintenance prevents issues and extends its lifespan. This section provides essential tips for keeping your vent cover in top shape.
Regular Cleaning
Clean the vent cover every few months. Dust and debris can accumulate, blocking airflow. Use a soft brush or cloth to wipe off dirt. Avoid harsh chemicals that can damage the material.
Inspecting For Damage
Regularly inspect the vent cover for cracks or wear. Look for any signs of damage. Small issues can escalate if ignored. Addressing them early saves time and money. Replace damaged parts promptly to maintain efficiency.
Troubleshooting Common Issues
Installing a Maxxair Vent Cover can be a straightforward task. But sometimes, issues arise that need troubleshooting. Understanding and resolving these common problems ensures your vent cover performs optimally. This section addresses frequent issues users encounter and how to fix them.
Addressing Leaks
Leaks can occur around the vent cover. First, check the sealant. If it appears cracked or has gaps, apply new sealant. Ensure you cover the entire perimeter. Tighten all screws. Loose screws can cause small gaps, leading to leaks. If the vent cover is still leaking, inspect the roof surface for damage. Repair any cracks or holes to ensure a proper seal.
Fixing Installation Errors
Incorrect installation can cause the vent cover to malfunction. Start by reviewing the installation instructions. Ensure you followed each step correctly. If the cover is not sitting flat, check if the mounting bracket is aligned. Realign if necessary. Make sure the cover is not obstructing the vent opening. This can restrict airflow. If the cover is not secure, double-check the screws. Ensure they are tight and evenly fastened.
Frequently Asked Questions
How To Install A Maxxair 2 Vent Cover?
To install a Maxxair 2 vent cover, remove the old cover first. Attach the brackets to the existing vent. Place the Maxxair cover over the brackets. Secure it with provided screws. Ensure it is tightly fitted and test the vent operation.
How To Install Camper Roof Vent Covers?
To install camper roof vent covers, first, remove the existing vent. Clean the area thoroughly. Align the new cover, then screw it in place. Seal the edges with a waterproof sealant to prevent leaks. Check for secure installation and proper ventilation.
How To Attach A Vent Cover?
To attach a vent cover, align it with the vent opening. Secure it using screws or clips provided. Ensure it fits snugly.
How Do You Install An Air Vent Deflector?
To install an air vent deflector, align it with the vent. Attach using screws or adhesive strips. Adjust the deflector to direct airflow. Ensure secure fitting to prevent movement.
Conclusion
Installing a Maxxair vent cover is simple and rewarding. You enhance your RV’s ventilation. Protect it from rain and debris. Follow the steps. Use the right tools. Ensure a snug fit. Enjoy improved airflow. Safeguard your investment. Happy RVing!