Testing an RV converter is crucial for maintaining your vehicle’s electrical system. Follow these steps to ensure it’s working correctly.
An RV converter transforms 120-volt AC power into 12-volt DC power, essential for running various RV appliances. Regular testing helps prevent electrical issues and ensures safety. Whether you’re a seasoned RV enthusiast or new to the lifestyle, knowing how to test your RV converter is vital.
This guide will walk you through the process, making it easy to check your converter’s performance. Proper testing can save you from unexpected breakdowns and costly repairs. Let’s dive into the steps to ensure your RV converter is in top shape, keeping your travels smooth and trouble-free.
Credit: www.youtube.com
Safety Precautions
Ensure your safety by turning off the RV’s power supply first. Use insulated tools to check the converter’s output. Wear protective gear to avoid electric shocks.
Testing an RV converter is essential to ensure your vehicle’s electrical system runs smoothly. However, before diving into the technical aspects, it’s crucial to take safety precautions seriously. Safety should always be your top priority to prevent accidents and damage.Wearing Protective Gear
When working with electrical systems, always wear protective gear. This includes gloves and safety glasses. Gloves will protect your hands from electrical shocks and sharp objects, while safety glasses will shield your eyes from sparks or debris. Consider wearing long sleeves and closed-toe shoes. This might seem like overkill, but it’s better to be safe than sorry. I once skipped wearing gloves while handling a simple wiring task and ended up with a nasty shock. Trust me, it’s not worth the risk.Disconnecting Power Sources
Before you begin testing your RV converter, make sure to disconnect all power sources. This includes unplugging from shore power and switching off the main circuit breaker. This step is non-negotiable to ensure your safety. Remember to remove any connected devices or appliances. Even small gadgets can pose a risk if left connected. Think about how you’d feel if a sudden power surge damaged your favorite coffee maker. Use a voltage tester to double-check that there’s no electricity running through the system. It’s a small tool but incredibly useful. Why take chances when you can easily confirm your safety? By taking these safety precautions, you’re not just protecting yourself but also ensuring the longevity of your RV’s electrical system. What other safety tips do you follow while working on your RV? Your insights might help fellow readers.Locating The Rv Converter
Finding the RV converter is the first step to test it. The RV converter is an essential component. It converts AC power to DC power. This powers your RV’s electrical systems. Locating it can be tricky if you don’t know where to look.
Checking The Owner’s Manual
The owner’s manual is a great place to start. It contains detailed information about the RV’s components. Look for the electrical system section. This section usually shows the converter’s location. Follow the instructions given in the manual. It will save you time and effort.
Common Converter Locations
Converters are often hidden in cabinets or compartments. Check under the bed or near the power distribution panel. Look in storage areas or under seating. These are common places where converters are installed. Some RVs have the converter near the battery compartment. Others might have it in the basement storage area. Keep an eye out for a metal box with cooling vents. This is a clear indicator of the converter’s presence.
Visual Inspection
Performing a visual inspection is an essential step in testing your RV converter. This process helps you identify any visible issues that might affect its performance. Let’s break down the visual inspection into two key areas.
Checking For Physical Damage
Start by examining the RV converter for any physical damage. Look closely at the exterior casing. Check for cracks, dents, or any other signs of damage. Physical damage can indicate internal issues.
Inspect the cooling fans. Ensure they are clean and free from debris. Dirty or damaged fans can lead to overheating. This affects the converter’s performance.
Inspecting Connections And Wires
Next, inspect the connections and wires. Ensure all connections are tight and secure. Loose connections can cause electrical problems.
Check for frayed or damaged wires. Damaged wires can lead to short circuits. Replace any wires that show signs of wear and tear.
Look at the terminals for corrosion. Corroded terminals can affect the flow of electricity. Clean any corrosion you find.
Testing The Converter Output
Testing the converter output of your RV is crucial. It ensures your electrical system is working properly. A faulty converter can lead to a dead battery. This section will guide you through testing the converter output. It will help you understand the readings and what they mean.
Using A Multimeter
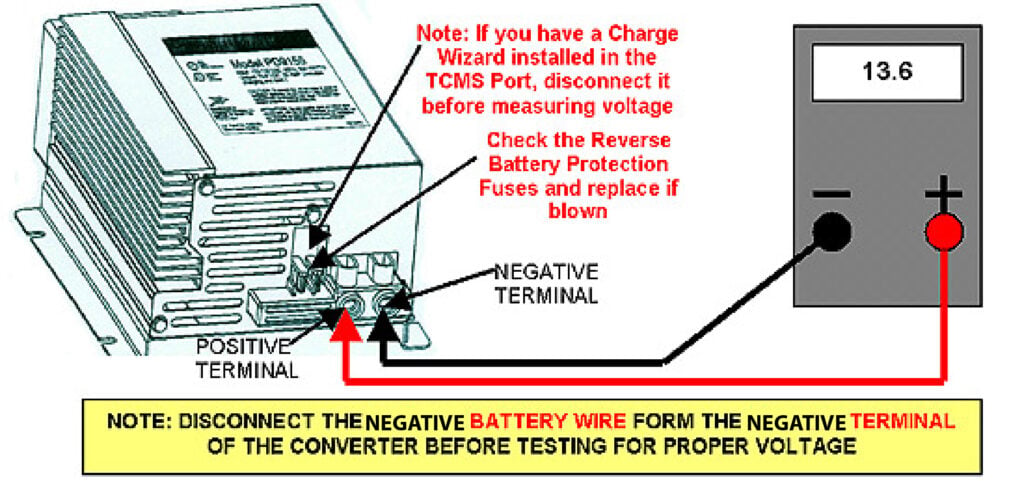
A multimeter is essential for testing the converter output. Start by setting your multimeter to DC voltage. Connect the black probe to the negative terminal. Attach the red probe to the positive terminal. Ensure you have a good connection.
Turn on the RV converter. Check the multimeter display. The reading should show the output voltage. A typical reading is between 13.6 and 14.4 volts. If the reading is outside this range, the converter may be faulty.
Interpreting Voltage Readings
Understanding the voltage readings is important. A reading below 13.6 volts means the converter isn’t charging the battery. This could indicate a problem with the converter or wiring. A reading above 14.4 volts can damage the battery. It suggests the converter is overcharging.
Compare the readings with your RV’s manual. Each RV model may have specific voltage ranges. Always refer to the manufacturer’s guidelines. If the readings are off, consider consulting a professional. It’s important to address any discrepancies quickly.
Checking Battery Connection
Ensuring your RV’s battery connection is solid is crucial for the overall health of your electrical system. A faulty connection can lead to inefficiencies and even damage your equipment. Let’s dive into how you can check the battery connection effectively.
Testing Battery Voltage
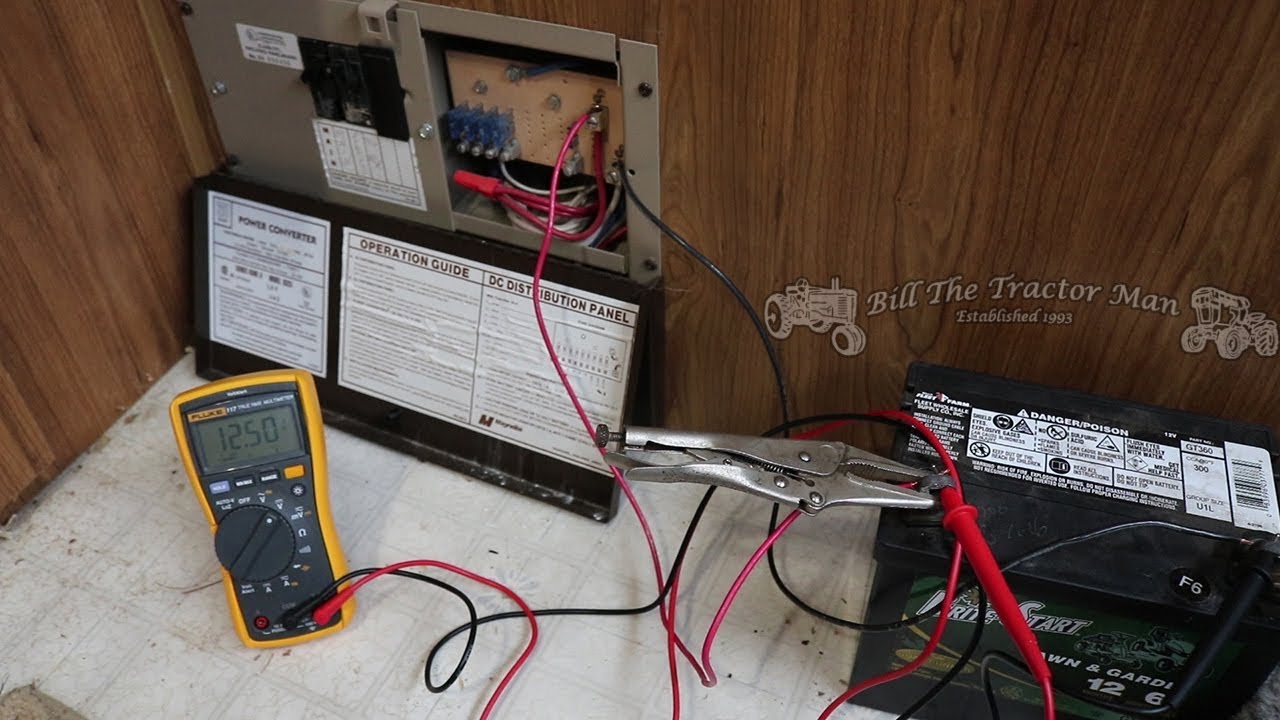
Testing the battery voltage is your first step. Grab a multimeter and set it to measure DC voltage. Connect the multimeter’s positive lead to the battery’s positive terminal and the negative lead to the negative terminal.
Your RV battery should read around 12.6 volts when fully charged and not connected to any load. If you notice a significant drop, the battery might be failing. Regularly testing your battery voltage helps keep track of its health.
Ensuring Proper Charging
Next, verify that your RV converter is charging the battery correctly. Start by connecting your RV to shore power and turning on the converter. Use the multimeter again to measure the battery voltage.
With the converter running, the voltage should rise to around 13.6 to 14.4 volts. If the voltage stays the same or drops, your converter may not be working properly. This step ensures your battery remains charged and ready for use.
Have you ever been on a trip and noticed your battery dying faster than usual? It might be due to a poor connection or a failing converter. Regular checks can prevent these hassles and keep your adventures smooth.
Have you checked your RV’s battery connection lately? Regular maintenance can save you from unexpected problems on the road. Make it a habit to test and ensure everything is working as it should.

Credit: blog.campingworld.com
Troubleshooting Common Issues
Testing an RV converter can be a bit tricky. You might encounter several issues. Some of these problems are common. Understanding these can help you troubleshoot efficiently. Let’s dive into some frequent problems.
Low Voltage Output
Low voltage output can be frustrating. The first step is to check the battery. Make sure it is charged. Next, inspect the connections. They should be clean and tight. Dirty or loose connections can cause low voltage. Also, test the converter itself. Use a multimeter to measure output. If the output is below 12 volts, the converter might be faulty.
Overheating Problems
Overheating is another common issue. Ensure the cooling fan is working. A faulty fan can lead to overheating. Clean any dust from the fan and vents. Blocked vents restrict airflow. This can cause the converter to overheat. Place the converter in a well-ventilated area. Poor ventilation can also lead to overheating. Finally, check for any unusual smells. A burning smell might indicate overheating components.
When To Seek Professional Help
Seek professional help if your RV converter shows inconsistent power, unusual noises, or fails to charge the battery. Safety concerns and complex issues warrant expert attention.
When to Seek Professional Help Testing your RV converter can be a straightforward task. However, there are times when seeking professional help is the best course of action. Let’s dive into those scenarios and ensure your RV stays in top shape.Identifying Complex Issues
Not all RV converter problems are easy to spot. Sometimes, the issues are deeply rooted in the electrical system. If you’re experiencing inconsistent power or frequent tripping of circuit breakers, it might be more than just a converter issue. I once faced this with my RV. The lights flickered, and outlets were unreliable. After hours of troubleshooting, I realized the problem was beyond my expertise. Don’t hesitate to call a professional if you’re in a similar situation.Choosing A Qualified Technician
Finding the right professional is crucial. You want someone experienced and reliable. Look for technicians with certifications and good reviews. Your local RV community is a great resource for recommendations. When I needed help, I asked fellow RVers and found a highly recommended technician. It saved me time and ensured the job was done correctly. Remember, your RV is your home on wheels. Trusting a qualified professional ensures safety and peace of mind. Have you faced a tricky issue with your RV converter? Share your experiences in the comments!
Credit: www.youtube.com
Frequently Asked Questions
How Can I Tell If My Rv Converter Is Bad?
Check for dim or flickering lights, dead batteries, or malfunctioning appliances. These signs indicate a faulty RV converter.
How To Test A Rv Converter With A Multimeter?
To test an RV converter, set your multimeter to DC voltage. Check the output terminals. A healthy converter should read 13. 6 to 14. 4 volts.
How To Tell If An Rv Converter Is Charging The Battery?
Check the voltage at the battery terminals with a multimeter. A reading between 13. 6V and 14. 4V indicates charging.
Will An Rv Converter Work Without A Battery?
An RV converter can work without a battery, but it’s not recommended. The battery helps stabilize power and ensures consistent operation.
Conclusion
Testing an RV converter is simple and important. Follow these steps for safety. Ensure your RV runs smoothly on the road. Regular checks can prevent unexpected issues. Always use a multimeter for accurate results. Remember, a well-maintained converter extends your RV’s life.
Happy travels!