Resetting an auto leveling system can seem daunting. But it is simpler than you think.
Auto leveling systems keep your vehicle balanced and smooth. Over time, these systems may need resetting. This ensures they work correctly. In this guide, you will learn easy steps to reset your auto leveling system. You do not need to be a mechanic.
With basic tools and a little time, you can do it yourself. This will help maintain your vehicle’s performance and safety. Ready to get started? Let’s dive in.

Credit: eqsystems.us
Preparation
Resetting the auto leveling system in your vehicle requires careful preparation. Ensuring you have the right tools and following safety precautions can make the process smooth. Let’s go through the essential steps to prepare for resetting your auto leveling system.
Tools Needed
Gathering the correct tools is the first step. You will need a wrench set. A socket set is also necessary. Don’t forget a jack and jack stands. These tools will help you work under the vehicle safely. Lastly, have a flashlight handy. It will help you see clearly in dim areas.
Safety Precautions
Safety should always be your priority. First, park your vehicle on a flat surface. This prevents it from rolling. Engage the parking brake as well. This adds an extra layer of safety. Wear gloves and safety goggles to protect your hands and eyes. Use jack stands to support the vehicle. Never rely solely on the jack. This prevents accidents if the jack fails.
Initial Checks
Resetting your auto leveling system can be a straightforward process. The first step involves conducting initial checks to ensure everything is in order. These checks help identify any issues early, making the reset smoother. Let’s break down these checks into two main areas: inspecting the system and identifying faulty components.
Inspecting The System
Begin by visually inspecting the auto leveling system. Look for any obvious signs of damage. Check for loose connections or cables. Ensure all parts appear to be in their correct positions. If you see any dirt or debris, clean it carefully. Sometimes, simple cleaning can solve many problems.
Identifying Faulty Components
Next, identify any faulty components. This step requires a bit more attention. Listen for unusual sounds while the system operates. These sounds might indicate a malfunctioning part. Check for warning lights or error codes on the control panel. These codes can guide you to the exact problem. If needed, refer to the user manual for specific fault codes.
By performing these initial checks, you can pinpoint issues early. This will make the reset process much easier and more effective.
Powering Down
Reset the auto leveling system by first powering down the vehicle. Then, locate the reset button and hold it until the system reboots.
Resetting your auto-leveling system might seem daunting, but it’s a straightforward process if you break it down into manageable steps. Powering down the system is crucial before attempting any resets or adjustments. This ensures safety and prevents any potential damage to the system. Let’s walk through the steps to power down your auto-leveling system.Switching Off The System
First, locate the control panel or switch for your auto-leveling system. This is often found near your driver’s seat or in the control area of your vehicle. Once you find it, simply switch the system to the “off” position. This step is essential as it stops the system from making automatic adjustments while you work on it. Give it a moment to ensure everything has powered down completely. You might even hear a slight click or see an indicator light go off.Disconnecting Power Source
Now, it’s time to disconnect the power source. This step adds an extra layer of safety by ensuring no electricity flows through the system. Locate your vehicle’s battery. This is typically under the hood, but consult your vehicle’s manual if you’re unsure. Use a wrench or a suitable tool to disconnect the negative terminal of the battery. This step will cut off power to the auto-leveling system completely. Remember, safety first. Ensure you’re wearing gloves and eye protection during this process. Have you ever forgotten to disconnect the battery and ended up with a surprising jolt? It’s a mistake you don’t want to repeat. Disconnecting the power source avoids such mishaps. By following these steps, you’ve successfully powered down your auto-leveling system. Ready for the next step? What other preparations do you think are crucial before diving into the reset process? Share your thoughts in the comments below.Resetting The System
Resetting the auto leveling system is essential for ensuring optimal performance. Over time, your vehicle’s leveling system may need a reset to function correctly. This process involves a few simple steps that you can easily perform. Let’s dive into the details on how to reset the system effectively.
Accessing The Reset Button
First, locate the reset button for your auto leveling system. The button is often found near the control panel or dashboard. Check your vehicle’s manual for the exact location. Once you find the button, ensure your vehicle is in park mode. Turn off the engine before proceeding. This step is crucial for safety and proper reset.
Performing A Soft Reset
To perform a soft reset, press and hold the reset button. Hold it for about five seconds. Release the button after the time elapses. This action will reset the auto leveling system. Your vehicle may show a confirmation message or beep sound. If the system does not reset, repeat the process. Ensure you hold the button firmly.
After completing the reset, start your engine and check the system’s functionality. Drive your vehicle to see if the leveling system works as expected. If issues persist, consult a professional mechanic.
Calibrating The System
Calibrating the auto leveling system is crucial for optimal performance. This process ensures that your vehicle or equipment remains level. Proper calibration also helps in reducing wear and tear. Follow these simple steps to calibrate the system effectively.
Setting Initial Parameters
First, locate the control panel for your auto leveling system. Read the user manual to understand the settings. Set the initial parameters based on your specific needs. These parameters could include height, weight distribution, and leveling speed. Ensure all values are accurate to avoid issues later.
Running Calibration Tests
Next, start the calibration tests to check the system’s accuracy. Activate the auto leveling function and observe its operation. Note any inconsistencies in the leveling process. Make adjustments to the initial parameters if needed. Repeat the tests until the system operates smoothly. Always monitor the readings during these tests for precision.
Testing The System
Resetting the auto leveling system involves turning off the vehicle and disconnecting the battery for a few minutes. Reconnect the battery and start the vehicle to allow the system to recalibrate. Check the owner’s manual for specific instructions.
Resetting your vehicle’s auto-leveling system can be a straightforward task if you follow the right steps. After you’ve completed the reset, it’s essential to test the system to ensure everything is working properly. This section will guide you through the process of verifying the functionality and troubleshooting any persistent issues you may encounter. ###Verifying Functionality
Once you’ve reset the auto-leveling system, start by turning on your vehicle. Observe the leveling lights on your dashboard. These lights should indicate that the system is calibrating. Take your car for a short drive. Pay close attention to how the car levels itself when you encounter different terrains or go over speed bumps. You should notice a smooth adjustment in the vehicle’s height. If the car feels uneven or the lights continue to blink, the reset might not have worked. ###Troubleshooting Persistent Issues
If you’re still facing problems after the reset, don’t worry. There are a few troubleshooting steps you can take. First, check the auto-leveling sensors. They are usually located near the wheels. Ensure they are clean and free from debris. Next, inspect the wiring. Loose or damaged wires can disrupt the system’s functionality. Secure any loose connections and replace any damaged wires. If the problem persists, you may need to consult your vehicle’s manual for specific instructions or seek professional help. Resetting the auto-leveling system can sometimes be tricky, but with patience and attention to detail, you can get your vehicle back to optimal performance. Have you ever encountered issues with your auto-leveling system? How did you resolve them? Share your experiences and tips in the comments below!Maintenance Tips
Resetting your auto leveling system can be easy. Start by turning off the vehicle. Then, turn it back on and check the system’s settings. Consult your vehicle’s manual for specific instructions.
Maintaining your auto leveling system can seem daunting, but with the right tips, it becomes manageable. Regular upkeep ensures the system functions properly and extends its lifespan. Here are some practical maintenance tips to keep your auto leveling system in top shape.Regular Inspections
Conduct regular inspections of your auto leveling system. Check for any visible damage or wear. Look closely at the sensors and wiring. Make it a habit to inspect your system monthly. This practice helps catch problems early before they become major issues. Ensure all connections are secure. Loose wires can lead to system malfunctions.Preventative Measures
Taking preventative measures can save you from costly repairs. Keep your auto leveling system clean and free from debris. Dirt and grime can cause the sensors to malfunction. Use a soft cloth to wipe down the sensors regularly. This simple step can significantly improve the system’s accuracy. Consider using a protective cover if your vehicle is parked outside often. This helps protect the system from harsh weather conditions. By staying proactive with these maintenance tips, you can ensure your auto leveling system remains reliable. Have you ever faced issues with your auto leveling system? Share your experiences and what you did to resolve them.
Credit: www.tiktok.com

Credit: www.youtube.com
Frequently Asked Questions
How To Reset Automatic Leveling System On Rv?
Turn off the RV leveling system. Then, press and hold the “Auto Level” button for 3-5 seconds. The system resets.
How To Calibrate An Auto Leveling System?
To calibrate an auto leveling system, follow the manufacturer’s instructions. Place the vehicle on a level surface. Use the control panel to initiate calibration. Ensure sensors are clean and unobstructed. Check the system’s manual for specific steps and troubleshooting tips.
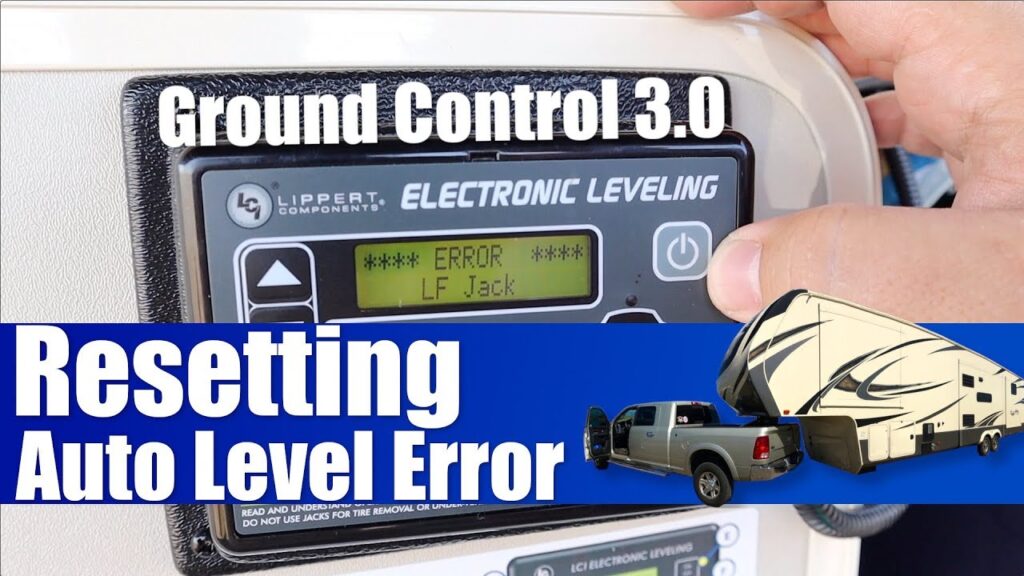
How Do I Clear An Error On Lippert Electronic Leveling?
To clear an error on Lippert electronic leveling, press the “Up” and “Down” buttons simultaneously for 3 seconds. This resets the system.
How Do I Reset My Power Gear Leveling System?
To reset your Power Gear leveling system, turn off the engine, press “All Retract,” then restart the engine. Press “Auto” to re-level.
Conclusion
Resetting your auto leveling system is simple with these steps. Follow the guide, and your car will be back in balance. Remember to check your car’s manual for specific instructions. Regular maintenance ensures your system works correctly. This keeps your ride smooth and safe.
Don’t ignore any warning signs from your vehicle. Proper care prevents bigger issues. Happy driving!