
Installing trailer bearings is crucial for smooth towing. It ensures safety and prolongs the trailer’s lifespan.
If you’re a trailer owner, knowing how to install trailer bearings is essential. This skill can save you from costly repairs and breakdowns. Trailer bearings help in reducing friction between moving parts, making your ride smoother and safer. You might think this task is only for mechanics, but with the right tools and steps, you can do it yourself.
This guide will walk you through the process, making it simple and understandable. Whether you’re a seasoned DIYer or a complete novice, this introduction sets the stage for a successful installation. Let’s dive in and get your trailer rolling safely!

Credit: www.youtube.com
Tools And Materials
Installing trailer bearings is a task that requires precision and the right set of tools and materials. This guide will help you understand what you need to get the job done correctly. Let’s break down the essential tools and required materials to ensure a smooth installation process.
Essential Tools
To install trailer bearings, you’ll need a few basic tools. These tools will help you complete the task efficiently and safely.
- Jack and Jack Stands: These will lift and support the trailer.
- Lug Wrench: Use this to remove the wheel nuts.
- Hammer: A hammer will help in removing and installing parts.
- Pliers: Needle-nose pliers will be useful for removing cotter pins.
- Socket Set: A socket set will help in removing various bolts and nuts.
- Grease Gun: This will be used to apply grease to the bearings.
- Clean Rags: Use rags to clean parts and hands during the process.
Required Materials
Besides tools, you will need specific materials for installing trailer bearings. These materials are crucial for the bearings to function properly.
- New Bearings: Always use new bearings for replacement.
- Grease: High-quality bearing grease is necessary for lubrication.
- Cotter Pins: New cotter pins are required for securing the castle nuts.
- Seal: A new seal will prevent grease from leaking.
- Wheel Chocks: These will prevent the trailer from moving while you work.
With these tools and materials, you are ready to install trailer bearings. Ensure you have everything on hand before starting the process.

Credit: www.youtube.com
Safety Precautions
Ensure a safe workspace by using jack stands and wheel chocks. Wear gloves and eye protection to prevent injuries. Clean all components thoroughly before installation.
Installing trailer bearings requires careful attention to safety. Ensuring your safety during this process is crucial. Following safety precautions helps prevent injuries and ensures a successful installation.Protective Gear
Wear gloves to protect your hands. Use safety glasses to shield your eyes from debris. A dust mask can prevent inhaling harmful particles.Workspace Safety
Keep your workspace clean and organized. Ensure adequate lighting for visibility. Avoid clutter to prevent accidents. Use stable surfaces to work on your trailer bearings. Ensure tools are within reach and properly maintained. “`Preparing The Trailer
Before you start installing new trailer bearings, it’s crucial to prepare your trailer properly. This ensures a smooth and hassle-free process. Think of it like setting the stage before a big performance; you need everything in place to avoid any interruptions. Let’s dive into the steps of securing the trailer and removing the wheels.
Securing The Trailer
First things first, you need to secure the trailer to prevent any accidental movement. Trust me, you don’t want your trailer rolling away mid-operation. Here’s how you can do it:
- Park on a Level Surface: Ensure your trailer is parked on a flat, stable surface. An uneven surface can lead to unwanted surprises, so double-check this step.
- Engage the Parking Brake: If your trailer has a parking brake, engage it. This adds an extra layer of security.
- Use Wheel Chocks: Place wheel chocks in front of and behind the trailer wheels. This prevents any movement and keeps the trailer in place.
Securing your trailer properly is like laying a solid foundation for a building. It ensures everything you do afterwards is safe and stable. Have you ever had a project go sideways because you skipped a crucial step? Don’t let that happen here!
Removing The Wheels
Once your trailer is secure, it’s time to remove the wheels. This step is essential because you need access to the bearings. Here’s a simple guide to follow:
- Loosen the Lug Nuts: Use a lug wrench to loosen the lug nuts on the wheels. Do this before you lift the trailer to make it easier.
- Lift the Trailer: Use a hydraulic jack to lift the trailer. Position the jack under the axle for the best support. Raise it high enough to remove the wheels comfortably.
- Remove the Lug Nuts: Now that the trailer is lifted, remove the loosened lug nuts completely and take off the wheels. Place them aside in a safe area.
Removing the wheels might seem straightforward, but it’s a pivotal step. You get clear access to the bearings, making the next steps easier. Have you ever tried working in a cramped space? It’s frustrating. Removing the wheels eliminates that frustration.
By securing your trailer and removing the wheels carefully, you’re setting yourself up for success in installing new trailer bearings. What other preparatory steps do you think are essential for a smooth installation process?
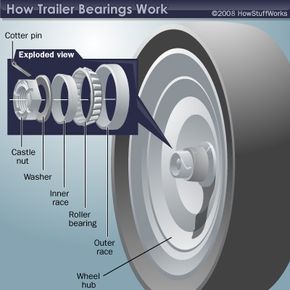
Removing Old Bearings
Removing old trailer bearings is an essential step in maintaining your trailer. Proper maintenance ensures smooth and safe rides. Follow these steps to remove old bearings effectively.
Disassembling Components
First, ensure your trailer is on a level surface. Use a jack to lift the trailer. Secure it with jack stands. Remove the wheel by loosening the lug nuts. Take off the wheel and set it aside. Next, remove the dust cap using a flathead screwdriver. Be gentle to avoid damage. Under the dust cap, you’ll find a cotter pin. Remove it with pliers. Unscrew the castle nut by hand. Now, slide the hub off the spindle carefully. The outer bearing might fall out, so keep a tray handy.
Cleaning Bearing Housing
Once the hub is off, clean the bearing housing. Use a clean rag to wipe away old grease. Inspect the spindle for wear and damage. Clean the spindle thoroughly. Proper cleaning ensures the new bearings fit correctly and function well.
Installing New Bearings
Replacing old trailer bearings ensures smooth travel and safety. Installing new bearings might seem challenging, but it is manageable with the right steps.
Greasing Bearings
First, gather the new bearings and a high-quality grease. Greasing is essential for reducing friction. Place a dollop of grease in your palm. Press the bearing into the grease. Continue until grease oozes from the other side. Repeat this process until the bearing is fully coated.
Fitting New Bearings
After greasing, insert the new bearings into the hub. Slide the bearings onto the spindle. Ensure a snug fit. Next, place the washer and nut onto the spindle. Tighten the nut. Do not overtighten. Bearings need some play to function correctly. Spin the wheel to check for smooth rotation.
Finally, secure the nut with a cotter pin. Bend the pin ends to hold it in place. Replace the dust cap. Your new bearings are now ready for the road.
Credit: auto.howstuffworks.com
Reassembling The Trailer
Reassembling the trailer after installing new bearings is crucial. It ensures the trailer functions smoothly and safely. This step-by-step guide makes the reassembly process easy to follow.
Reattaching Wheels
Begin by placing the wheel back onto the spindle. Ensure it sits properly. Use a jack to lift the trailer slightly. This makes it easier to position the wheel. Once the wheel is in place, align it with the bolt holes. Insert the lug nuts by hand to hold the wheel in place.
Next, use a wrench to tighten the lug nuts. Tighten them in a crisscross pattern. This ensures the wheel is evenly secured. Avoid over-tightening as it can damage the wheel or spindle.
Securing Components
After reattaching the wheels, focus on securing other components. Start with the bearing protector or dust cap. Place it over the hub and tap it gently into place. Use a rubber mallet for this step. It prevents damage to the cap.
Check the cotter pin next. Insert it through the spindle nut and secure it by bending the ends. This keeps the nut in place and prevents it from loosening. Finally, reattach any other parts like the brake drum or hub cover. Ensure all components are securely fastened before lowering the trailer.
Testing The Installation
Once you’ve installed your new trailer bearings, it’s crucial to ensure they are functioning properly. Testing the installation is a key step to avoid any mishaps on the road. This section will guide you through the initial checks and a test drive to confirm everything is in order.
Initial Checks
Before hitting the road, perform some initial checks to verify the installation.
- Spin the Wheels: Jack up the trailer and spin each wheel. They should rotate freely without any noise or resistance.
- Check for Play: Grab the wheel at the top and bottom and try to move it. There should be no wobbling or play. If there is, the bearings might be too loose.
- Inspect for Leaks: Look around the hub for any signs of grease leakage. Properly sealed bearings should not leak.
These initial checks help ensure that everything is set up correctly. But to be thorough, a test drive is essential.
Test Drive
Now it’s time to take your trailer for a short test drive. This will help you identify any potential issues that weren’t apparent during the initial checks.
- Start Slow: Begin by driving slowly around your neighborhood. Listen for any unusual noises such as grinding or clunking.
- Feel the Wheels: After driving for a short distance, stop and feel the hubs. They should be warm, not hot. Excessive heat indicates a problem with the bearings.
- Gradual Increase in Speed: Gradually increase your speed and pay attention to how the trailer handles. It should be smooth without any vibrations.
- Check Again: After the test drive, perform the initial checks once more. This double-check ensures that nothing has changed during the drive.
Testing the installation is not just a formality. It’s a critical step to ensure your safety on the road. Have you ever had a trailer breakdown due to neglected bearings? Share your experiences and tips in the comments below!
Maintenance Tips
Maintaining your trailer bearings is crucial to ensure your trailer runs smoothly and safely. Proper maintenance can prevent costly repairs and dangerous breakdowns. Here are some essential maintenance tips to keep your trailer bearings in top shape:
Regular Inspections
Regular inspections are the first step in maintaining your trailer bearings. Check for any signs of wear and tear, such as unusual noises or vibrations. Inspect the bearings for rust, dirt, and other contaminants. If you notice any damage or excessive wear, replace the bearings immediately.
It’s also important to lift the trailer and spin the wheels by hand. Feel for any roughness or play. If the wheels don’t spin freely or if you feel any wobbling, it’s time for a closer look.
By conducting regular inspections, you can catch potential issues early and avoid more significant problems down the road. This proactive approach ensures your trailer remains reliable and safe.
Lubrication Advice
Proper lubrication is essential for the longevity of your trailer bearings. Always use high-quality grease specifically designed for wheel bearings. This type of grease can withstand the high temperatures and pressures that bearings experience.
When lubricating the bearings, ensure you apply enough grease to cover all the bearing surfaces but avoid over-packing. Over-packing can cause the grease to overheat and break down, leading to bearing failure. Use a grease gun to apply the grease evenly and consistently.
Remember to reapply grease regularly, especially before long trips or after exposure to water. Proper lubrication reduces friction, prevents overheating, and extends the life of your bearings.
Have you ever been stranded on the side of the road due to a bearing failure? It’s not an experience you want to repeat. By following these lubrication tips, you can avoid such mishaps and keep your trailer running smoothly.
Maintaining your trailer bearings doesn’t have to be a daunting task. With regular inspections and proper lubrication, you can ensure your trailer is always ready for the road. So, when was the last time you checked your trailer bearings?
Frequently Asked Questions
How To Set Trailer Wheel Bearings?
To set trailer wheel bearings, lift the trailer and remove the wheel. Clean and inspect bearings. Grease them thoroughly. Reassemble, tightening the nut until snug, then back off slightly for proper play. Reinstall the wheel and check for smooth rotation.
Can I Install Wheel Bearings Myself?
Yes, you can install wheel bearings yourself. It requires basic tools and mechanical knowledge. Follow the vehicle’s manual instructions.
How Do I Know If My Trailer Bearings Are Full Of Grease?
Check the grease level by removing the dust cap and inspecting the bearings. Grease should be visible and abundant.
How Often Should Trailer Bearings Be Repacked?
Trailer bearings should be repacked every 12 months or 12,000 miles. Regular maintenance ensures safety and longevity.
Conclusion
Installing trailer bearings is straightforward with the right steps. Gather your tools. Follow instructions carefully. Ensure bearings are clean and greased. Tighten nuts properly. Regular maintenance prevents issues. Enjoy smoother rides and safer travels. With practice, this task becomes easier.
Your trailer’s performance will improve. Happy towing!