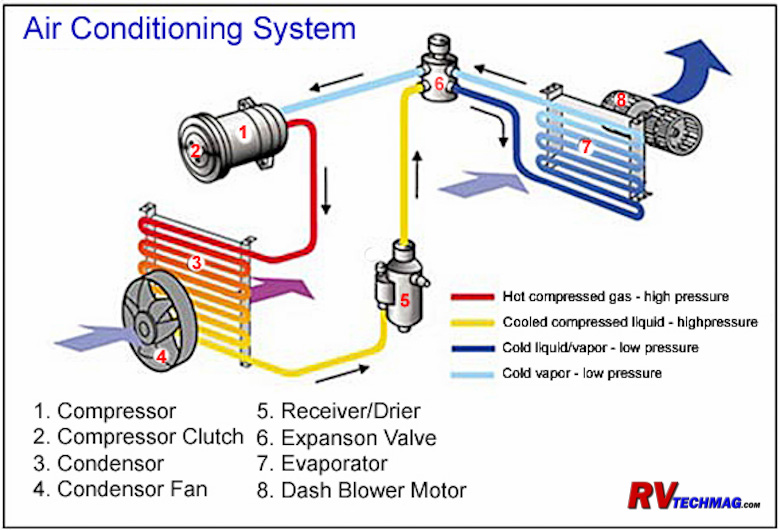
Charging an RV air conditioner might seem tricky, but it’s doable. First, know the basics.
This guide will help you understand the process step-by-step. RVs are great for travel and adventure, but comfort is key. The air conditioner in your RV keeps you cool during hot weather. Over time, it might need a recharge to work efficiently.
Charging the AC involves checking the refrigerant levels and adding more if needed. This task ensures your air conditioner runs smoothly, providing the comfort you need on the road. In this guide, we will break down the steps to charge your RV air conditioner. You’ll learn what tools you need, how to check refrigerant levels, and safely add refrigerant. Let’s get started and keep your RV cool!

Credit: www.youtube.com
Tools You Need
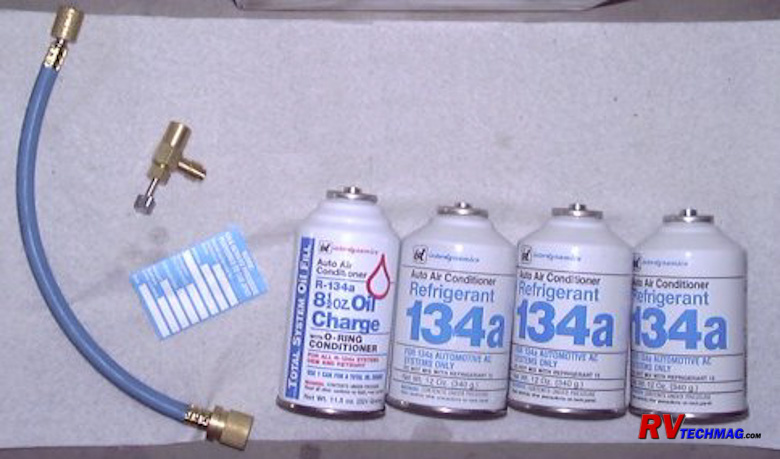
Gather essential tools like a refrigerant gauge, a can of refrigerant, and a wrench set for charging your RV air conditioner. Ensure safety glasses and gloves are on hand for protection during the process.
When it comes to charging your RV air conditioner, having the right tools can make the job much easier and safer. Whether you’re a seasoned RV enthusiast or a newbie, knowing what tools you need is crucial. In this section, we’ll break down the essential and optional tools that can help you get the job done efficiently.Essential Tools
To start, there are some tools you absolutely need:- Refrigerant: First and foremost, you need the correct type of refrigerant for your RV air conditioner. Check your unit’s manual to ensure you get the right one.
- Manifold Gauge Set: This is a must-have for measuring the pressure inside the air conditioner’s refrigerant lines. It’s essential for diagnosing issues and ensuring your system is properly charged.
- Refrigerant Scale: Accurate measurement is key. A refrigerant scale helps you measure the amount of refrigerant you’re adding, avoiding overcharging or undercharging the system.
- Screwdriver Set: You’ll need a variety of screwdrivers to open panels and access different parts of your air conditioning unit.
- Safety Gear: Safety should always come first. Gloves and safety glasses protect you from accidental refrigerant leaks and other hazards.
Optional Tools
While the tools listed above are essential, there are some optional tools that can make the job easier:- Leak Detector: A leak detector can help you find tiny leaks in your system that might be causing issues. It’s not always necessary but can be a lifesaver.
- Vacuum Pump: If your system needs a thorough clean-out, a vacuum pump can help remove moisture and other contaminants from the air conditioning lines.
- Digital Thermometer: This tool can help you measure the temperature of the air coming out of the vents, ensuring your system is cooling effectively.
- UV Dye Kit: If you suspect a leak but can’t find it, a UV dye kit can help. Add the dye to the system, and use a UV light to spot leaks easily.
- Toolbox: Keeping all your tools organized in a toolbox makes the whole process easier and ensures you don’t lose anything important.
Credit: www.rvtechmag.com
Safety Precautions
Charging an RV air conditioner requires careful attention to safety. It’s crucial to follow specific guidelines to protect yourself and your RV. This section covers essential safety precautions.
Safety Gear
Always wear protective gear when charging your RV air conditioner. Use safety goggles to protect your eyes from refrigerant splashes. Wear gloves to shield your hands from cold refrigerants. Consider wearing long sleeves and pants to avoid skin exposure.
Common Hazards
Be aware of common hazards during the charging process. Refrigerant leaks can cause breathing difficulties. Ensure proper ventilation in your work area. Electrical components can pose a shock risk. Disconnect power before starting. Always double-check connections to prevent accidents.
Preparation Steps
Charging your RV air conditioner can be a straightforward process. But it starts with proper preparation. This ensures safety and efficiency. Follow these steps to get started.
Power Off Rv
First, turn off the RV. This includes the engine and any electrical systems. Unplug from any external power sources. This step is crucial for safety. It prevents electrical shocks and damage to the AC unit.
Locate Ac Unit
Next, find the air conditioner unit on your RV. It is usually on the roof. You might need a ladder to reach it. Ensure you have a stable surface to work from. Safety is important. Check that the AC unit is clean and free of debris.
Accessing The Ac Unit
Accessing the AC unit in your RV is the first step to charging it. You’ll need to locate the air conditioner on the roof of your vehicle. Once you know where it is, follow these simple steps to get started.
Remove Exterior Cover
First, remove the exterior cover of the AC unit. This cover usually has screws holding it in place. Use a screwdriver to remove these screws. Be careful not to lose them. Once the screws are removed, gently lift off the cover.
Inspect Components
After removing the cover, inspect the components inside the AC unit. Look for any signs of damage or wear. Check the wiring, fans, and coils. Make sure everything looks clean and in good condition. If you see any issues, you may need to replace or repair those parts.
Ensure there are no obstructions blocking the airflow. Dirt and debris can affect performance. Clean any visible dust or dirt using a soft brush or cloth.
Checking Refrigerant Levels
Regularly check refrigerant levels to ensure your RV air conditioner works efficiently. Low levels can cause poor cooling performance.
When it comes to maintaining your RV’s air conditioner, checking the refrigerant levels is crucial. Ensuring that your AC unit has the right amount of refrigerant can make the difference between a comfortable, cool interior and a sweltering, unpleasant environment. But how do you go about checking these levels? Let’s dive into the specifics, focusing on using a pressure gauge and identifying low refrigerant levels.Use Pressure Gauge
One of the best ways to check the refrigerant levels in your RV air conditioner is by using a pressure gauge. This tool measures the pressure within the system, giving you a clear indication of whether the refrigerant is at the correct level. When I first started working on my RV, I was intimidated by the idea of using a pressure gauge. However, it turned out to be simpler than I thought. The pressure gauge connects to the service port on your air conditioner. When you turn on the AC, the gauge will give you a reading. A good rule of thumb is to compare the pressure readings with the specifications listed in your RV’s manual. If the pressure falls outside the recommended range, it’s time to take action.Identify Low Levels
Once you have your pressure gauge reading, the next step is to identify if the refrigerant levels are low. Low refrigerant levels can lead to poor cooling performance and increased energy consumption. When I noticed my RV air conditioner was not cooling as effectively, I checked the refrigerant levels and found them to be lower than recommended. This was a clear sign that my AC needed a recharge. Ask yourself: Have you noticed your AC struggling to maintain a cool temperature? Is it running longer than usual? These can be telltale signs of low refrigerant. You don’t need to be a professional to identify these issues. With a little practice and the right tools, anyone can ensure their RV air conditioner is running efficiently. By taking these steps, you can keep your RV cool and comfortable, making your road trips more enjoyable. Don’t wait until it’s too late—regularly check those refrigerant levels to maintain peak performance of your air conditioner.Adding Refrigerant
Adding refrigerant to your RV air conditioner can improve cooling efficiency. This process is vital for optimal performance, especially during hot weather. Follow these steps to ensure your air conditioner runs smoothly and keeps you comfortable.
Choosing Refrigerant Type
Before adding refrigerant, choose the right type. RV air conditioners typically use R-410A or R-134A refrigerant. Check the label on your unit to find the correct type. Using the wrong refrigerant can damage the system.
Connecting Refrigerant Can
After choosing the right refrigerant, connect the refrigerant can to the air conditioner. Locate the service port on your unit. Attach the hose from the refrigerant can to the port. Make sure the connection is secure to prevent leaks. Open the valve on the can to release refrigerant into the system.
Monitor the pressure gauge to ensure proper levels. Do not overfill the system. Overcharging can cause damage. Once the correct amount is added, close the valve and remove the hose. Your RV air conditioner should now be ready to provide cool air.
Monitoring Charge Process
Monitoring the charge process of your RV air conditioner ensures it operates efficiently. Keeping an eye on the pressure gauge and avoiding overcharging are crucial steps. These steps will protect your unit from damage and extend its lifespan.
Watch Pressure Gauge
First, connect the gauge to the service port of your RV air conditioner. The gauge will show the pressure inside the system. Ensure the pressure stays within the manufacturer’s recommended range. If the pressure is too low, your air conditioner won’t cool effectively. If the pressure is too high, the system might get damaged. Regular monitoring helps maintain optimal performance.
Avoid Overcharging
Overcharging the system can cause serious issues. Excess refrigerant increases the pressure inside the air conditioner. High pressure can damage the compressor and other components. To avoid this, add refrigerant slowly and check the gauge frequently. Stop charging once the pressure reaches the recommended level. This step ensures your air conditioner runs smoothly and avoids costly repairs.
Credit: www.youtube.com
Final Checks
Final checks ensure your RV air conditioner works efficiently and safely. These steps are crucial after recharging the system. Follow the steps below to complete the final checks.
Reassemble Ac Unit
Begin by reassembling the AC unit. Make sure all parts are clean. Place the cover back carefully. Secure it with screws. Check all connections. Ensure wires are tight and in the right place.
Inspect the unit for any debris. Clean as needed. Ensure the filters are in place. A clean filter improves performance. Check the vents. Ensure they are clear of obstructions. Proper airflow is essential.
Test Ac Performance
Turn on the RV air conditioner. Set it to the desired temperature. Let it run for a few minutes. Check for cool air. Listen for unusual noises. The unit should operate quietly.
Observe the compressor. It should turn on and off smoothly. Check the airflow from the vents. It should be strong and consistent. Ensure the thermostat responds to adjustments. A functional thermostat maintains comfort.
Finally, monitor the unit for any leaks. Look around the connections. Address any issues immediately. A well-maintained AC ensures a comfortable RV experience.
Frequently Asked Questions
How To Recharge An Air Conditioner On An Rv?
To recharge an RV air conditioner, locate the service port, connect the refrigerant, and follow manufacturer instructions. Ensure proper refrigerant type.
How Do I Know If My Rv Ac Is Low On Freon?
Check for warm air from vents, ice buildup on the unit, or frequent cycling. These signs indicate low freon.
What Kind Of Freon Does A Rv Ac Take?
RV AC units typically use R-134a or R-410a freon. Always check the manufacturer’s specifications for the correct type.
Can I Recharge My Air Conditioner Myself?
Yes, you can recharge your air conditioner yourself. Ensure you follow the manufacturer’s instructions and safety guidelines.
Conclusion
Charging an RV air conditioner is simple. Follow the steps for a smooth process. Always check your unit’s manual for specifics. Regular maintenance ensures efficient cooling. Remember to use the correct refrigerant type. Proper charging keeps your RV comfortable. Avoid overcharging to prevent damage.
Keep tools handy for quick adjustments. Routine checks save you from sudden breakdowns. Enjoy your journey with a well-charged air conditioner. Happy travels and stay cool!