Most cabin filters aren’t meant to be washed; a careful vacuum can buy a little time, but swapping in a new filter is often the safer fix.
Weak airflow, a dusty smell, glass that fogs up faster than it used to—those are common signs your cabin air filter is packed with debris. It’s a small part in the HVAC intake path that catches grit before it reaches the blower and your vents.
If you’ve pulled the filter and it looks ugly, the first thought is simple: can I clean it and put it back? Sometimes you can tidy it up. Many times, cleaning is a short-lived patch and replacement is the better move. The difference comes down to filter material, moisture, and how loaded the media is.
What A Cabin Air Filter Does
Your HVAC system pulls air through an intake, moves it past a filter, then sends it through the heater or A/C and out the vents. The cabin air filter traps dust, pollen, road soot, and leaf bits so they don’t pile up in the ductwork and on the blower.
AAA notes that a restricted cabin filter can reduce airflow and make defrosting harder. That mix of comfort and visibility is why this part earns attention.
Can You Clean A Cabin Air Filter?
With most cars, you can remove loose debris, but you can’t bring a used filter back to “like new.” Many cabin filters are pleated media meant to be replaced. Fine dust embeds into the fibers and stays there.
Cleaning can also damage the media. Tears, crushed pleats, or a warped frame create bypass gaps where dirty air slips around the filter. If your goal is cleaner cabin air, a damaged filter is worse than a dirty one.
There’s still a place for a light cleanup: you’re on the road, stores are closed, or you want to confirm the filter is the problem before you buy a replacement. Treat cleaning as a stopgap, not a reset.
Start With The Filter Material
Read the frame for a part number and an airflow arrow. Most cabin filters look “paper-like” but use blended fibers. Some have a gray carbon layer for odor control. A few are foam or labeled washable. If it’s stiff pleated media, plan to replace it. If it’s truly washable, follow the maker’s cleaning steps and let it dry fully.
What Cleaning Can Safely Mean
For a standard pleated cabin filter, safe cleaning is gentle and dry. Water, aggressive brushing, and high-pressure air can weaken the media or drive dirt deeper into the pleats.
- Tap and shake: Lightly tap the frame outdoors to drop leaves and grit.
- Vacuum: Use a vacuum with a soft brush and hover over the dirty side.
- Dry wipe the housing: If you see leaf bits in the tray, wipe them out with a dry microfiber cloth.
If the filter is damp, smells sour, or shows visible fuzz or spotting, skip cleaning. Replacement is the safer call.
When Replacement Beats Cleaning
These signs usually mean you’re done with “clean it and hope”:
- The pleats are dark through the depth, not just on the surface.
- The media is torn or separating from the frame.
- The frame is bent or the seal edge is crushed.
- You see heavy soot after smoke exposure.
The Filter Manufacturers Council gives a common general interval of 12,000–15,000 miles or about once a year, with more frequent changes in dusty conditions. Auto Care Association technical bulletin on servicing cabin air filters also lists symptoms like weak airflow and windshield fogging.
Cleaning A Cabin Air Filter Safely Before You Replace It
If you want to clean it as a short-term fix, keep the steps simple. Plan for five minutes and a trash bag.
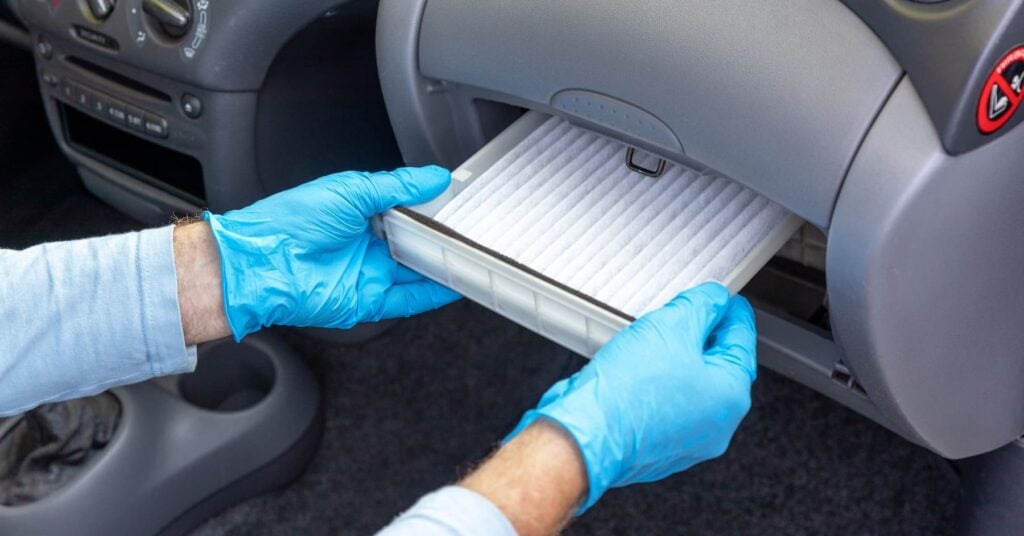
Step 1: Access The Filter
Many filters sit behind the glove box. Empty it, release the side stops, and lower it carefully. Some cars use a small damper arm that pops off a pin.
Step 2: Note The Airflow Arrow
Take a quick photo so you reinstall the filter the same way.
Step 3: Remove Loose Debris
Hold the filter over a bag and tap the frame lightly. If leaves fall out, check the housing tray and wipe it clean.
Step 4: Vacuum Gently
Use a soft brush attachment and glide along the pleats. Don’t press hard and don’t crush the folds.
Step 5: Reinstall And Test
Slide it back in with the arrow correct, close the access door until it clicks, then test airflow on medium fan speed.
Table 1: Cabin Filter Types And What You Can Do
| Filter Type | What Cleaning Can Do | Best Next Step |
|---|---|---|
| Pleated fiber media (common) | Vacuum removes loose grit; fine dust stays embedded | Replace soon if airflow or odors are still poor |
| Carbon-treated pleated media | Vacuum may help airflow; odor-control capacity doesn’t return | Replace when odors return or airflow drops |
| Multi-layer electrostatic media | Gentle vacuum can clear surface debris | Replace on schedule; avoid water and harsh brushing |
| HEPA-style cabin filter | Surface vacuum may help briefly; media must stay intact | Replace rather than wash; follow the maker’s interval |
| Foam washable filter | Rinsing can remove debris if the maker allows it | Wash, dry fully, then reinstall; replace if foam breaks down |
| Reusable cotton-gauze style | May be cleaned with a dedicated kit if designed for it | Use the maker’s cleaner; avoid household detergents |
| Two-piece or dual cabin filters | Both pieces need inspection; one clogged half still restricts airflow | Replace as a set when one looks loaded |
| Cabin filter missing or bypassed | No filtration, so dust builds up in the HVAC box | Install the correct filter to protect the system |
Picking A Replacement That Matches Your Needs
If odors bug you, a carbon-treated filter can help with traffic smells. If allergies hit hardest in the car, a tighter media can cut pollen and fine dust. If airflow is your main complaint, a fresh standard filter often moves more air than a high-efficiency option that’s overdue.
Whatever you choose, fit matters. A filter that buckles or leaves gaps won’t do its job.
Cost, Time, And When DIY Makes Sense
Cabin air filters are usually one of the lowest-cost maintenance items on a car. The part price varies by model and filter style, yet it’s often less than a tank of gas. Labor at a shop can add a bit, but many vehicles let you swap the filter in ten to fifteen minutes with no tools.
DIY is a good fit when the filter sits behind the glove box and the access panel uses simple clips. If your car needs trim pieces removed, or the access is tight and you’re worried about breaking tabs, a shop visit can be money well spent. Either way, you’re paying for cleaner airflow and less strain on the blower, not just a “nice smell.”
Air Settings That Help The Filter Last Longer
Your HVAC settings affect how fast the filter loads up. On dusty roads, keep windows closed and use recirculation for short stretches to reduce intake of outside debris. In rain or when glass starts to fog, switch back to fresh air so moisture can clear faster. If you’re behind a smoky truck, a brief switch to recirculation can cut the worst of the odor until you can create distance.
Install Details That Prevent Whistles And Rattles
- Match the part number: Wrong sizing can warp and leak around the edges.
- Seat it square: If it rides on a corner, air can whistle past it.
- Close the access panel fully: A loose panel can rattle on bumps.
- Write the mileage on the frame: Your next check gets easier.
When A New Filter Doesn’t Fix Odor
A fresh filter helps, but odors can also come from moisture on the A/C evaporator. A simple habit can help: during the last few minutes of a drive, switch off A/C and run the fan on fresh air to dry the box. If smells keep returning, a shop can inspect the drain tube and evaporator area.
Smoke And Heavy Debris Periods
During wildfire smoke or heavy dust, cabin filters load up fast. The Car Care Council advises that a cabin air filter should not be cleaned and reinstalled during wildfire smoke exposure, and it recommends changing more often in these conditions. Car Care Council note on wildfire smoke and air filters explains why inspection and replacement matter after smoke and debris spikes.
Table 2: Replacement Timing Checklist
| What You Notice | What It Can Mean | What To Do Next |
|---|---|---|
| Weak airflow at all vents | Filter media loaded with fine dust | Inspect and replace if dirty; test airflow again |
| Fogging glass and slow defrost | Restricted intake airflow | Replace filter, then check fan settings |
| Musty odor on startup | Damp filter or HVAC box moisture | Replace filter; dry out with fan on fresh air after A/C use |
| Dust film builds up quickly | Filter missing, torn, or poorly seated | Confirm correct fit and seal; replace if damaged |
| Fan noise rises as airflow drops | Blower working harder against restriction | Replace filter; clear leaf debris in the tray |
| Traffic smells linger inside | Carbon layer spent or filter overloaded | Switch to carbon filter and replace sooner |
| Allergy symptoms mainly in the car | Pollen and fine dust building up | Install a high-efficiency filter and change sooner |
| Recent smoke exposure | Rapid loading of filter media | Inspect early and replace if odor or heavy discoloration is present |
A Maintenance Rhythm That Sticks
Check the cabin filter at every other oil change. If you park under trees or drive on dusty roads, check it more often. When it’s time, replacement is usually the cleanest reset you can do without opening the HVAC box.
Cleaning can help in a pinch. A new filter is what brings back airflow and fresher cabin air for the long run.
References & Sources
- Auto Care Association (Filter Manufacturers Council).“The Importance of Servicing Cabin Air Filters.”Lists common replacement intervals and signs of restricted cabin airflow.
- Car Care Council.“Wildfires a Serious Concern for Vehicles, Passengers.”Advises frequent cabin filter changes during wildfire smoke and heavy debris periods.