Understanding the wiring of a 7 pin trailer plug is crucial for any trailer owner. It ensures safe and efficient connectivity between your vehicle and trailer.
A 7 pin trailer plug connects the electrical systems of your vehicle and trailer. This connection allows signals, lights, and power to transmit correctly. Without a proper wiring diagram, you might face issues like malfunctioning lights or signals. Learning the wire diagram helps prevent these problems, ensuring your trailer functions smoothly.
In this guide, we’ll explore the details of each pin and its function. Whether you are a beginner or an experienced trailer owner, this information will help you maintain and troubleshoot your trailer’s electrical system effectively.
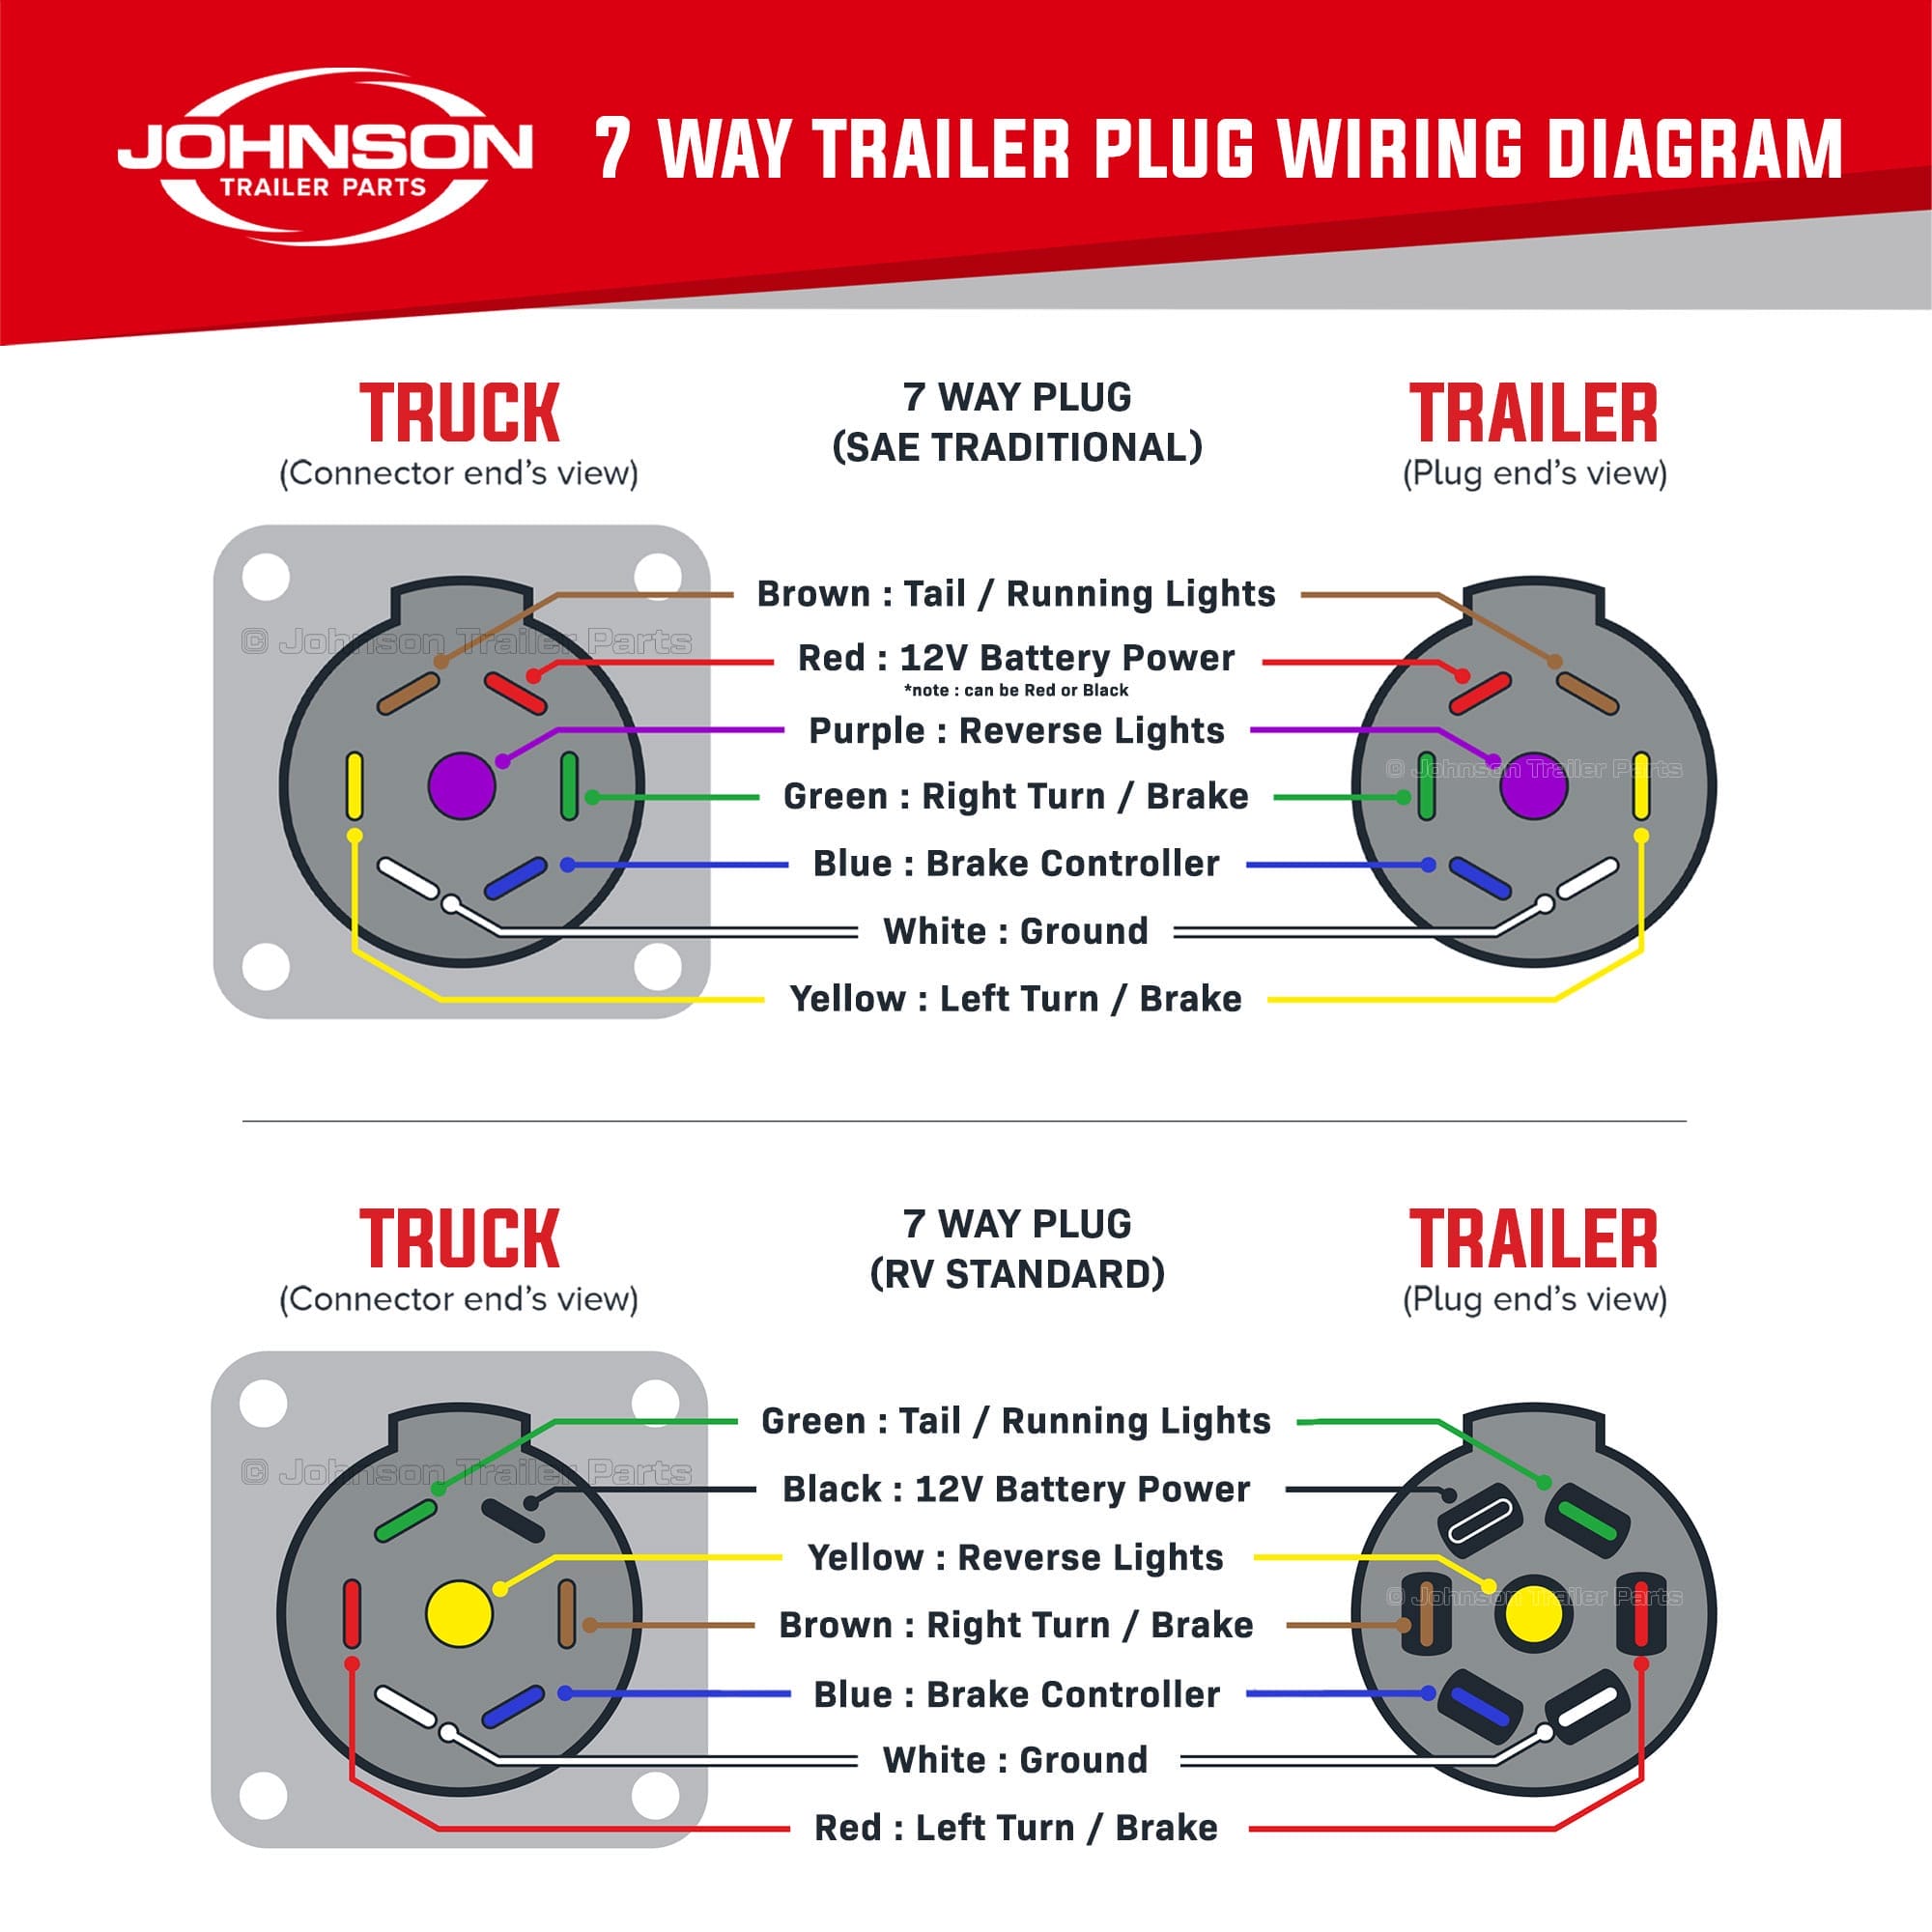
Credit: johnsontrailerparts.com
Components Of A 7 Pin Trailer Plug
A 7 pin trailer plug connects various functions like brake lights, turn signals, and reverse lights. Each pin has a specific role, detailed in the wire diagram. This ensures safe and proper trailer operation.
When dealing with trailer wiring, understanding the components of a 7 pin trailer plug is essential. Each pin serves a specific function, ensuring your trailer lights and electric brakes work harmoniously with your vehicle. This knowledge is not just for the pros; even a novice can grasp the basics and troubleshoot common issues.Pin Layout
The pin layout of a 7 pin trailer plug might seem confusing at first glance, but it’s quite straightforward once you break it down. The 7 pins are typically arranged in a circular pattern, each numbered for easy identification. Each pin has a dedicated function, such as powering the taillights, brake lights, or electric brakes. Understanding this layout is key to successful wiring. For example, Pin 1 is usually for the left turn signal, while Pin 2 is for the right turn signal. Knowing which pin does what can save you from a lot of wiring headaches.Connector Types
There are different connector types available for 7 pin trailer plugs, and knowing the right one for your setup is crucial. The most common types are the round and the flat connectors. The round connectors are more traditional and are often found on older trailers. They are robust and reliable, making them a favorite among many users. The flat connectors, on the other hand, are more modern and compact. They’re easier to install in tight spaces and offer a sleeker look. If you’re working with limited space, a flat connector might be the best option for you. Choosing the right connector type depends on your specific needs and the configuration of your vehicle and trailer. Always consider compatibility and ease of use. Understanding the components of a 7 pin trailer plug can seem daunting, but with a bit of knowledge, it becomes manageable. Have you ever faced a wiring issue with your trailer? Knowing these basics can empower you to fix it yourself, saving time and money.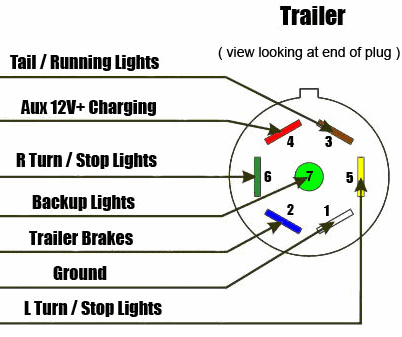
Credit: www.ajtnt.com
Tools And Materials Needed
Creating a wire diagram for a 7 pin trailer plug requires specific tools and materials. This guide will help you prepare for the task. Gathering the right tools and materials is essential for a successful project.
Essential Tools
Ensure you have these essential tools:
- Wire strippers: These will help you strip the ends of the wires.
- Crimping tool: Necessary for securing the wire connectors.
- Multimeter: Used to test the electrical connections.
- Screwdrivers: You need both flathead and Phillips types.
- Electrical tape: Important for insulating exposed wires.
- Heat shrink tubing: Provides protection and insulation for wire connections.
Recommended Materials
Gather these recommended materials:
- 7 pin trailer plug: The main component of your wiring project.
- Wire connectors: These will join the wires securely.
- Wiring diagram: A reference to ensure correct connections.
- Spare wires: Extra wires in case of mistakes.
- Terminal grease: Prevents corrosion on the connections.
Step-by-step Wiring Guide
Wiring a 7 pin trailer plug might seem difficult, but it’s manageable. Follow this step-by-step guide for a smooth process. It breaks down the task into easy-to-follow steps.
Preparing The Wires
First, gather your tools. You will need wire strippers, electrical tape, and a screwdriver. Make sure you have all the necessary wires. Each wire serves a different function. Cut the wires to the right length. Strip about half an inch of insulation from each wire. This ensures a good connection. Lay out the wires to match the pins on the plug. This step helps avoid confusion later.
Connecting The Wires
Now, start connecting the wires to the plug. Refer to a wiring diagram for accuracy. Attach the ground wire to the designated pin. Secure it tightly. Next, connect the left turn signal wire. Follow with the right turn signal wire. Each wire should be securely fastened to its pin. Continue with the tail lights and brake lights. Double-check each connection. This ensures that everything is wired correctly. Wrap each connection with electrical tape. This prevents short circuits.

Credit: www.etrailer.com
Common Wiring Configurations
Understanding the common wiring configurations for a 7 pin trailer plug is crucial for ensuring a smooth and safe towing experience. Whether you’re a seasoned trailer user or just starting, knowing the standard and alternative wiring setups can make all the difference. In this section, we’ll explore the most widely used configurations, providing you with the essential knowledge to get your trailer connected correctly.
Standard Configuration
The standard configuration for a 7 pin trailer plug is designed to cover the basic needs of most trailers. This setup includes connections for:
- Ground: Ensures a stable connection to prevent electrical issues.
- Running Lights: Keeps your trailer visible at night.
- Left Turn Signal: Indicates when you are turning left.
- Right Turn Signal: Indicates when you are turning right.
- Brake Lights: Activates when you apply the brakes.
- Reverse Lights: Helps when backing up your trailer.
- Auxiliary Power: Powers additional features, like interior lights or charging systems.
Imagine you’re on a late-night drive, and your trailer lights start flickering. Properly wired running lights would prevent such issues, ensuring you and your trailer remain visible and safe.
Alternative Configurations
Sometimes, the standard configuration might not meet all your needs. Alternative configurations can add extra functionalities or adapt to different trailer types. These configurations might include:
- Electric Brakes: Enhances braking control, especially useful for heavier trailers.
- Battery Charge Line: Keeps your trailer’s battery charged while driving.
- Backup Alarm: Alerts others when you’re reversing your trailer.
Consider a scenario where you’re towing a larger trailer with electric brakes. Using an alternative configuration with electric brake wiring ensures safer and more controlled braking, giving you peace of mind on steep descents.
Have you ever struggled with trailer wiring? Which configuration do you think would best suit your needs? Share your thoughts and experiences in the comments!
Troubleshooting Tips
Need help with a wire diagram for a 7 pin trailer plug? These troubleshooting tips will guide you through the wiring process efficiently. Ensure all connections are secure to avoid issues.
When it comes to towing, ensuring your 7-pin trailer plug is working correctly is crucial. Troubleshooting wiring issues can be challenging, but it’s a skill every trailer owner should have. With a few tips, you can quickly diagnose and fix common problems, ensuring a smooth towing experience every time.Diagnosing Common Issues
Start by checking the basics. Ensure the trailer plug is firmly connected. A loose connection can lead to intermittent power. Inspect the pins for corrosion or dirt. Clean them with a wire brush if necessary. Corroded pins can prevent proper electrical contact. Use a test light or multimeter to check for power at each pin. This tool can quickly identify whether the issue is with the vehicle or the trailer.Fixing Wiring Problems
Once you’ve identified an issue, repair it promptly. If a wire is frayed or broken, strip the insulation back and twist the ends together securely. Use electrical tape or heat shrink tubing to protect the connection. If a pin is damaged, replace it. Most auto parts stores carry replacement pins and plugs. Follow the wire color codes to ensure each wire connects to the correct pin. Sometimes, a fuse might blow. Check the vehicle’s fuse box and replace any blown fuses. This step is often overlooked but can solve many wiring problems. Remember, keeping your trailer’s wiring in good condition not only enhances safety but also prevents frustrating delays. Have you ever had a wiring issue while on the road? Share your experience and tips in the comments below!Maintenance And Safety Tips
Maintaining the wire diagram for a 7 pin trailer plug is crucial for safety. Regular checks ensure the plug functions well and prevents accidents. Here are some essential maintenance and safety tips to keep your trailer plug in top shape.
Regular Inspections
Regular inspections help find potential issues early. Check the plug for dirt, corrosion, and damage. Clean the pins with a wire brush. Ensure all connections are secure. A loose wire can cause malfunction.
Inspect the wires for wear and tear. Replace any frayed or damaged wires immediately. This prevents electrical shorts and keeps the system safe. Regular checks ensure your trailer plug remains reliable.
Safety Precautions
Safety is paramount. Always disconnect the trailer plug before performing any maintenance. This avoids electric shock. Wear gloves to protect your hands from sharp edges and dirt. Working in a well-lit area helps identify issues clearly.
Use proper tools for maintenance. Incorrect tools can damage the plug. Follow the manufacturer’s guidelines for maintenance. This ensures you perform the tasks correctly and safely. Prioritize safety during all checks and maintenance activities.
Frequently Asked Questions
What Wires Go Where On A 7 Pin Trailer Plug?
The 7 pin trailer plug wiring: Brown – Tail/Running Lights, Yellow – Left Turn/Brake, Green – Right Turn/Brake, White – Ground, Blue – Electric Brakes, Black – Battery, Red – Reverse Lights. Ensure connections are secure for safety.
What Is The Color Code For A 7 Wire Trailer Plug?
The color code for a 7 wire trailer plug is: brown, yellow, green, red, blue, black, and white.
What Color Wires Go Together On A Trailer?
The standard trailer wiring color code is: brown for tail lights, yellow for left turn signal, green for right turn signal, and white for ground.
What Are The 2 Extra Wires On 7 Pin Trailer Plug?
The two extra wires on a 7-pin trailer plug are typically for reverse lights and auxiliary power.
Conclusion
Understanding the wire diagram for a 7 pin trailer plug is essential. It helps ensure safe and efficient towing. Follow the color codes and connections carefully. This will prevent any electrical issues on the road. Regular checks and maintenance also play a key role.
You can now connect your trailer with confidence. Safe travels and happy towing!