Winterizing your RV is crucial for protecting it during cold months. It prevents damage and keeps it ready for spring adventures.
As the temperature drops, RV owners must take steps to shield their vehicle from the harsh winter elements. Proper winterization ensures that the plumbing systems don’t freeze and the exterior remains intact. Without these precautions, you risk costly repairs and a shortened lifespan for your RV.
This guide will walk you through essential tips and techniques to prepare your RV for winter, ensuring it stays in top condition until it’s time to hit the road again. Whether you’re a seasoned RV owner or a newbie, these steps are easy to follow and will make a significant difference.
Credit: gagscamperway.com
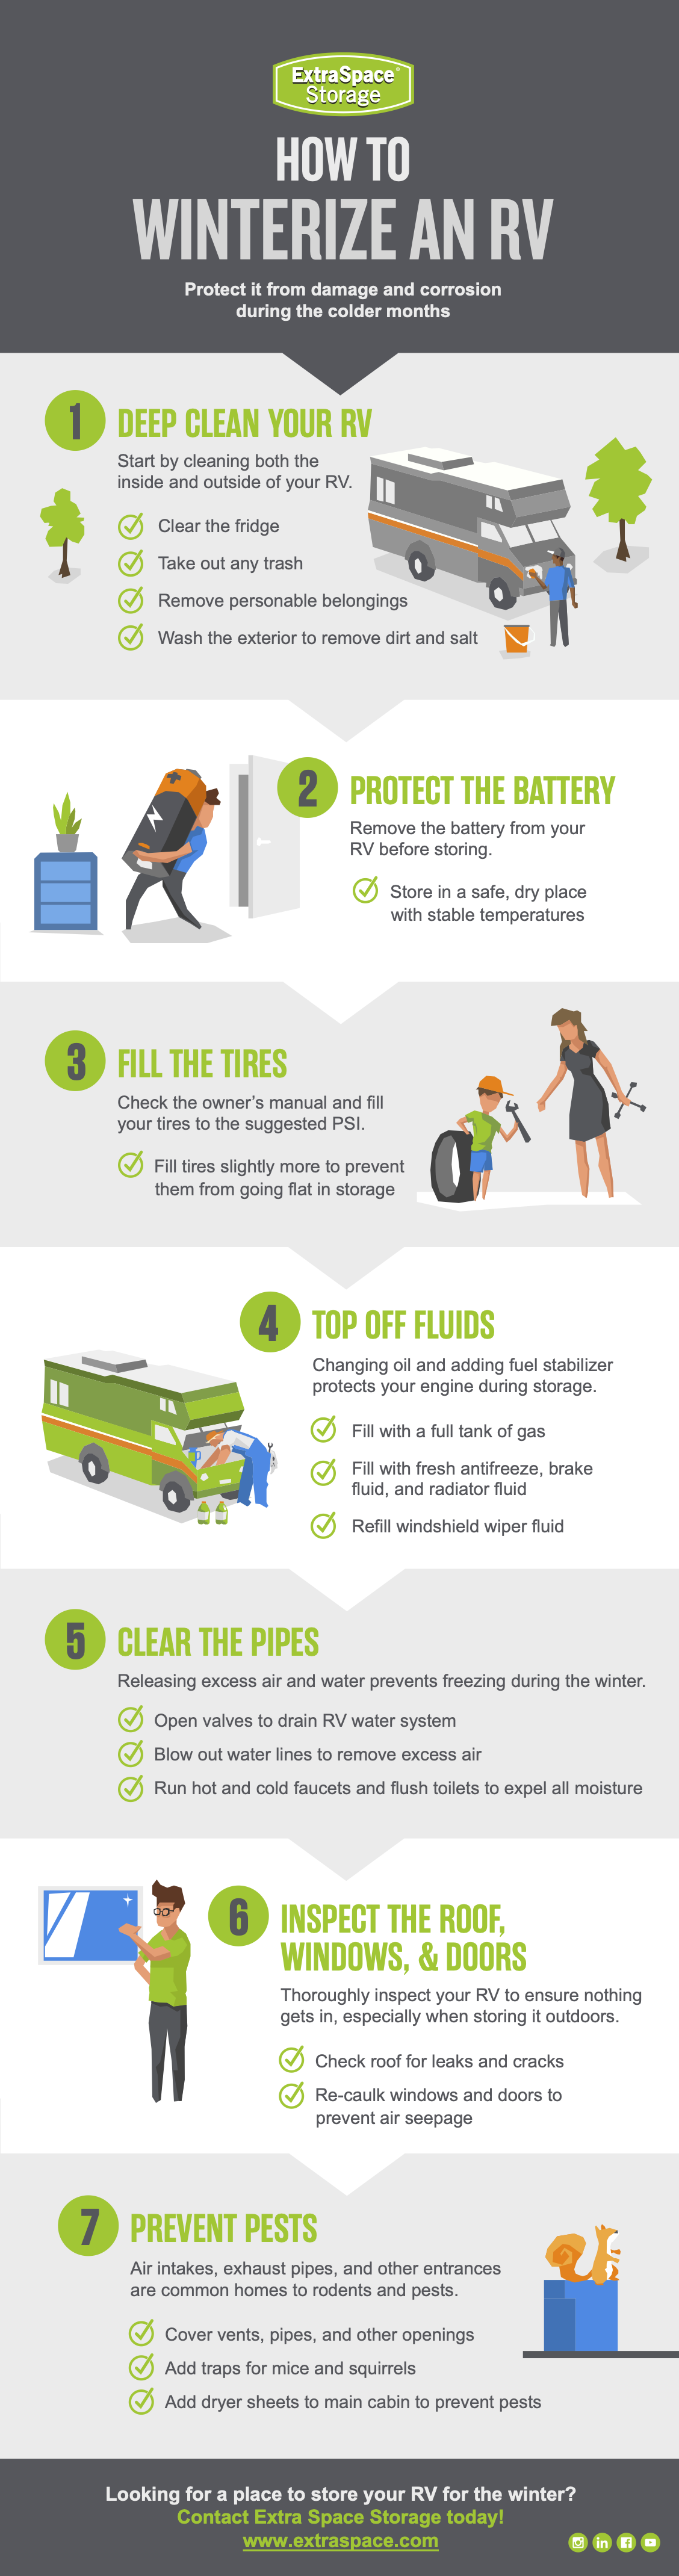
Preparing The Plumbing
Winterising your RV involves several steps. Preparing the plumbing is crucial to prevent damage from freezing temperatures. Properly preparing the plumbing will ensure your RV is ready for use when spring arrives.
Drain Water Systems
First, drain all water from your RV’s systems. Start with the fresh water holding tank. Open the drain valve and let the water flow out. Next, move to the grey and black water tanks. Empty them at a designated dump station. Open all faucets, including the shower, and turn on the water pump to clear out any remaining water. Don’t forget to drain the water heater too. Make sure every bit of water is out of the system.
Add Antifreeze
After draining, it’s time to add antifreeze. Use RV-specific antifreeze, not the one for cars. Start by bypassing the water heater. This step saves antifreeze and protects the heater. You can install a bypass kit for this purpose. Next, pour the antifreeze into the fresh water holding tank. Turn on the water pump to circulate the antifreeze through the system. Open each faucet, one at a time, until you see pink antifreeze flowing out. Don’t forget the shower head and the toilet. Flush the toilet until pink antifreeze appears. This ensures the entire plumbing system is protected.
Credit: www.extraspace.com
Insulating The Rv
Winterizing your RV is crucial to ensure comfort during cold months. One of the most important steps is insulating the RV. Proper insulation helps maintain the interior temperature and reduces energy consumption. Focusing on sealing windows and doors and adding extra insulation can make a significant difference.
Seal Windows And Doors
Windows and doors are common places where cold air enters. Check all seals around windows and doors. Look for cracks or gaps. Use weatherstripping to seal any gaps. This simple step can prevent drafts and keep the RV warmer. Don’t forget to check the seals regularly during winter.
Add Extra Insulation
Adding extra insulation can greatly improve the RV’s warmth. Start with insulating the walls and floors. Use foam boards or insulated panels for better results. Insulating the RV’s underbelly can also help. Ensure all pipes and tanks are properly insulated to prevent freezing. Extra insulation can make your winter RV experience more comfortable.
Heating Solutions
Preparing your RV for winter is essential to prevent damage. Drain all water systems, insulate pipes, and use antifreeze. Check seals and windows to keep the cold out.
Winter is just around the corner, and if you’re an RV owner, it’s time to think about keeping your mobile home warm and cozy. Heating solutions are crucial when winterising your RV. The right approach can make all the difference between a comfortable winter adventure and a chilly, uncomfortable experience. Let’s dive into some effective heating solutions to keep your RV warm. ###Portable Heaters
Portable heaters can be lifesavers when it comes to heating your RV. They are convenient, easy to use, and can be placed almost anywhere. Personally, I’ve found that a compact ceramic heater works wonders in smaller spaces. It’s efficient, and it heats up quickly. Why Portable Heaters? – Versatility: You can move them around to target specific areas. – Cost-effective: They are generally cheaper than installing additional built-in heating systems. – Backup Option: If your main heating system fails, a portable heater can save the day. Important Tips: – Always ensure the heater is placed on a flat, stable surface. – Keep it away from flammable materials. – Choose a heater with an automatic shut-off feature for safety. ###Rv Furnace Maintenance
Your RV’s furnace is the backbone of your heating system. Proper maintenance is essential to ensure it runs efficiently and safely throughout the winter. Steps for Maintenance: 1. Inspect the Furnace: Before the cold hits, check for any visible damage or wear. Look at the vents, ducts, and connections. 2. Clean the Vents and Ducts: Dust and debris can accumulate over time, reducing efficiency. Use a vacuum to clean these areas. 3. Check the Thermostat: Make sure your thermostat is working correctly. A malfunctioning thermostat can lead to uneven heating. 4. Test the Furnace: Turn it on and let it run for a while. Listen for any unusual noises and ensure it heats up the RV evenly. Personal Insight: Last winter, I neglected to clean my furnace vents, and halfway through a snowy trip, my furnace started acting up. After cleaning the vents, the heating improved significantly. Don’t make the same mistake; a little maintenance goes a long way. Thought-Provoking Question: Have you ever been caught in a cold snap with inadequate heating? What would you do differently to ensure you’re never in that situation again? Proper heating solutions are vital for a comfortable winter RV experience. By using portable heaters strategically and maintaining your RV furnace, you can enjoy warm and cozy travels all winter long.Protecting The Exterior
Winter can be harsh on your RV’s exterior. Snow, ice, and cold winds can cause damage. Proper protection is crucial to maintain its condition. Here are some effective ways to protect your RV’s exterior during winter.
Cover The Rv
A good RV cover shields your vehicle from snow and ice. It also keeps dirt and debris away. Choose a cover made of breathable material. This prevents moisture buildup and mold growth. Ensure the cover fits your RV snugly. Secure it properly to avoid wind damage.
Inspect Roof And Seals
Check the roof for any cracks or damage. Repair them before winter sets in. Look for signs of wear on seals around vents and windows. Replace old, cracked seals. Proper sealing prevents leaks and water damage. Pay close attention to the edges and corners. These areas are prone to leaks.
Maintaining The Battery
Winter can be tough on your RV battery. Cold temperatures can drain it quickly. Proper battery care is crucial for winterizing your RV. This ensures your battery stays healthy and lasts longer.
Charge Regularly
Keep your battery charged during winter. A fully charged battery resists freezing better. Plug in your RV and let it charge every few weeks. This helps maintain the battery’s health and prevents damage.
Monitor Battery Health
Check your battery’s health often. Use a voltmeter to measure its voltage. A healthy battery should read around 12.6 volts or more. If it’s lower, recharge or replace it. Inspect the battery terminals for corrosion. Clean them with a baking soda solution and a brush.
Credit: www.youtube.com
Stocking Up On Supplies
Stock up on antifreeze, insulation, and weatherproofing materials to winterise your RV. Protect pipes, seal windows, and ensure your vehicle stays warm.
Winterizing your RV is a crucial step to ensure that it remains in optimal condition during the colder months. One of the essential aspects of this process is stocking up on supplies. Ensuring you have everything you need can make your winter camping experience not only bearable but enjoyable. Here’s a detailed guide on the supplies you should consider.Food And Water
When winter arrives, access to fresh food and clean water can become challenging. Make sure to stock up on non-perishable food items. These can include canned goods, dried fruits, nuts, and pasta. Keeping a variety of options will help maintain a balanced diet. Use a checklist to ensure you don’t miss anything important. Water is another critical supply. Always carry enough bottled water. In colder conditions, water sources might freeze, making it difficult to get fresh water. Consider using insulated containers to prevent your water from freezing. Pro Tip: Always keep a portable water filter in case you need to source water from natural bodies.Winter Gear
Staying warm is essential when you’re winterizing your RV. Proper winter gear can make all the difference. Ensure that you have sufficient warm clothing. This includes thermal underwear, wool socks, gloves, and hats. Layering is your friend during winter, as it traps heat effectively. Your RV should also be equipped with additional heating options. A portable heater can be a lifesaver, especially during unexpectedly cold nights. Make sure to have extra propane or fuel if your heater requires it. Personal Insight: Last winter, my portable heater broke down unexpectedly. Having a backup portable heater saved the trip and kept us warm. Don’t forget about the RV itself. Insulate windows and doors to prevent drafts. Use heavy curtains or reflective foil to add an extra layer of insulation. Consider investing in a heated water hose to prevent freezing of the water supply. Thought-Provoking Question: Have you ever checked if your RV’s insulation is adequate for winter conditions? Pay attention to these supplies and preparations to make your winter RVing experience smooth and enjoyable.Managing Condensation
Prevent condensation in your RV during winter by ensuring proper ventilation and using dehumidifiers. Insulating windows and walls also helps maintain a dry, comfortable interior.
Managing condensation in your RV during winter is crucial for maintaining a comfortable and healthy living environment. Condensation can lead to mold, mildew, and unpleasant odors, which can ruin your winter camping experience. To keep your RV dry and cozy, you need to focus on reducing moisture. Here are some effective strategies to manage condensation in your RV.Use Dehumidifiers
Dehumidifiers are your best friend when it comes to controlling moisture levels. They work by extracting excess humidity from the air, which prevents condensation from forming on windows and walls. Consider investing in a small, portable dehumidifier designed for RVs. These units are compact, energy-efficient, and effective at maintaining optimal humidity levels. Place the dehumidifier in a central location in your RV, and let it run continuously. Remember to empty the water collection tank regularly to ensure it operates efficiently. For those on a tight budget, moisture-absorbing products like DampRid can also help. Place these in strategic locations such as closets, under sinks, and near windows to absorb excess moisture.Ventilate Properly
Proper ventilation is key to preventing condensation. Even in cold weather, it’s important to allow fresh air to circulate inside your RV. Open your roof vents slightly to let warm, moist air escape. If your RV has a vent fan, use it to enhance air circulation. Cracking a window or two can also help, but make sure it’s not too cold outside. When cooking or showering, always use exhaust fans to vent steam outside. This reduces the amount of moisture released into your living space. During my first winter RV trip, I noticed a significant reduction in condensation after I started using the vent fan religiously while cooking. It was a simple change that made a big difference. Do you find condensation a challenge in your RV? Try implementing these tips and see how much of a difference they make!Safety Precautions
Ensure your RV is safe this winter by draining water lines and adding antifreeze. Check seals and cover vents to prevent leaks and drafts.
Winterizing your RV is crucial to protect it from the harsh winter weather and ensure it’s ready for the next adventure. One of the most important aspects of winterizing your RV is taking safety precautions. Ensuring that your RV is safe during winter storage and use will give you peace of mind and keep you and your loved ones protected.Check Carbon Monoxide Detectors
Carbon monoxide (CO) is a silent killer. As you prepare your RV for winter, it’s essential to check your carbon monoxide detectors. These devices can save lives by alerting you to the presence of this dangerous gas. – Test the detectors: Press the test button on each detector to ensure they are working correctly. Replace batteries if needed. – Check the expiration date: Detectors have a lifespan. Make sure yours are not expired and replace them if they are. – Install additional detectors: If your RV lacks sufficient CO detectors, consider adding more. Place them near sleeping areas and any fuel-burning appliances. Imagine waking up to the silent alarm of a CO detector, knowing it protected you from a potentially deadly situation. This simple step can make all the difference.Emergency Kit
Having an emergency kit on hand is essential for any RV owner, especially during the winter months. An emergency kit should contain items that can help you in case of unexpected situations. – First aid supplies: Include bandages, antiseptics, pain relievers, and any necessary prescription medications. – Tools and repair items: Pack a set of essential tools, duct tape, and spare fuses. These can help you handle minor repairs on the go. – Warm clothing and blankets: In case your heating system fails, having extra layers can keep you warm. – Flashlights and batteries: Winter days are shorter, and you may find yourself needing light during a power outage. – Non-perishable food and water: Stock up on items like canned goods, granola bars, and bottled water. When was the last time you checked your emergency kit? Do you have everything you need to stay safe and comfortable if something goes wrong? Taking these safety precautions seriously can make your winter RV experience much smoother and safer. By checking carbon monoxide detectors and preparing an emergency kit, you ensure that you’re ready for any situation that winter might throw your way.Frequently Asked Questions
How Do You Winterize An Rv Step By Step?
Drain all water tanks and lines. Add RV antifreeze to plumbing. Disconnect and store the battery. Cover and seal windows and doors. Inspect and repair the roof.
At What Temperature Does An Rv Need To Be Winterized?
Winterize your RV when temperatures drop below 32°F (0°C). This prevents water lines and tanks from freezing.
How Long Can You Leave Rv Antifreeze In An Rv?
You can leave RV antifreeze in your RV for up to one year. Ensure it remains effective and doesn’t freeze.
Do You Leave Faucets Open After Winterizing Rv?
Yes, leave faucets open after winterizing your RV. This helps prevent pressure buildup and protects plumbing from potential damage.
Conclusion
Winterizing your RV ensures it stays in top shape. Protecting pipes from freezing is crucial. Draining water tanks prevents damage. Adding antifreeze keeps systems safe. Clean and cover your RV. Check seals and fix any gaps. This prevents pests and moisture.
Store your RV in a sheltered spot. Regular maintenance will save you money. Enjoy worry-free travels next spring. Happy RVing!