To test an RV battery, you need a few basic tools. First, ensure the battery is fully charged.
Then, use a multimeter to check its voltage. RV batteries are crucial for powering your adventures. Without a reliable battery, your travel plans can come to a halt. Knowing how to test your RV battery is essential for maintaining its health.
Regular testing helps you avoid unexpected breakdowns. It also ensures that all your appliances work smoothly. In this guide, we’ll explain the steps to test your RV battery. You’ll learn how to use simple tools to check its condition. With this knowledge, you can keep your RV running efficiently. Let’s dive in and ensure your next trip is trouble-free.
Introduction To Rv Batteries
Owning an RV is like having a home on wheels, offering freedom and adventure. But to keep your RV running smoothly, understanding its battery is crucial. RV batteries are the heart of your vehicle’s electrical system, powering everything from the lights to the fridge.
Importance Of Testing
Testing your RV battery regularly is vital. It ensures that your battery is in good condition and can hold a charge. An unreliable battery can leave you stranded, disrupting your travel plans.
Regular testing helps you catch problems early. This can save you time and money in the long run. Plus, it gives you peace of mind knowing your RV is ready for the road.
Types Of Rv Batteries
There are two main types of RV batteries: lead-acid and lithium-ion. Each type has its pros and cons.
Lead-acid batteries are more common and less expensive. However, they require regular maintenance. You need to check water levels and keep them charged.
Lithium-ion batteries are pricier but offer longer life and less maintenance. They are lighter and more efficient. However, they can be sensitive to extreme temperatures.
Understanding these differences helps you choose the right battery for your needs. Make sure to test and maintain your battery according to its type.
Have you ever been caught off guard by a dead battery? Share your story in the comments below and let’s learn from each other’s experiences!

Credit: www.trailertester.com
Necessary Tools And Equipment
Testing an RV battery is a crucial task to ensure its longevity and performance. Having the right tools and equipment makes this process easier and safer. Below, we will discuss the essential items you need before testing your RV battery.
Safety Gear
Safety is paramount when dealing with batteries. Always wear protective gear to avoid accidents. Essential safety gear includes gloves and goggles. Gloves protect your hands from acid and electrical shocks. Goggles shield your eyes from potential splashes.
Also, wear long sleeves and pants to protect your skin. Ensure that your workspace is well-ventilated. Batteries can release harmful gases.
Testing Instruments
Accurate testing requires specific instruments. A multimeter is essential. It measures voltage, current, and resistance. Ensure it has good battery life and proper calibration.
A hydrometer is useful for checking the battery’s electrolyte density. It helps determine the state of charge. An RV battery tester is also handy. It can give quick results on battery health.
Having these tools ready makes the testing process smooth and efficient. Proper equipment leads to precise readings, ensuring your RV battery’s optimal performance.
Preparing For The Test
Testing an RV battery ensures its optimal performance. Proper preparation is key. Before beginning, gather all necessary tools. This includes a multimeter, gloves, and safety glasses. Follow these steps to ensure a smooth testing process.
Safety Precautions
Always prioritize safety. Wear gloves to protect your hands from acid. Safety glasses shield your eyes from potential splashes. Ensure the RV is off and keys are removed. Disconnect any electrical devices. This prevents accidental shocks.
Battery Inspection
Inspect the battery visually. Check for any signs of damage. Look for cracks, leaks, or corrosion. Clean the terminals with a wire brush. A clean battery ensures accurate test results. Note the battery’s age. Older batteries may need replacement.
Conducting A Visual Inspection
Conducting a visual inspection is an important step in testing an RV battery. This helps in identifying visible issues. A thorough inspection ensures the battery’s longevity. Let’s dive into the details.
Checking For Corrosion
Start by checking the battery for corrosion. Corrosion can be seen as a white, powdery substance. It often appears around the battery terminals. Corrosion can affect the battery’s performance. Use a wire brush to clean the corroded areas. Wear gloves for safety. Ensure the battery is disconnected before cleaning.
Inspecting Battery Terminals
Next, inspect the battery terminals. Look for any loose connections. Loose terminals can lead to poor electrical contact. Check for cracks or damage on the terminals. Damaged terminals should be replaced immediately. Ensure terminals are clean and tight. This helps in maintaining a good connection.
Testing Battery Voltage
Testing the voltage of your RV battery is crucial for ensuring reliable power. It helps you understand the battery’s health and charge status. This simple process can save you from unexpected power issues on the road.
Using A Multimeter
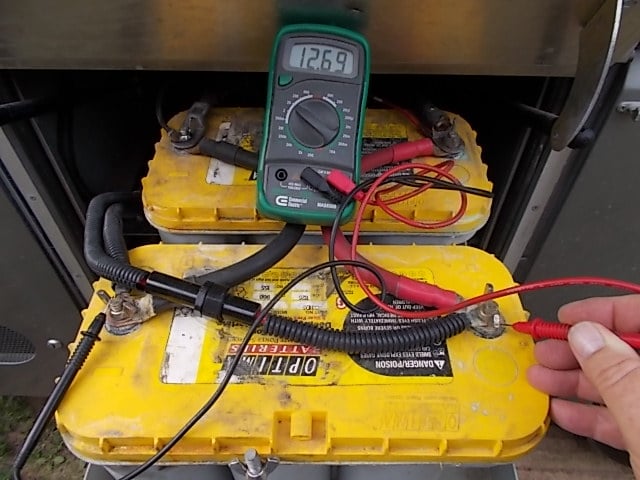
A multimeter is a handy tool for testing battery voltage. Set the multimeter to the DC voltage setting. Connect the red probe to the battery’s positive terminal. Then, connect the black probe to the negative terminal. The multimeter will display the voltage reading.
Interpreting Voltage Readings
Understanding the voltage reading is key. A fully charged RV battery should read around 12.6 volts or higher. If the voltage is between 12.4 and 12.6 volts, the battery is about 75% charged. Readings below 12.4 volts suggest the battery is partially charged. A reading below 12.0 volts indicates the battery is discharged. This may require charging or even replacement.
Performing A Load Test
Perform a load test to check your RV battery’s capacity. Connect a load tester, then observe the voltage drop. Ensure the voltage stays within the acceptable range for a healthy battery.
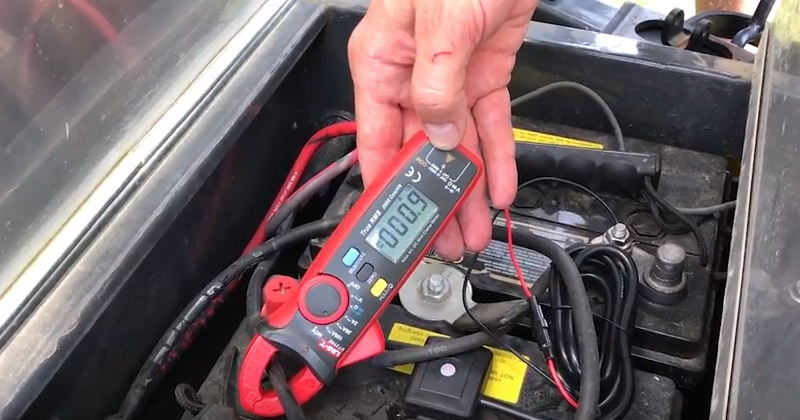
Performing a Load Test on your RV battery is an essential step to ensure it is functioning correctly. This process helps you determine the battery’s health and capacity. By conducting a load test, you can avoid unexpected power issues during your travels. Here’s a detailed guide on how to perform a load test, which includes using a load tester and analyzing the results.Using A Load Tester
First, gather your materials. You’ll need a load tester, safety gloves, and safety goggles. Make sure your RV is off and the battery is disconnected. Next, connect the load tester to your RV battery. Attach the positive (red) clamp to the positive terminal and the negative (black) clamp to the negative terminal. Turn on the load tester. Most testers have a simple on/off switch or button. Follow the instructions on your specific model. The tester will apply a load to the battery, simulating real-world usage. Observe the meter or display on the load tester. It should indicate the battery’s voltage and load. Make sure to hold the load for the recommended time, usually around 15 seconds.Analyzing Load Test Results
Now, let’s make sense of the numbers. A healthy RV battery should maintain a voltage above 9.6V under load. If your battery’s voltage drops below this level, it may be time to replace it. If the voltage is within the acceptable range, your battery is in good shape. However, if it’s borderline, consider retesting in a few weeks or after your next trip. Keep track of your battery’s performance over time. Regular testing can help you spot issues before they become serious problems. Make notes of the voltage readings and any changes you observe. By mastering the load test process, you can ensure your RV adventures are powered smoothly. Have you ever faced a battery issue during a trip? Share your experiences and tips in the comments below!Checking Battery Capacity
Checking the capacity of your RV battery is essential. It ensures that your trips remain smooth and hassle-free. A weak battery can leave you stranded. To avoid this, you need to test its capacity. There are several methods to do this. Two of the most reliable are the Hydrometer Test and Specific Gravity Readings. Let’s dive into each.
Hydrometer Test
A hydrometer measures the density of the battery’s electrolyte. This test helps determine the battery’s state of charge. To use a hydrometer, draw some electrolyte from the battery cell. The hydrometer will float, showing a reading.
Compare the reading to the battery’s specifications. A fully charged battery will have a higher density reading. If the reading is low, your battery may need charging or replacing.
Specific Gravity Readings
Specific gravity readings give a detailed view of the battery’s health. This method also uses a hydrometer. Draw the electrolyte and read the specific gravity for each cell.
A good reading is usually between 1.265 and 1.299. If the readings are lower, the battery may be sulfated. Different readings in each cell indicate cell damage or imbalance.
Regular checks help extend your battery’s life. It also ensures that your RV trips remain worry-free.
Maintaining Your Rv Battery
Maintaining your RV battery is crucial for ensuring long-lasting performance. A well-maintained battery keeps your adventures uninterrupted and hassle-free. Let’s explore some essential tips for maintaining your RV battery in top condition.
Regular Inspections
Regular inspections are key to keeping your RV battery healthy. Check the battery terminals for corrosion. Clean them if needed. Look for any signs of damage or wear. Ensure the battery is properly secured in its compartment. A loose battery can cause issues. Also, check the electrolyte levels in flooded batteries. Top them up with distilled water if necessary.
Proper Storage Practices
Proper storage practices are essential for extending the life of your RV battery. Store the battery in a cool, dry place during off-season. Disconnect it from the RV to prevent any drain. Charge the battery fully before storage. Consider using a battery maintainer or trickle charger. This keeps the battery at an optimal charge level. Avoid storing the battery on a concrete floor. Use a wooden pallet or shelf instead.
Troubleshooting Common Issues
Testing an RV battery is essential for a smooth trip. Sometimes, issues arise even with the best batteries. Knowing how to troubleshoot common problems can save you a lot of headaches. Below, we explore some typical issues and how to address them.
Battery Won’t Hold Charge
A common problem is the battery not holding a charge. This can result from several reasons. First, check if the battery terminals are clean and tight. Dirt and loose connections can prevent proper charging. Use a wire brush to clean the terminals.
Next, inspect the electrolyte levels. If they are low, add distilled water. Never use tap water. It contains minerals that can harm your battery. Also, test the battery voltage with a multimeter. A fully charged battery should read around 12.6 volts. If the voltage is low, you may need to recharge the battery.
Dealing With Sulfation
Sulfation is a common issue in lead-acid batteries. It occurs when the battery sits unused for long periods. Sulfation forms crystals on the battery plates, reducing its capacity. To deal with sulfation, you can try a process called desulfation. Many modern chargers have a desulfation mode. This mode sends small pulses of electricity to break down the crystals.
If the charger doesn’t have this mode, you can manually desulfate the battery. First, fully charge the battery. Then, discharge it slowly using a small appliance. Repeat the charging and discharging cycle several times. This process can help restore some of the battery’s capacity.
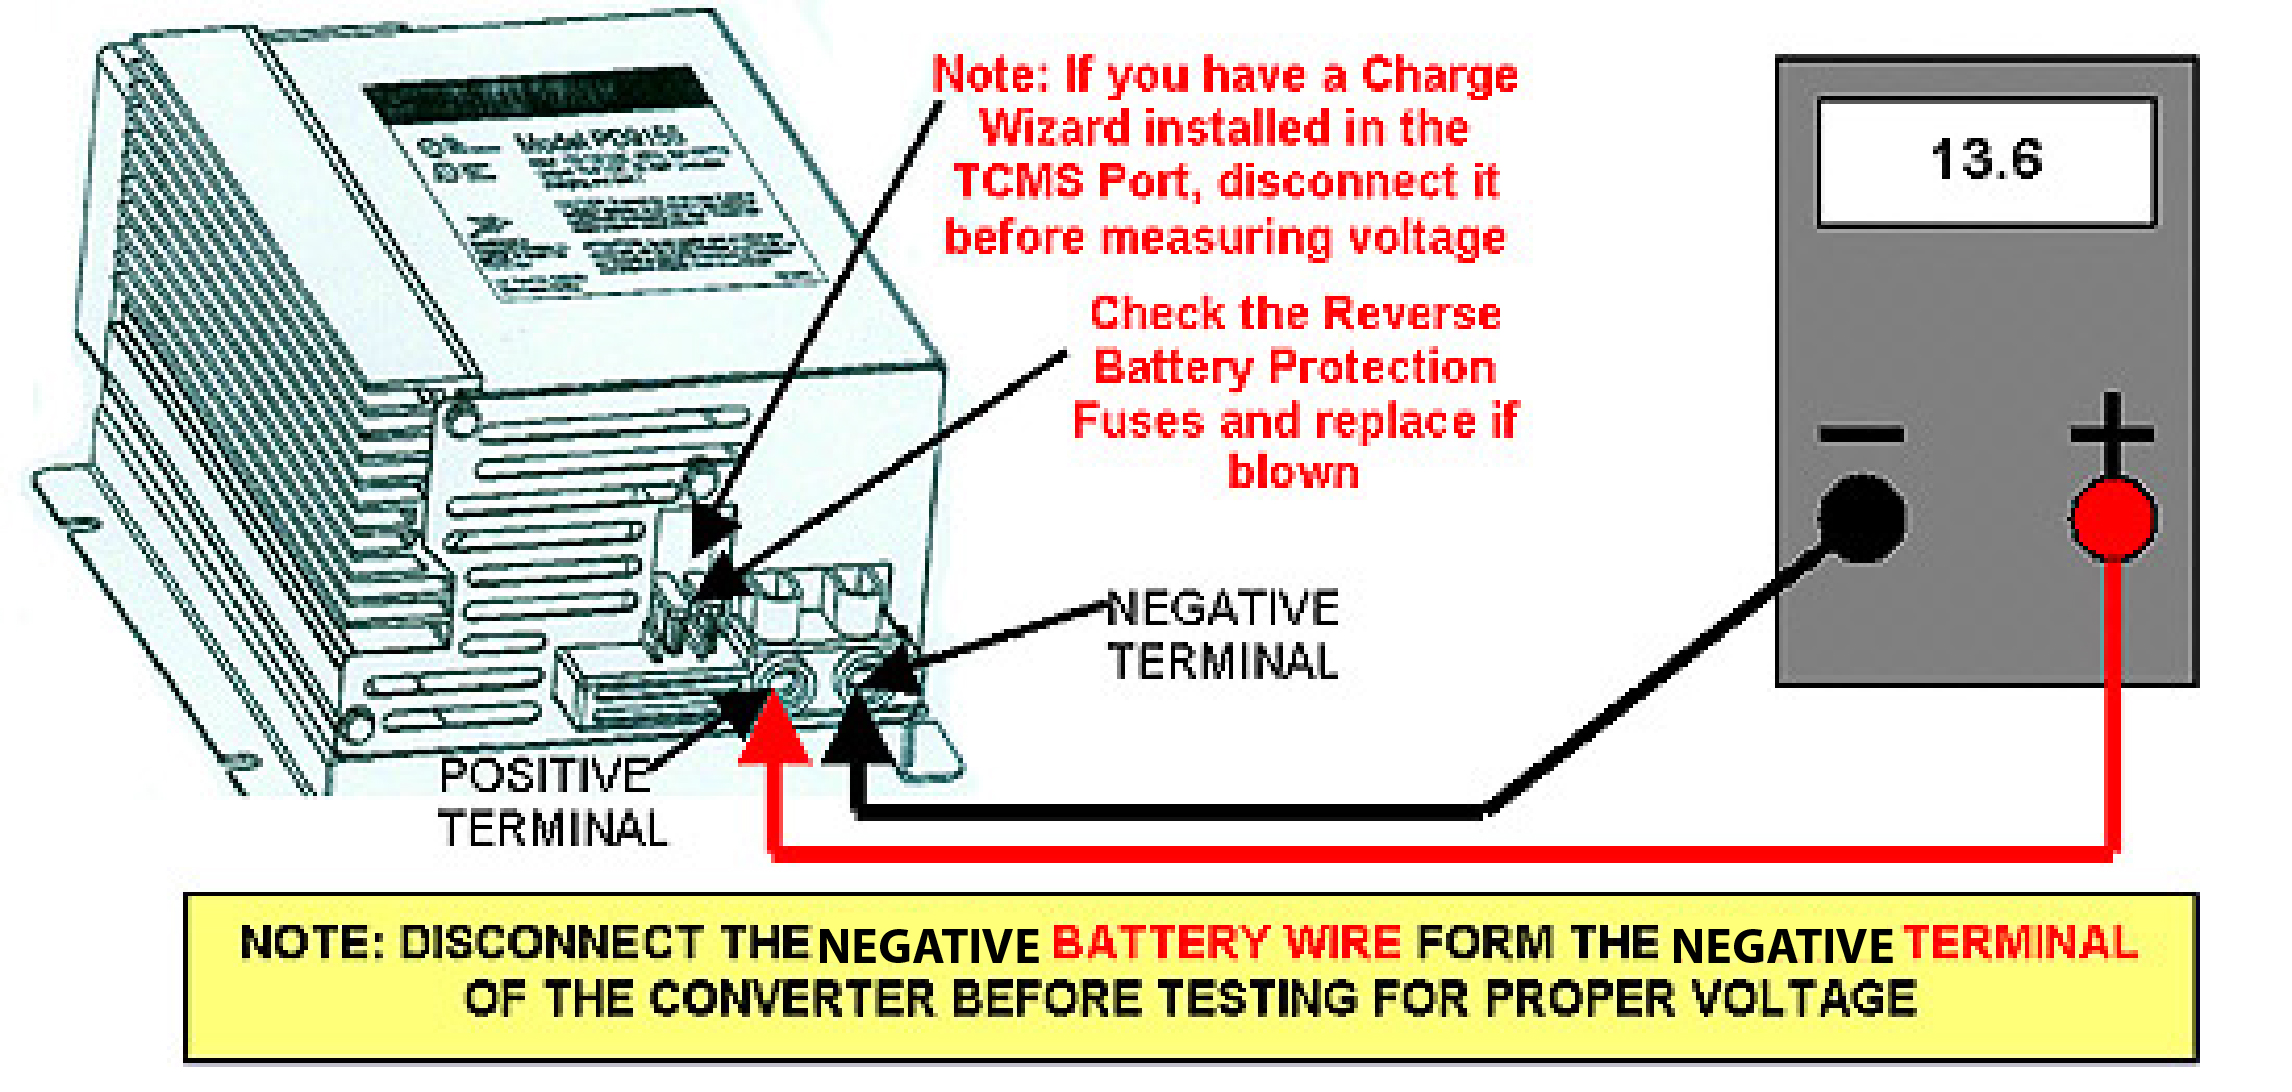
Credit: www.progressivedyn.com
Credit: www.cargenerator.com
Frequently Asked Questions
How Can I Tell If My Rv Battery Is Bad?
Check for slow cranking, dim lights, or unusual noises. Measure voltage; below 12. 4V indicates a bad battery. Inspect for corrosion or leaks.
How To Check A Rv Battery With A Multimeter?
Set the multimeter to DC voltage. Connect the red probe to the positive terminal and the black probe to the negative terminal. Read the voltage. A fully charged RV battery should show 12. 6 volts or more. Recharge if necessary.
How Do I Know When My Rv Battery Needs Replacing?
Check if your RV battery holds a charge. Look for dim lights, slow appliance operation, or frequent recharging.
How Do You Test And Maintain A Deep Cycle Rv Battery?
Test and maintain a deep cycle RV battery by regularly checking voltage, cleaning terminals, adding distilled water, and fully charging.
Conclusion
Testing your RV battery is essential for a smooth trip. Regular checks ensure safety and efficiency. Follow the steps to maintain battery health. Use a multimeter for accurate readings. Clean connections to prevent issues. Proper maintenance can extend battery life.
Now, you’re ready for your next adventure with confidence. Happy travels and safe journeys!