
Resealing an RV roof is essential for maintenance. It helps prevent leaks and damage.
Owning an RV brings freedom and adventure, but it also requires upkeep. One crucial task is resealing the roof. Over time, weather and wear can cause the sealant to crack or peel. This can lead to leaks and costly repairs.
By learning how to reseal your RV roof, you can protect your investment. It’s a straightforward process that can save you time and money. In this guide, we’ll walk you through the steps to reseal an RV roof. We’ll cover the tools you need, the materials to use, and the techniques to ensure a lasting seal. Keep reading to keep your RV in top shape and enjoy worry-free travels.

Credit: www.youtube.com
Preparation Steps
Preparation is crucial before resealing your RV roof. Proper preparation ensures a long-lasting seal. It prevents future leaks and damage. Let’s dive into the essential steps to get your roof ready.
Cleaning The Roof
First, thoroughly clean the roof. Remove all dirt, debris, and old sealant. Use a broom to sweep away loose particles. Next, wash the roof with soapy water and a soft brush. Pay attention to corners and edges. Rinse thoroughly with clean water. Allow the roof to dry completely. This step ensures the new sealant adheres properly.
Inspecting For Damage
Once the roof is clean, inspect it for damage. Look for cracks, tears, and holes. Check around vents, skylights, and seams. Use a flashlight for better visibility. Mark any damaged areas with a marker. This helps you remember where repairs are needed. Addressing damage now prevents bigger issues later.
Choosing The Right Sealant
Choosing the right sealant for your RV roof can be a challenging task. The sealant you select will determine how well your roof is protected against leaks and damage. Making an informed choice is crucial to ensure your RV remains in excellent condition.
Types Of Sealants
There are various types of sealants available for RV roofs. Each type serves a different purpose and has unique properties.
Silicone sealants are popular for their flexibility and long-lasting durability. They offer excellent resistance to UV rays and extreme temperatures.
Acrylic sealants are easy to apply and provide a smooth finish. They are also UV resistant but may not be as durable as silicone sealants.
Polyurethane sealants are known for their strong adhesive properties. They create a tough barrier against water and are highly durable.
Benefits Of Each Sealant
Silicone sealants are ideal for areas exposed to harsh weather. Their flexibility prevents cracking and ensures a tight seal.
Acrylic sealants are great for quick repairs. Their ease of application makes them perfect for DIY projects.
Polyurethane sealants offer superior strength and longevity. They are perfect for heavy-duty sealing needs.
Choosing the right sealant ensures your RV roof remains leak-free and protected. Consider your specific needs and the conditions your RV will face.
Tools You Will Need
Gather essential tools such as a caulking gun, roof sealant, putty knife, and a ladder. Ensure you have gloves and a cleaning brush.
When it comes to resealing your RV roof, having the right tools at your disposal can make the job easier and more efficient. You don’t want to start the task only to realize halfway through that you’re missing a crucial tool. Below, we’ll break down the essential tools and safety gear you’ll need to ensure a smooth and successful resealing project.Essential Tools
To get started, gather these essential tools:- Caulk gun: This is crucial for applying sealant evenly and efficiently. Make sure it’s a heavy-duty model to handle thicker materials.
- Putty knife: You’ll need this for removing old sealant and smoothing out new applications. A flexible, metal one works best.
- Utility knife: This comes in handy for cutting away old material and trimming new sealant.
- Paint roller: For larger areas, a paint roller can help spread liquid sealant quickly and evenly.
- Brush: Use a stiff-bristled brush to clean off debris and dirt from the roof surface before you start sealing.
- Sealant tape: This is perfect for quick fixes or sealing smaller cracks. It’s a must-have for any RV maintenance kit.
Safety Gear
Safety should always be a priority. Here’s what you’ll need:- Gloves: Protect your hands from harsh chemicals and sharp edges. Nitrile gloves are durable and offer good protection.
- Safety glasses: Shield your eyes from debris and sealant splashes. A clear, wrap-around design offers the best protection.
- Knee pads: You’ll be spending a lot of time on your knees, so protect them with padded knee pads to avoid discomfort and injury.
- Non-slip shoes: Ensure you have a good grip while working on the roof. Non-slip, rubber-soled shoes are ideal.
Credit: dicorproducts.com
Applying The Sealant
Resealing your RV roof is a crucial task that extends the life of your RV and prevents costly damage. One of the most important steps in this process is applying the sealant. This step ensures that your roof remains watertight and protected from the elements. Let’s dive into how you can do this efficiently and effectively.
Step-by-step Guide
Applying the sealant to your RV roof isn’t as daunting as it seems. With the right tools and a bit of patience, you can achieve professional results. Here’s a step-by-step guide to help you through the process:
- Choose the Right Sealant: Not all sealants are created equal. Make sure you pick one that is specifically designed for RV roofs. Check your RV manual for recommendations.
- Clean the Roof: Use a mild soap and water to clean the roof thoroughly. Remove any dirt, debris, or old sealant. A clean surface ensures better adhesion.
- Inspect for Damage: Look for cracks or damage. Repair any issues before applying the sealant to ensure a smooth application.
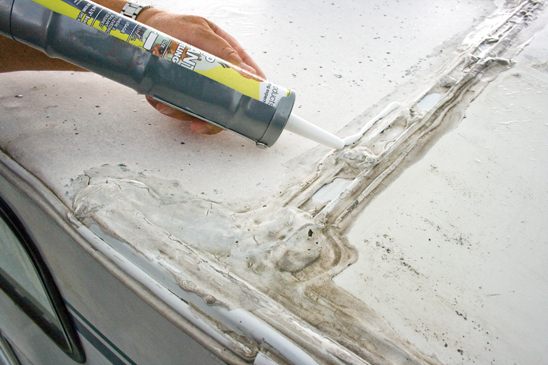
- Apply the Sealant: Follow the instructions on the sealant packaging. Generally, you will apply the sealant in a steady, even line along the seams and any areas prone to leaks. Use a caulking gun for precise application.
- Smooth the Sealant: Use a putty knife or your finger (wearing gloves) to smooth the sealant. This step ensures complete coverage and a professional finish.
- Allow to Dry: Let the sealant dry as per the manufacturer’s instructions. This usually takes 24 to 48 hours. Avoid using the RV during this time to ensure the sealant sets properly.
Tips For Even Application
Applying sealant evenly can be tricky, but with a few tips, you can master the technique:
- Maintain Steady Pressure: When using a caulking gun, maintain consistent pressure to ensure an even flow of sealant. This helps avoid lumps and gaps.
- Work in Small Sections: Tackle small sections at a time. This prevents the sealant from drying out before you have a chance to smooth it.
- Use the Right Tools: A high-quality caulking gun and a wide putty knife can make a big difference. Invest in good tools for better results.
- Practice Makes Perfect: If you’re new to applying sealant, practice on a piece of cardboard first. This helps you get a feel for the right pressure and speed.
- Check the Weather: Apply the sealant on a dry, warm day. Moisture and cold temperatures can affect the sealant’s ability to adhere properly.
Have you ever tackled a DIY project only to realize halfway through that you missed a crucial step? It’s frustrating, right? When I first resealed my RV roof, I skipped cleaning the surface properly. The sealant didn’t stick well, and I had to redo the entire job. Lesson learned: preparation is key.
What are your biggest concerns when it comes to maintaining your RV? Is applying the sealant something you feel confident about now? Share your thoughts and experiences in the comments below!
Curing Time
Allow enough curing time for the sealant to dry completely. This ensures a long-lasting reseal for your RV roof. Proper curing helps prevent future leaks and damage.
Resealing your RV roof is an essential maintenance task that ensures your home on wheels stays dry and comfortable. One of the critical aspects of this process is the curing time. Understanding how long it takes for the sealant to cure, and the factors that influence this, can help you plan effectively and avoid potential mishaps. Let’s dive into the details.How Long To Wait
The curing time for RV roof sealant can vary depending on the product you use. Some sealants cure in as little as 24 hours, while others may take up to a week. Reading the manufacturer’s instructions on the sealant packaging will provide the most accurate timeframe. From personal experience, I once used a popular brand of sealant that took 48 hours to cure fully. During this period, I avoided driving the RV to ensure the sealant set properly. This waiting period might seem inconvenient, but it’s crucial for a long-lasting seal.Factors Affecting Cure Time
Several factors can affect the cure time of your RV roof sealant. – Temperature: Warmer temperatures generally speed up the curing process. If you’re working in colder weather, expect the sealant to take longer to cure. For example, in the summer, a sealant might cure in 24 hours, but in the winter, it could take 72 hours or more. – Humidity: High humidity levels can slow down the curing process. If you live in a humid area, you might need to wait a bit longer. – Sealant Type: Different types of sealants have different curing times. Silicone-based sealants often cure faster than polyurethane ones. – Thickness of Application: Applying a thicker layer of sealant will generally take longer to cure. Make sure to apply an even layer to avoid extending the curing time unnecessarily. – Ventilation: Proper airflow can aid in the curing process. If you’re working in a closed garage, ensure it’s well-ventilated to help the sealant cure faster. Remember, patience is key. Rushing the curing process can lead to inadequate sealing, which might cause leaks and damage in the long run. Are you considering the best time to reseal your RV roof? Think about how temperature and humidity could affect your project. Planning ahead can save you from unexpected delays and ensure a successful reseal.
Credit: www.youtube.com
Maintenance Tips
Maintaining your RV roof is crucial. It ensures a longer lifespan and prevents leaks. Regular upkeep can save you from costly repairs. Here are some essential maintenance tips.
Regular Inspections
Regular inspections are vital. Check your RV roof at least twice a year. Look for cracks, holes, or any signs of damage. Pay attention to seals around vents, skylights, and edges. Spotting issues early can prevent bigger problems.
Cleaning Techniques
Keep your RV roof clean. Dirt and debris can cause damage over time. Use mild soap and water to clean the roof. Avoid harsh chemicals that may harm the material. A soft brush can help remove stubborn dirt. Rinse thoroughly to ensure no soap residue remains.
After cleaning, let the roof dry completely. Moisture can affect sealants and lead to leaks. Regular cleaning keeps the roof in good condition and extends its life.
Common Mistakes To Avoid
Resealing your RV roof can seem like a straightforward task. But, many make mistakes that lead to problems later. These errors can cost time and money. Knowing what to avoid is crucial.
Over-application
Many people think more sealant is better. This is a common mistake. Over-applying sealant can cause issues. It can create lumps and uneven surfaces. These can trap water and lead to leaks. Use only the amount recommended by the manufacturer.
Ignoring Prep Work
Preparation is key to a good seal. Skipping prep work is a big mistake. Dirt and debris can prevent the sealant from sticking. Clean the roof thoroughly before applying any sealant. Also, check for any damage and repair it first.
Failing to do this can lead to poor adhesion. This means the sealant won’t work effectively. Taking time to prep ensures a longer-lasting seal.
Professional Help
Resealing an RV roof can be a challenging task for many. Sometimes, you need professional help to get the job done right. Professionals have the skills and tools that ensure the roof is sealed correctly. This section will guide you on when to seek help and how to find a specialist.
When To Seek Help
Not all RV roof issues are easy to fix. If you see water stains inside, it might be time to call a pro. If the roof feels soft or spongy, you may need expert repair. Visible cracks and large tears often require professional attention. Mold or mildew on the roof can also be a sign that you need help. Safety is crucial. So, if you feel unsure, it’s best to seek help.
Finding A Specialist
Finding the right specialist can save you time and money. First, ask other RV owners for recommendations. Check online reviews to see what others say about local professionals. Look for a specialist with proper certification and experience. Ensure they have worked on your type of RV roof before. Contact them and ask about their process and costs. Compare a few options before making your decision. This helps to ensure you get the best service for your RV roof.
Frequently Asked Questions
Can I Reseal My Own Rv Roof?
Yes, you can reseal your RV roof. Ensure you use proper materials, follow manufacturer guidelines, and maintain safety precautions.
How Often Should An Rv Roof Be Resealed?
Reseal your RV roof at least once a year. Inspect it regularly for cracks or leaks to maintain durability.
What Is The Best Sealant To Use On An Rv Roof?
The best sealant for an RV roof is a high-quality, UV-resistant, and flexible product like Dicor EPDM Rubber Roof Lap Sealant.
What Do You Clean An Rv Roof With Before Resealing?
Use a mild detergent and water to clean the RV roof. Scrub with a soft brush and rinse thoroughly. Ensure the roof is completely dry before resealing.
Conclusion
Resealing your RV roof can save money and stress. Start by inspecting for damages. Clean the roof thoroughly. Choose the right sealant for your RV type. Apply the sealant evenly. Allow it to dry properly. Regular maintenance prevents future leaks.
Follow these steps for a secure, leak-free roof. Enjoy your travels with peace of mind. Protecting your RV roof extends its lifespan. Happy camping!