
Removing an RV valance isn’t as difficult as it might seem. With the right tools and steps, you can easily remove it yourself.
RV valances are decorative pieces often found above windows. They add a touch of style to the interior. But, sometimes, you may want to replace or clean them. Understanding the process of removing these valances is crucial. This guide will walk you through the steps in a simple and clear manner.
By the end, you’ll know exactly what to do. Whether you’re redecorating or just curious, this guide is for you. Let’s get started on making your RV look the way you want.

Credit: www.youtube.com
Tools Needed
Removing an RV valance requires basic tools such as a screwdriver, pliers, and a utility knife. You may also need a step stool for better reach.
Removing an RV valance can seem like a daunting task, but with the right tools, it becomes much more manageable. The tools you need range from basic to optional, depending on the complexity of your specific RV setup. Let’s dive into the essential and optional tools you might need for this project.Basic Tools
First off, you’ll need a screwdriver. Most RV valances are secured with screws, so having a set of screwdrivers with various heads (flathead and Phillips) is essential. A cordless electric screwdriver can make the job quicker and easier. A drill is also useful, especially if the screws are tightly secured or if you’re dealing with tougher materials. A lightweight, cordless drill is perfect for this kind of project. A pair of pliers can help you grip and remove any stubborn screws or nails. Needle-nose pliers are particularly handy for tight spaces. Lastly, a utility knife can help you cut through any fabric or bindings that might be holding the valance in place. Make sure the blade is sharp to avoid any unnecessary effort.Optional Tools
Depending on your RV’s specific setup, you might find some additional tools helpful. A stud finder can be useful if the valance is attached to the RV wall with hidden screws or nails. This tool helps you locate the studs behind the wall, ensuring you don’t damage the wall during removal. A small pry bar can help you gently lift the valance away from the wall without causing damage. This is particularly useful if the valance is glued or nailed in place. A tape measure can help you keep track of the dimensions of the valance, especially if you plan to replace it with a new one. Accuracy is key to ensuring a perfect fit. A headlamp or a portable work light can provide extra lighting, which is especially useful in dimly lit RV interiors. Good visibility ensures you don’t miss any screws or nails. Do you have all these tools on hand? If not, consider borrowing from a friend or visiting your local hardware store. Having the right tools can make the difference between a smooth removal process and a frustrating one. Remember, the key to a successful RV valance removal is preparation. Gather your tools, take your time, and you’ll have that valance down in no time. What other tools have you found helpful for this kind of project? Share your tips in the comments below!Preparing The Area
Clear the space around the RV valance. Remove any nearby items for easy access. Ensure good lighting to see better.
Removing an RV valance can seem like a daunting task, but with the right preparation, it’s manageable. Before you start, it’s crucial to prepare the area properly to ensure a smooth process. This involves taking necessary safety precautions and clearing the space effectively.Safety Precautions
Safety should be your top priority. Ensure your RV is parked on a flat surface to prevent any accidental movements. Turn off any electrical appliances nearby to avoid any mishaps. Wear gloves and safety goggles to protect yourself from any unexpected debris or sharp edges.Clearing The Space
Start by removing any furniture or items near the valance. This will give you ample room to work and prevent any damage to your belongings. Take down curtains or blinds attached to the valance to make the removal process easier. Keep a toolbox handy with all necessary tools such as screwdrivers and pliers. This will save you time and effort, making the task more efficient. Have you ever tried to remove something only to realize you don’t have enough space to maneuver? Clearing the space is crucial to avoid such situations. Think about the last time you worked in a cramped area—wasn’t it frustrating? By following these steps, you’ll set yourself up for a smooth and hassle-free valance removal. Are you ready to get started?Removing Screws
Removing the screws from your RV valance might seem like a daunting task, but with a few simple steps, you can get the job done quickly and efficiently. Whether you’re upgrading your RV’s interior or fixing a damaged valance, knowing how to properly remove the screws is crucial. Let’s dive into the details.
Locating Screws
First, you need to locate the screws holding the valance in place. These screws are often hidden behind fabric or trim, making them less visible. Carefully inspect the edges and corners of the valance.
Use a flashlight to spot any screws tucked away in dark areas. If you can’t see the screws, feel around the valance for any bumps or irregularities indicating their presence. Take your time and be thorough in your search.
Unscrewing Method
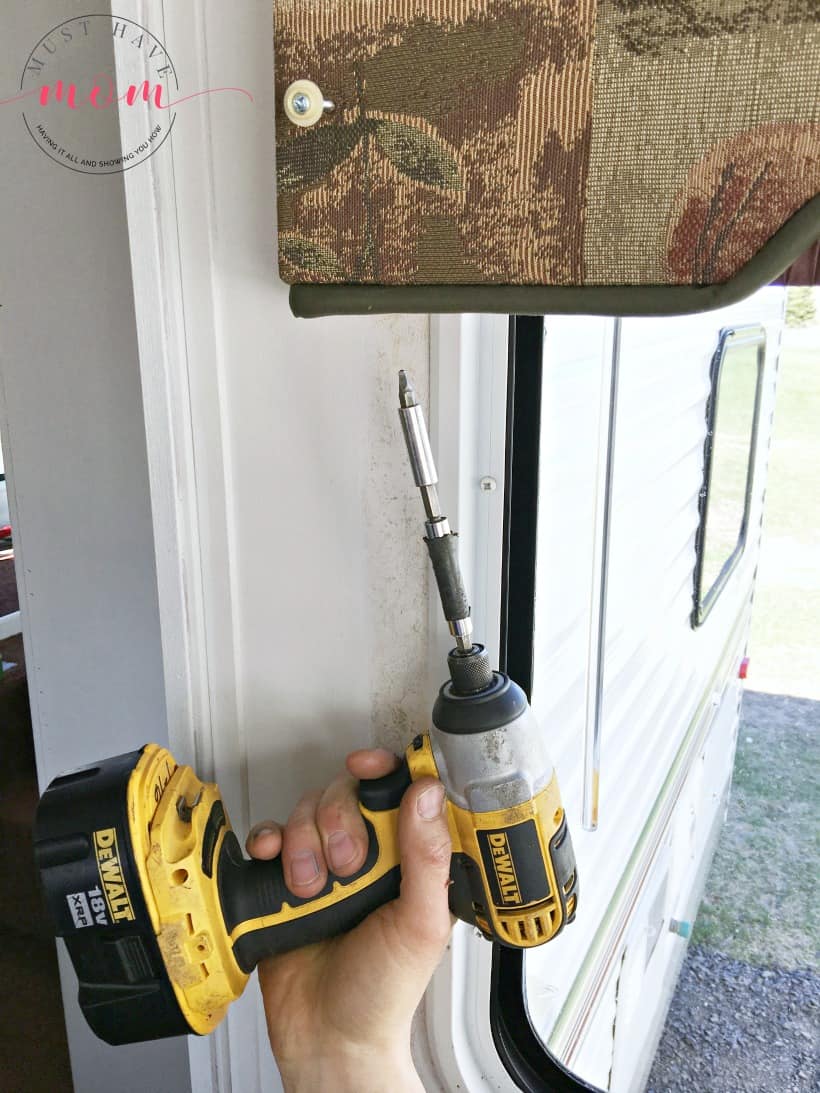
Once you’ve located the screws, it’s time to remove them. Use a screwdriver that fits the screw head perfectly to avoid stripping the screw. Start by turning the screwdriver counterclockwise.
Apply steady pressure while turning to ensure the screw comes out smoothly. If the screw is stuck, try using a bit of lubricant to loosen it. Remember, patience is key—rushing might damage the valance or the surrounding area.
Have you ever struggled with a stubborn screw? What tricks did you use to get it out? Share your experiences in the comments below!
Credit: musthavemom.com
Detaching Valance
Removing an RV valance can seem like a daunting task, but with a bit of patience and the right approach, it can be done smoothly. The key is to detach the valance carefully, ensuring you don’t damage the surrounding area or the valance itself. In this guide, we’ll walk you through the steps to loosen and remove the valance safely and efficiently.
Loosening Valance
Start by examining how the valance is attached. Typically, it’s secured with screws or brackets. Use a screwdriver to gently loosen these screws. If you’re unsure about the screw locations, look for small holes or indentations where they might be hidden.
Once you have located the screws, carefully unscrew them. Keep a small container handy to store the screws. This helps avoid losing them and makes reassembly easier. If the screws are tight, consider using a bit of lubricant to ease their removal.
Careful Removal
With the screws removed, gently pull the valance away from the wall. Do this slowly to avoid tearing or damaging the fabric or wood. If the valance seems stuck, double-check to ensure all screws are removed.
In some cases, adhesive might be used alongside screws. If you encounter resistance, use a flat tool like a putty knife to carefully separate the valance from the wall. Pry gently to avoid leaving marks or causing damage.
Once the valance is off, inspect the area for any residual adhesive or screw holes. Clean up any adhesive with a suitable remover, and patch up screw holes if necessary. This ensures a clean surface for potential new installations.
Have you ever struggled with removing a valance? What tips helped you? Share your experience below to help others!
Cleaning The Surface
Cleaning the surface of your RV valance is a crucial step before removal. This ensures that you don’t spread dust or grime during the process. Clean surfaces also make it easier to see screws or attachments. Let’s break this down into simple steps.
Dust Removal
Begin by removing dust from the valance. Use a soft cloth or duster. Gently wipe the surface to avoid pushing dust into the fabric. Dusting helps reveal the true state of the valance. Repeat this process until no more dust is visible.
Surface Inspection
After dusting, inspect the valance surface. Look for stains, marks, or sticky spots. Check for loose threads or fabric damage. Identifying these issues early can help in the cleaning process. Make a note of any problem areas that need special attention.
Repairing Holes
Repairing holes in your RV valance is essential. It helps maintain the aesthetics and integrity of your RV interior. This process includes two main steps: filling holes and sanding smooth. Each step is crucial for a flawless finish. Let’s dive into the details.
Filling Holes
First, clean the area around the holes. Use a damp cloth to remove any dust or debris. Next, choose a suitable filler. Wood putty or a similar product works well. Apply the filler with a putty knife. Ensure the filler completely covers the hole. Smooth the surface with the knife. Allow the filler to dry as per the product instructions.
Sanding Smooth
Once the filler is dry, it’s time to sand the area. Use fine-grit sandpaper for this task. Gently sand the filled area until it is smooth. Be careful not to damage the surrounding surface. Wipe away any dust with a clean cloth. Now your RV valance is ready for a fresh coat of paint or stain.
Reinstalling Valance
Reinstalling the RV valance can seem difficult, but it becomes easy with the right steps. This guide will help you align and secure your valance correctly. Follow these simple instructions to ensure your RV valance looks perfect and stays in place.
Aligning Valance
First, hold the valance up to the window. Make sure it is centered. Check that the sides are equal distance from the window frame. Adjust as needed to achieve a balanced look.
Use a level to ensure the valance is straight. An uneven valance can spoil the appearance. Mark the positions where the screws will go. This helps in the next step.
Securing Screws
Start by inserting screws into the marked positions. Use a drill for this task. This ensures the screws go in straight and secure. Do not tighten all the way yet. Leave some space for adjustments.
Check the alignment again. Make small adjustments if needed. Once satisfied, tighten the screws completely. This will secure the valance in place. Check once more to ensure it is firm and does not move.
These steps will help you reinstall your RV valance with ease. A well-secured valance enhances the look of your RV interior.
Final Touches
Removing an RV valance involves taking off screws and brackets holding it in place. Carefully detach the fabric to avoid damage. Clean the area for a fresh look.
After successfully removing the RV valance, you might think the job is done. But, the final touches are equally important to ensure everything looks perfect and functions well. Paying attention to these details can make a significant difference in your RV’s interior aesthetics.Inspecting Work
Inspect your work thoroughly. Look for any loose screws or brackets that might need tightening. Check if the wall or window area where the valance was mounted is damaged. If you notice any issues, address them immediately to prevent future problems. Make sure the wall looks neat. If there are any holes, consider filling them with putty. A smooth, clean wall will make the final setup look professional and well-maintained.Cleaning Up
Cleaning up is crucial. Remove any debris, screws, or tools that might be lying around. A clean workspace will not only look better but will also be safer for you and others. Don’t forget to clean the area where the valance was installed. Wipe down the walls and windows to remove dust and residue. Use a gentle cleaner to ensure no damage is done to the surfaces. Take a moment to admire your work. Seeing the area clean and free of the old valance can be rewarding. It’s a small but significant step towards achieving the look you want for your RV. Your final touches can make all the difference. Have you ever noticed how a small detail can either enhance or detract from a space? Be meticulous in this last step, and you’ll create an interior that feels complete and well thought out.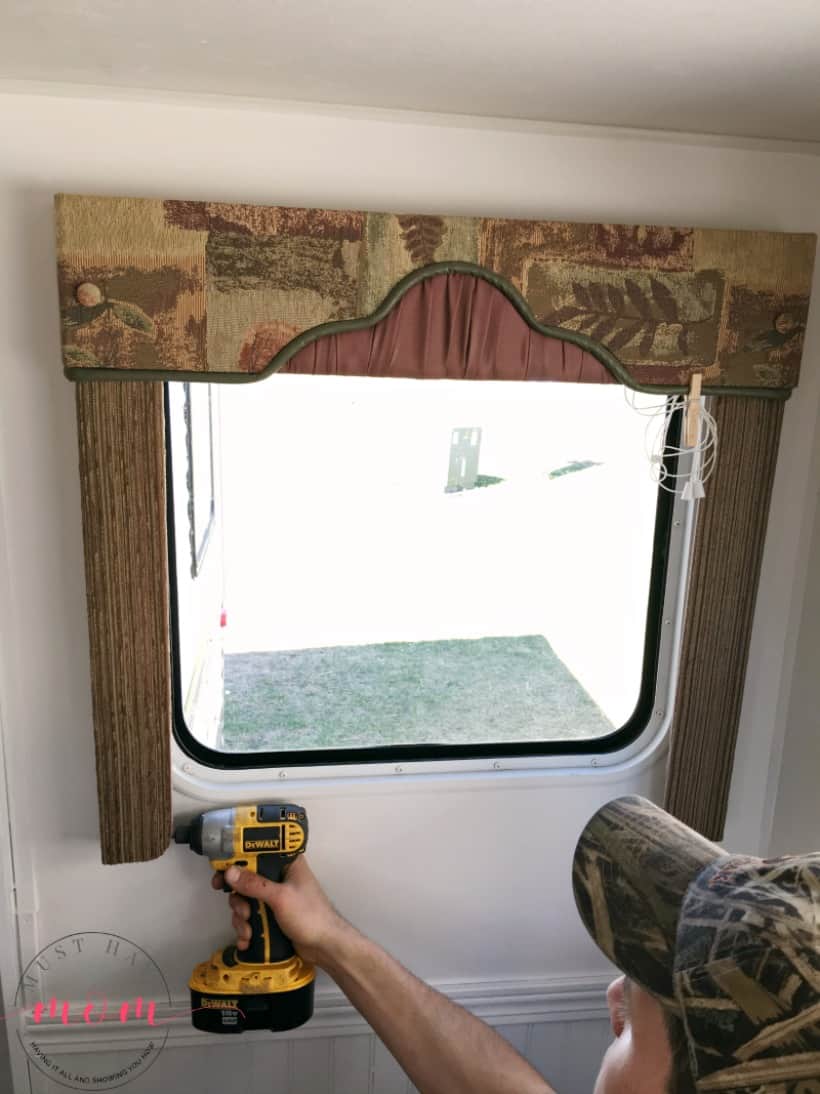
Credit: musthavemom.com
Frequently Asked Questions
How To Take Off Valance?
To remove a valance, unscrew or unclip it from the brackets. Carefully pull it away from the window frame.
How To Remove Drywall Valance?
To remove a drywall valance, first, cut along the edges with a utility knife. Next, unscrew or pry off the screws and nails. Carefully pull the valance away from the wall. Finally, patch any holes and repaint as needed.
How To Remove A Valance Clip?
To remove a valance clip, gently lift the valance. Slide the clip off the headrail or unscrew it.
What Are The Three Types Of Valance?
The three types of valance are swag valances, ascot valances, and scarf valances. They enhance window aesthetics.
Conclusion
Removing an RV valance is a simple task. Follow the steps carefully. Gather tools and take safety measures. Unscrew the valance and remove brackets. Carefully detach the fabric. Clean the area after removal. Reinstalling is just as easy. With these tips, you can do it yourself.
Save time and money. Your RV will look great! Enjoy your refreshed space. Happy travels!