
Adding Freon to an RV air conditioner involves specific steps. It’s crucial for efficient cooling.
RV air conditioners sometimes need a Freon recharge to work well. This can help keep your RV cool during hot days. But handling Freon requires care and knowledge. This guide will walk you through the process. Learn how to safely add Freon to your RV air conditioner, ensuring it operates at peak performance.
Whether you’re a seasoned RV owner or a newbie, understanding this task can save you time and money. Let’s dive into the steps to maintain your RV’s cooling system effectively.
Introduction To Rv Air Conditioner Freon
Maintaining your RV air conditioner is crucial. One key component is Freon. Without it, your air conditioner cannot cool the air. Understanding Freon is the first step in keeping your RV comfortable.
What Is Freon?
Freon is a refrigerant. It helps cool the air inside your RV. Freon is a brand name for a type of refrigerant. It is used in many air conditioning systems. Freon absorbs heat and releases cool air.
Why Rv Air Conditioners Need Freon
RV air conditioners need Freon to function. Without it, the system can’t cool the air. Freon cycles through the air conditioner. It absorbs heat and releases cool air. This process keeps your RV cool.
Low Freon levels can cause problems. Your air conditioner may blow warm air. It may also run longer, increasing energy use. Keeping the Freon level correct is important.

Credit: www.calarestaurante.com
Safety Precautions
Wear protective gloves and goggles to avoid skin and eye irritation. Ensure proper ventilation in the workspace. Follow manufacturer instructions carefully to prevent accidents.
Ensuring safety while adding Freon to your RV air conditioner is crucial. A few simple precautions can prevent accidents and keep you safe. Let’s break down the necessary safety measures.Necessary Safety Gear
First, equip yourself with the right safety gear. Wear gloves to protect your hands from the cold Freon. Safety goggles will shield your eyes from any accidental splashes or leaks. Consider wearing a long-sleeve shirt and pants to cover your skin. Freon can cause frostbite on contact. It’s also advisable to have a fire extinguisher nearby. Although rare, mishandling Freon can lead to dangerous situations.Handling Freon Safely
Handling Freon requires care and attention. Before starting, ensure you’re in a well-ventilated area. Freon fumes can be harmful if inhaled. Use the correct tools for the job. A Freon recharge kit typically includes a gauge and hose. Ensure all connections are tight and secure to prevent leaks. Follow the manufacturer’s instructions closely. Overfilling the system can damage your RV air conditioner. Aim for a steady and controlled flow when adding Freon. Taking these precautions will not only protect you but also ensure your RV air conditioner runs smoothly. Are you ready to prioritize safety in your next DIY project?Tools And Materials Needed
Gather tools like a refrigerant gauge, wrench, and safety glasses. Essential materials include Freon, gloves, and a recovery machine.
When you’re ready to put Freon in your RV air conditioner, having the right tools and materials at hand is crucial. Not only does it make the process smoother, but it also ensures safety and efficiency. Here, we’ll break down the essential tools and required materials to get the job done right.Essential Tools
First, you need a set of essential tools. Start with a refrigerant manifold gauge set. This tool helps you measure the pressure in your AC system accurately. Next, you should have a refrigerant recovery machine. This device is used to safely remove any old refrigerant from the system before adding the new Freon. A leak detector is also important. It helps you find any leaks in your air conditioning system that might cause Freon to escape. Finally, a socket set and a screwdriver are handy for opening up the air conditioning unit and accessing the necessary components.Required Materials
You’ll need some specific materials as well. First on the list is, of course, the Freon itself. Make sure you get the correct type for your RV air conditioner. Check your unit’s manual if you’re unsure. You’ll also need refrigerant oil. This oil lubricates the compressor and other moving parts inside the AC unit. Don’t forget a new set of O-rings. These are essential for sealing connections and preventing leaks. Finally, have some safety gear on hand. Gloves and safety glasses protect you from potential hazards like refrigerant burns or debris. By gathering these tools and materials beforehand, you ensure a smoother, safer, and more efficient process. Have you ever found yourself halfway through a task only to realize you’re missing a crucial item? Preparing in advance can save you from that frustration. Are you ready to dive into the actual process? Stay tuned as we guide you through the steps to put Freon in your RV air conditioner.Locating The Rv Air Conditioner’s Service Port
Maintaining your RV’s air conditioner is vital for a comfortable journey. One essential task is adding freon. First, you need to locate the service port. This port is where you will connect the freon canister.
Finding the service port might seem tricky. But with a few tips, it can be straightforward. Below, we will guide you through identifying and accessing the service port.
Identifying The Service Port
The service port is usually found on the side of the air conditioner unit. It looks like a small valve or fitting. Typically, it has a cap that you can unscrew. This cap protects the port from dirt and debris.
Sometimes, the port is labeled with an “S” for service. Check your RV’s manual for specific locations. The manual will have diagrams and detailed instructions.
Accessing The Service Port
Once identified, you need to access the service port. First, turn off the air conditioner. This is important for safety.
Next, remove any covers or panels blocking the port. These covers protect internal components. Use a screwdriver if necessary. Keep track of screws and parts you remove.
With the port exposed, you can proceed with adding freon. Attach the freon canister to the port. Ensure a secure connection to prevent leaks.
Follow the instructions on the freon canister. Adding too much or too little can affect performance. Double-check connections and monitor the process closely.
Checking Freon Levels
Maintaining your RV air conditioner’s efficiency involves checking the Freon levels. This step is crucial for proper cooling. Low Freon can cause your AC unit to underperform. Let’s dive into how you can check these levels correctly.
Using A Gauge
To check Freon levels, use a gauge. A gauge helps measure the pressure in your AC system. Attach the gauge to the service port of the air conditioner. Ensure the unit is off during this process. This step is for safety and accuracy.
Interpreting Gauge Readings
Next, interpret the gauge readings. A healthy system usually shows a specific pressure range. For example, most RV air conditioners should read between 40 to 70 psi. If the reading is lower, your system may need more Freon. If higher, there might be another issue. Compare your readings to the AC unit’s manual.

Credit: evapolar.com
Adding Freon To The Rv Air Conditioner
Adding Freon to your RV air conditioner can seem like a daunting task. But with the right tools and guidance, it becomes manageable. This process ensures your AC unit runs smoothly and efficiently. Follow these steps to add Freon to your RV air conditioner.
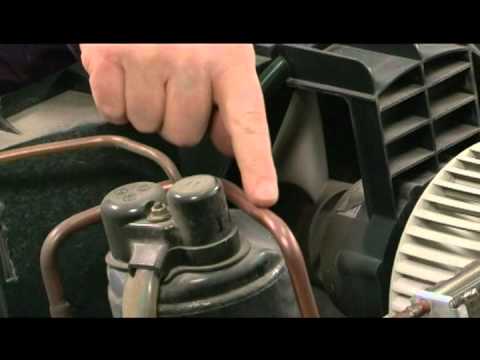
Connecting The Freon Canister
First, locate the low-pressure service port on your AC unit. It’s usually on the larger of the two copper tubes. Remove the protective cap from the port. Attach the hose from the Freon canister to this port. Ensure the connection is secure to avoid leaks. Use a wrench if necessary, but do not over-tighten. A snug fit is enough.
Releasing Freon Into The System
Turn on your RV air conditioner to its highest setting. This helps the Freon flow into the system. Open the valve on the Freon canister slowly. Allow the Freon to enter the AC unit gradually. Monitor the pressure gauge closely. Do not let the pressure exceed the recommended level. Close the valve once the correct amount of Freon is added. Remove the hose and replace the protective cap. This completes the process of adding Freon to your RV air conditioner.
Testing The Air Conditioner
After adding Freon to your RV air conditioner, testing is crucial. This ensures the unit works efficiently and cools your space properly. Follow these steps to make sure everything is in order.
Running A Test Cycle
Start by turning on the RV air conditioner. Set it to its coldest setting. Let it run for about 15 minutes. Observe the unit closely during this time. Make sure it runs smoothly without unusual noises or vibrations. This initial test helps identify any immediate issues.
Ensuring Proper Cooling
Check the air temperature coming from the vents. It should be significantly cooler than the air in your RV. Use a thermometer to get an exact reading. Place it near the vent and note the temperature. Compare it to the room temperature. A difference of 15 to 20 degrees Fahrenheit indicates proper cooling.
If the air isn’t cool enough, there might be other issues. These could include a dirty filter or a malfunctioning component. Regular maintenance can prevent such problems. Keep your air conditioner clean and inspect it periodically. This ensures it stays in good working condition.
Credit: www.youtube.com
Maintaining Your Rv Air Conditioner
Adding Freon to your RV air conditioner is essential for optimal cooling. Start by locating the unit’s service port. Carefully connect the Freon canister, ensuring no leaks.
Maintaining Your RV Air Conditioner Keeping your RV air conditioner in top shape is crucial for those comfortable road trips. Regular maintenance not only ensures cool air but also extends the lifespan of your unit. Let’s dive into some practical tips and know when it’s time to call in a professional.Regular Maintenance Tips
Regular check-ups are your best friend. Clean or replace the air filter every 30 days during peak usage. A clogged filter reduces efficiency and strains the system. Inspect the unit for debris. Leaves, dirt, and other particles can block airflow. Clean the coils and fins carefully to keep things running smoothly. Check the thermostat settings. An inaccurate thermostat can lead to inefficiency. Make sure it’s calibrated correctly.When To Call A Professional
Sometimes, DIY maintenance isn’t enough. If your AC is making strange noises, it’s time to call a professional. Unusual sounds could indicate a deeper issue. Frequent cycling on and off can signal a problem. This might mean the refrigerant levels are low or there’s an electrical issue. If you notice a decrease in cooling performance, don’t hesitate. Low Freon levels can damage your compressor. A professional can safely add Freon and check for leaks. Maintaining your RV air conditioner doesn’t have to be daunting. With regular care and knowing when to seek help, you can ensure a cool and comfortable journey. How do you keep your RV AC in top shape? Share your tips in the comments!Frequently Asked Questions
Can You Add Freon To An Rv Air Conditioner?
Yes, you can add Freon to an RV air conditioner. Ensure the system has no leaks. Consult a professional for safety.
How Do I Know If My Rv Ac Is Low On Freon?
Your RV AC may be low on Freon if it blows warm air, cycles frequently, or makes hissing sounds. Check for ice buildup on the evaporator coil. Consider using a professional to confirm low Freon levels.
How To Stop Rv Ac From Freezing Up?
Clean the air filters regularly. Check for proper airflow and ensure vents are open. Maintain refrigerant levels. Avoid setting the thermostat too low. Inspect and fix any leaks in the system.
Why Is My Rv Ac Not Blowing Cold Air?
Your RV AC may not blow cold air due to low refrigerant, dirty filters, or a malfunctioning compressor. Check these components first.
Conclusion
Filling your RV air conditioner with Freon is straightforward. Follow each step carefully. Ensure you have the right tools. Always prioritize safety. Check for leaks after refilling. Proper maintenance increases your AC’s lifespan. Enjoy cool air on your journeys. Happy travels!