Painting camper cabinets can transform your RV’s interior. It’s a budget-friendly update.
To help you get started, we’ll guide you through the process. A fresh coat of paint can make old cabinets look new. It can add a personal touch to your camper. Plus, it’s a project that most people can handle themselves.
Whether you want a bright, modern look or a cozy, rustic feel, painting your camper cabinets can achieve it. With the right tools and a little patience, you can create a space that feels like home. This guide will walk you through each step, ensuring your cabinets look great and last for years. Let’s dive in and get those cabinets looking fabulous!
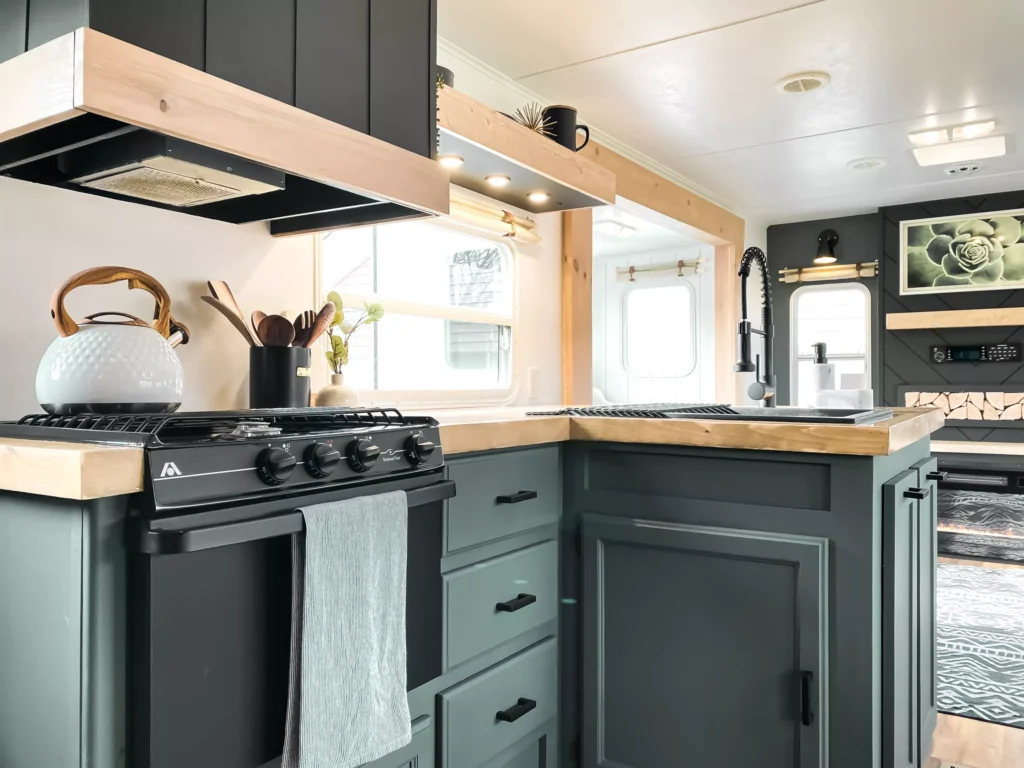
Credit: wildfireinteriors.com
Preparing Your Workspace
Set up a clean workspace before painting camper cabinets. Cover surfaces with drop cloths to prevent paint splatters. Organize your tools for easy access.
Painting camper cabinets can transform your space, giving it a fresh and updated look. But before you dive into painting, it’s crucial to prepare your workspace properly. This step ensures a smooth process and professional finish.Clearing The Area
First, you need to clear the area. Remove all items from the cabinets and surrounding space. This includes dishes, pots, pans, and any decorative items. Take out the cabinet doors and drawers for easier access. Label each one to ensure you know exactly where they go when you’re done. Keep screws and hinges in a safe place so they don’t get lost.Gathering Supplies
Next, gather all the supplies you’ll need. Make sure you have paint, primer, brushes, rollers, and sandpaper. Don’t forget painter’s tape and drop cloths to protect surfaces. Consider using a small paint sprayer for a more even finish. Check if you have everything before you start to avoid interruptions. Have you ever started a project only to find you’re missing a crucial tool? Avoid this by doing a quick inventory check. Preparing your workspace is an essential step to ensure a smooth and enjoyable painting experience. What steps will you take to make sure your area is ready?
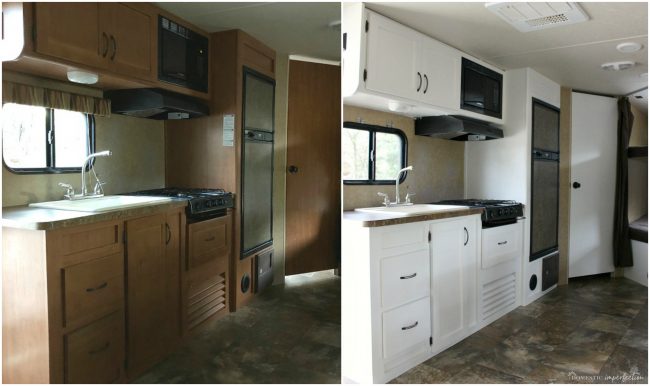
Credit: www.allthingswithpurpose.com
Choosing The Right Paint
Choosing the right paint for camper cabinets can transform the space. Look for durable, easy-to-clean paint. Opt for light colors to brighten the interior.
Choosing the Right Paint When it comes to painting camper cabinets, selecting the right paint is crucial. The wrong choice can lead to chipped surfaces and a less-than-stellar finish. Let’s dive into the types of paint and color selection to ensure your cabinets look their best.Types Of Paint
Choosing the appropriate type of paint can make or break your project. For camper cabinets, durability and ease of cleaning are key. Consider using acrylic paint. It’s water-based, dries quickly, and cleans up easily. Plus, it’s less likely to yellow over time. Oil-based paint is another option. It’s known for its smooth finish and durability but takes longer to dry. It can be harder to clean up as well, requiring solvents. Chalk paint offers a matte finish and is great for achieving a rustic look. However, it may need a sealant to protect against wear and tear. Think about your needs and lifestyle. If you often travel or cook in your camper, a durable, easy-to-clean option like acrylic might be best.Color Selection
Color can transform your camper cabinets and set the tone for your space. Neutral colors like white, beige, and gray offer a clean, timeless look. They’re also versatile and match different interior styles. Bold colors, such as navy blue or forest green, can make your cabinets a focal point. They add personality and depth to your camper. If you want a cozy feel, consider warm tones like mustard yellow or terracotta. These colors can make your space feel inviting and comfortable. Think about the rest of your camper’s decor. Do you want the cabinets to blend in or stand out? Choosing the right color is not just about aesthetics. It’s about creating a space that feels right for you and your adventures.Removing Cabinet Doors
Removing cabinet doors is the first step in painting your camper cabinets. This process involves careful steps to ensure nothing gets damaged or lost. Follow these instructions for a smooth experience.
Unscrewing Hinges
First, take a screwdriver and unscrew the hinges on each cabinet door. Carefully remove all screws and set them aside. Using a power drill can speed up this process.
Ensure you keep track of every screw. Place them in a small container or bag. This way, you won’t lose any pieces.
Labeling Components
Next, label each door and its corresponding cabinet. Use masking tape and a marker. Write a number or letter on the tape and stick it to the door and the cabinet frame.
This step is crucial. It helps you reattach the doors to the correct spots. It saves time and avoids confusion later.
Cleaning And Sanding
Thoroughly clean and sand camper cabinets before painting. Remove grease and grime for a smooth surface. Sanding ensures paint adhesion.
Painting camper cabinets can be a rewarding DIY project that breathes new life into your camper. However, successful painting starts with proper cleaning and sanding. These initial steps ensure that the paint adheres well and that your final finish looks professional. Let’s break down these crucial steps to make your cabinets look amazing. ###Degreasing Surfaces
First things first, you need to clean the cabinets thoroughly. Campers can accumulate grime and grease over time, especially in the kitchen area. Use a degreaser to tackle these tough spots. Apply the degreaser with a sponge or cloth, focusing on areas that look particularly dirty. Make sure to rinse the surfaces with clean water afterward to remove any leftover residue. You don’t want any cleaning agents interfering with the paint. ###Sanding Techniques
After cleaning, it’s time to sand the cabinets. Sanding helps to smooth out any imperfections and provides a better surface for the paint to stick to. Use a fine-grit sandpaper (around 220 grit is ideal). Sand in the direction of the wood grain to avoid scratches. If you encounter any rough spots or old paint, a slightly coarser grit may be needed first, followed by the fine grit. Remember to wipe down the cabinets with a damp cloth after sanding to remove any dust. This step is crucial; dust can ruin your paint job. Have you ever rushed through a project only to regret it later? Taking your time with these steps will save you frustration and ensure a beautiful finish. Are you excited to see your revamped camper cabinets? The prep work might seem tedious, but it’s worth the effort. Your future self will thank you!Priming The Cabinets
Priming camper cabinets is a crucial step. It ensures the paint sticks well. This process helps the final coat last longer. Proper priming prevents peeling and chipping. Let’s dive into the steps for priming your camper cabinets.
Applying Primer
First, choose a high-quality primer. An oil-based primer works best on wood. Clean the cabinets thoroughly. Remove any dirt or grease. Sand the surface lightly. This helps the primer adhere better.
Use a brush or roller to apply the primer. Apply a thin, even coat. Cover all areas, including corners and edges. Ensure there are no drips or thick spots. Let the primer settle into the surface.
Drying Time
Allow the primer to dry completely. This step is crucial for a smooth finish. Check the primer label for the recommended drying time. Typically, it takes a few hours. Ensure the area is well-ventilated.
Once dry, check for any missed spots. Apply a second coat if needed. Sand the surface lightly between coats. This ensures a smooth and even finish. Now, your cabinets are ready for the next step.
Painting The Cabinets
Transform the look of your camper by painting the cabinets. Clean, sand, and prime the surfaces first. Then, apply your chosen paint color for a fresh and stylish update.
### Painting the Cabinets Painting camper cabinets can transform your space. It’s more than a weekend project—it’s a chance to breathe new life into your camper. Let’s dive into the steps to ensure your cabinets look professional.First Coat Application
Start with a good quality primer. This helps the paint adhere better and ensures an even finish. Apply the first coat of paint using a brush or roller. A small foam roller works great for flat surfaces. For edges and corners, use a brush to get a smooth finish. Allow the first coat to dry completely. This usually takes about 4-6 hours, but check the paint can for specific drying times.Second Coat And Finishing
After the first coat dries, inspect the cabinets. Touch up any spots you may have missed. Apply the second coat using the same method as the first. This coat will enhance the color and provide a more durable finish. Once the second coat is dry, consider adding a clear sealant. This will protect your paint job from scratches and wear. Have you ever painted cabinets before? What techniques worked best for you?Reattaching Cabinet Doors
After painting your camper cabinets, the next step is reattaching the cabinet doors. This task ensures that your cabinets are functional and look neat. Proper alignment and screw placement are key to achieving a polished finish.
Screw Placement
Proper screw placement is essential for sturdy cabinet doors. First, identify the screw holes on the cabinet frame. Hold the door in place and use a pencil to mark the spots. This will help you align the screws perfectly.
Use a drill with a screwdriver bit to drive the screws into the marked spots. Start with the top screw to hold the door in place. This makes it easier to insert the remaining screws. Avoid over-tightening, as this can damage the wood.
Aligning Doors
Aligning the doors correctly is crucial for a clean look. Begin by closing the door and checking its position. It should be level and flush with the cabinet frame. If not, adjust the screws slightly to align the door properly.
Use a level tool to ensure the door is straight. Place the level tool on the edge of the door and make small adjustments as needed. Once aligned, tighten all screws securely. Repeat the process for each cabinet door to ensure consistency.
Adding Finishing Touches
Adding finishing touches to your painted camper cabinets makes them look professional. These final steps enhance the overall appearance and functionality of your cabinets.
Installing Hardware
After painting, choose new hardware for your cabinets. Pick handles or knobs that match your camper’s style. Use a screwdriver to attach them securely. Make sure all screws are tight. This prevents wobbly handles. Align the hardware properly for a clean look.
Final Clean-up
Before you finish, clean your cabinets one last time. Remove any dust or paint splatters. Use a damp cloth for a spotless finish. Ensure there are no streaks. This step gives your cabinets a polished appearance. Enjoy your refreshed camper with beautiful, painted cabinets.
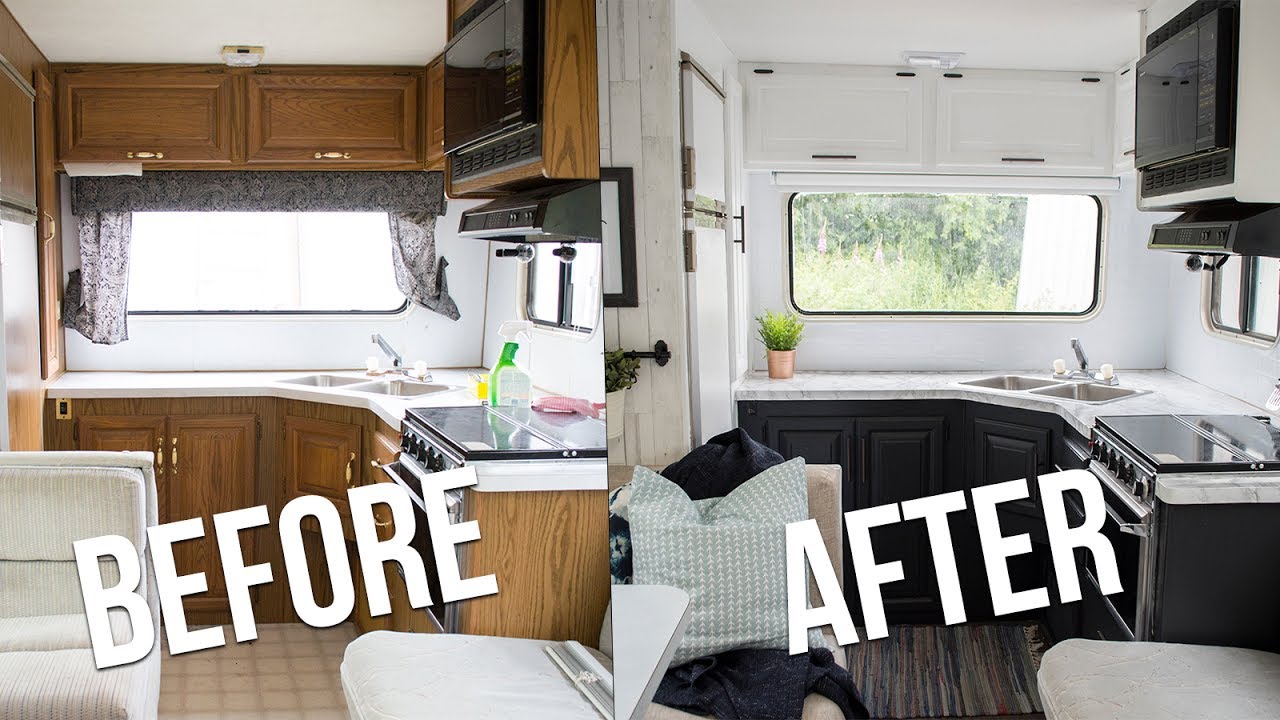
Credit: www.youtube.com
Frequently Asked Questions
What Kind Of Paint To Use On Camper Cabinets?
Use high-quality latex or acrylic paint for camper cabinets. Clean, sand, and prime the surface for best results. Choose a semi-gloss or satin finish for durability and easy cleaning.
Can I Paint Trailer Cabinets?
Yes, you can paint trailer cabinets. Clean the surface well and use a suitable primer and paint. Make sure to apply thin coats for a smooth finish.
What Primer To Use On Rv Cabinets?
Use a high-quality bonding primer like Zinsser B-I-N or KILZ Adhesion. These primers ensure proper adhesion and durability.
What Kind Of Paint Do You Use To Paint An Rv?
Use automotive or marine-grade paint to paint an RV. These paints are durable and weather-resistant. Choose high-quality polyurethane or acrylic enamel for best results. Ensure proper surface preparation before application.
Conclusion
Painting camper cabinets can seem challenging, but it is doable. Follow the steps, take your time, and enjoy the process. Your camper will look refreshed and new. Remember to use quality paint for a lasting finish. Happy painting!