
Installing an RV skylight can seem daunting at first. But with the right steps, it becomes an easy task.
An RV skylight brightens your space and saves energy. It offers a view of the sky and enhances your travel experience. You get more natural light, which makes your RV feel bigger and more open. Installing a skylight may sound complicated, but it’s not.
This guide will show you clear, simple steps to do it yourself. You’ll need some basic tools and a bit of patience. By the end, you’ll enjoy a brighter and more inviting RV. Ready to learn how? Let’s get started.
Tools And Materials
Installing an RV skylight can brighten up your space. But, it requires the right tools and materials. This section covers everything you need for a smooth installation. Let’s dive into the essentials.
Essential Tools
First, gather these essential tools. A drill with a set of bits will be your best friend. A screwdriver is also necessary. Have a utility knife on hand for cutting. Safety goggles protect your eyes. Gloves keep your hands safe. A measuring tape ensures accuracy. Lastly, a caulking gun is vital for sealing.
Materials Needed
Now, let’s talk about materials. You need a skylight that fits your RV. Butyl tape is essential for sealing. Get some screws and nails. Caulk is necessary for waterproofing. Use a putty knife to spread the caulk evenly. Have cleaning wipes ready. They help keep surfaces clean. Lastly, a piece of plywood can support the installation area.
Preparation
Gather necessary tools and materials for the RV skylight installation. Ensure the area is clean and dry before starting. Follow the instructions provided with the skylight kit for best results.
### Preparation Installing an RV skylight can transform your travel experience by letting in natural light and offering a glimpse of the sky. But before you start, preparation is key. It’s crucial to make sure everything is in order to avoid unnecessary complications during the installation process.Choosing The Right Skylight
First, you need to choose the right skylight for your RV. Consider the size, shape, and material. Are you looking for a rectangular skylight or a dome-shaped one? Think about the weather conditions you’ll be traveling in. If you expect heavy rain or extreme sunlight, opt for a durable, UV-resistant material. Talk to other RV owners and get their recommendations. Their experiences can be invaluable in making your decision.Measuring The Installation Area
Next, accurately measure the area where you plan to install the skylight. Use a tape measure to get the exact dimensions. Double-check your measurements to avoid any mistakes. A small error can lead to big problems later on. Mark the dimensions clearly with a pencil or marker. This will guide you when cutting out the installation area. Have you considered the location of roof supports and wiring? Ensure that your chosen spot won’t interfere with these critical components. Preparing well can make the installation process smooth and hassle-free. What challenges do you anticipate in your RV skylight installation?Removing The Old Skylight
Before installing a new RV skylight, you must remove the old one. This process involves taking safety precautions and following specific steps. Removing the old skylight is a crucial part of the installation. It ensures a proper fit for the new skylight.
Safety Precautions
Safety is the top priority. Wear gloves to protect your hands. Use safety goggles to shield your eyes from debris. Ensure you have a stable ladder. Secure the ladder on even ground. This prevents falls while working.
Steps To Remove
First, inspect the old skylight. Look for any screws or bolts holding it in place. Use a screwdriver to remove them. Keep the screws safe for later.
Next, use a putty knife to break the seal. Gently pry around the edges. Take your time to avoid damaging the roof.
Once the seal is broken, lift the skylight carefully. Have someone assist you if it is large. Place the old skylight aside. Clean the area where the skylight sat. Remove any old sealant or debris.
Check the roof for damage. Repair any issues before installing the new skylight.
Preparing The Roof
Ensure the roof is clean and free of debris before beginning the installation. Check for any damage and make necessary repairs. This step ensures a secure and watertight fit for the RV skylight.
When you’re ready to install an RV skylight, the first step is preparing the roof. Proper preparation ensures a watertight seal and longevity of the skylight. Let’s break it down into two main tasks: cleaning the area and inspecting for damage.Cleaning The Area
Before you start, grab some essential cleaning supplies: a brush, mild detergent, water, and a clean rag. Ensure you have a stable ladder and wear non-slip shoes for safety. Carefully remove any dirt, debris, or old sealant from the area where the skylight will be installed. A clean surface ensures a stronger bond when you apply the adhesive. Use the brush to sweep away loose debris, then scrub the area with the mild detergent and water. Rinse thoroughly and dry with a clean rag. Do you feel confident that the area is spotless? A clean surface is crucial for a successful installation.Inspecting For Damage
After cleaning, take a close look at the roof for any signs of damage. Check for cracks, punctures, or soft spots that might indicate water damage or structural issues. If you find any problems, address them immediately. Repairing damage before installing the skylight prevents future leaks and costly repairs. Use a flashlight to inspect hard-to-see areas. Press gently on suspicious spots to check for softness, which could indicate rotting or underlying issues. Have you found any potential problems? Fixing them now saves you headaches later. By cleaning the area and inspecting for damage, you set the stage for a smooth and successful RV skylight installation. Ready to move on to the next step? Your well-prepared roof will thank you!Installing The New Skylight
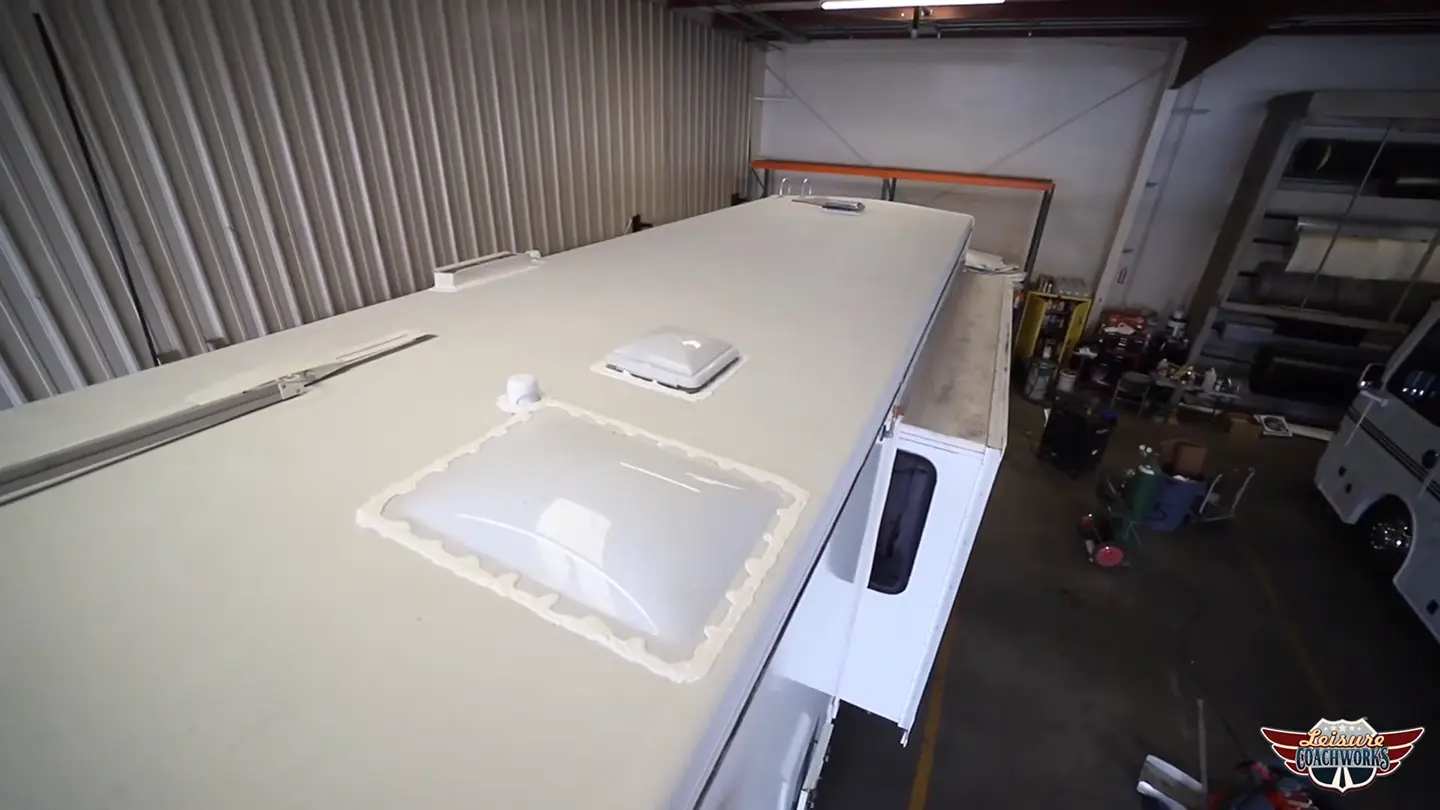
Ready to let some natural light into your RV? Installing a new skylight can transform your space, adding brightness and an open feel. It might seem like a challenging task, but with a few tools and some patience, you’ll have that skylight installed in no time.
Positioning The Skylight
First, you’ll want to find the perfect spot for your new skylight. Ideally, this should be in an area where you need extra light, like the kitchen or bathroom. Before you start cutting, double-check that there are no wires or structural elements in the way.
Mark the outline of the skylight on the ceiling. Use a pencil for this so you can easily correct any mistakes. It’s always better to measure twice and cut once!
Once you’re confident in your positioning, drill a small pilot hole in each corner of the marked area. This will act as a guide for your saw.
Securing The Skylight
With your pilot holes drilled, it’s time to cut out the opening. Use a jigsaw for clean, precise cuts. Always wear safety goggles to protect your eyes from debris.
When the opening is ready, place the skylight into the hole. Ensure it fits snugly. If it’s too tight, you might need to sand down the edges slightly.
Now, apply a generous amount of sealant around the edge of the opening. This will help keep water out. Press the skylight firmly into place and secure it with screws. Be sure to follow the manufacturer’s instructions for screw placement and spacing.
And there you have it! With the skylight securely in place, you can now enjoy the added natural light in your RV. Have you installed a skylight before? What tips and tricks did you find most useful?
Credit: leisurecw.com
Sealing And Waterproofing
Sealing and waterproofing your RV skylight is a crucial step to ensure that your mobile home remains dry and comfortable. Proper sealing prevents leaks that can cause damage to the interior of your RV. With the right approach, you can effectively seal and waterproof your skylight, ensuring long-term durability and peace of mind.
Applying Sealant
First, choose a high-quality sealant designed for RVs. Make sure the area around the skylight is clean and dry before you start.
Apply the sealant generously around the edge of the skylight. Use a caulking gun for a smooth and even application. Ensure that you fill any gaps completely to prevent water from seeping through.
Once you’ve applied the sealant, smooth it out with a caulking tool or your finger. This helps to create a tight seal and improves the overall appearance. Allow the sealant to dry thoroughly, following the manufacturer’s instructions.
Checking For Leaks
After the sealant has dried, it’s essential to check for leaks. Pour a small amount of water over the skylight and observe the area inside the RV. Look for any signs of water intrusion.
If you spot a leak, dry the area and apply an additional layer of sealant. Make sure to cover the entire problematic area. This may take some time, but it ensures that your skylight is thoroughly waterproofed.
Perform regular checks, especially after heavy rain or a car wash. This proactive approach helps you catch any potential issues early, saving you from more significant repairs down the line.
Have you ever had a surprise leak after thinking your skylight was sealed? It’s frustrating, but it teaches the importance of thoroughness. Double-checking your work can save you a lot of hassle later.
Remember, sealing and waterproofing your RV skylight is not just about applying sealant. It’s about ensuring a comfortable and dry living space. Don’t rush this process. Your patience and attention to detail will pay off.
Final Touches
After installing your RV skylight, the final touches will complete the job. These steps ensure a secure, polished, and professional finish. Let’s look at the interior finishing and important maintenance tips.
Interior Finishing
Start by cleaning any debris around the skylight. Ensure the area is spotless. Use a damp cloth to wipe away dust. This prepares the surface for the next steps.
Next, apply a bead of interior sealant around the skylight edge. This prevents air leaks and enhances insulation. Smooth the sealant with a finger or tool. Make sure it’s even and neat.
Install the interior trim piece. Align it carefully with the skylight. Secure it with screws. This gives a professional look and covers any rough edges. Check that the trim is flush with the ceiling.
Finally, paint the trim to match your RV’s interior. Use a brush for small details. Let the paint dry completely. This final touch blends the skylight seamlessly with the rest of your RV.
Maintenance Tips
Regular maintenance keeps your skylight in top shape. Inspect it every few months. Look for cracks or leaks. Address issues quickly to prevent damage.
Clean the skylight regularly. Use mild soap and water. Avoid harsh chemicals. These can damage the skylight material. Rinse thoroughly and dry with a soft cloth.
Check the seals around the skylight. They can wear out over time. Replace them if you notice cracks or gaps. This ensures your skylight remains airtight.
If you live in a colder climate, remove snow from the skylight. Heavy snow can strain the skylight and cause leaks. Use a soft brush to avoid scratching the surface.
Proper care extends the life of your RV skylight. It keeps your interior bright and beautiful. Follow these tips for years of enjoyment.

Credit: www.otherworldtravels.com

Credit: www.otherworldtravels.com
Frequently Asked Questions
Can You Add A Skylight To An Rv?
Yes, you can add a skylight to an RV. It enhances natural light and ventilation. Ensure proper installation for safety and durability.
Can I Install Skylights Myself?
Yes, you can install skylights yourself. Ensure you follow manufacturer instructions carefully. Use proper tools and safety equipment.
Are Rv Skylights A Standard Size?
RV skylights are not a standard size. They come in various dimensions to fit different RV models and designs. Always measure your RV skylight space before purchasing a replacement.
How To Replace A Skylight In A Motorhome?
To replace a skylight in a motorhome, remove the old skylight, clean the area, apply sealant, and install the new skylight. Secure it with screws and ensure a watertight seal.
Conclusion
Installing an RV skylight can be a simple and rewarding task. With the right tools and steps, you can brighten your space. Remember to measure accurately and follow all safety guidelines. Regularly check for leaks to maintain your skylight. Enjoy the natural light and enhanced atmosphere in your RV.
Happy travels and safe camping!