Draining an RV water heater is essential maintenance. It ensures efficiency and longevity.
Many RV owners often overlook this simple yet crucial task. Draining the water heater prevents sediment buildup, which can damage the system. A clean water heater also improves performance, ensuring you get hot water when needed. This process might seem daunting, but it’s straightforward with the right steps.
In this guide, we’ll walk you through the process. You will learn everything needed to drain your RV water heater safely and effectively. So, let’s dive in and keep your RV’s water system in top shape!
Safety Precautions
Ensure the RV is off and cooled down. Open the pressure relief valve and drain plug carefully to release water.
Draining your RV water heater is a crucial maintenance task to ensure its longevity and efficiency. However, it’s just as important to keep safety in mind while doing so. Here are some essential safety precautions to follow:Turn Off Power Supply
Before you do anything, make sure to turn off the power supply to the water heater. If your RV water heater is electric, switch off the breaker. For a gas heater, turn off the gas supply. This step is vital to avoid any potential electrical or gas hazards. I once skipped this step in a hurry and ended up with a minor shock. Trust me, you don’t want to make that mistake. Always double-check to ensure the power is completely off.Allow Water To Cool
After turning off the power, give the water heater some time to cool down. Hot water can cause severe burns. It’s better to wait a few hours or even overnight if you can. If you’re unsure whether the water is cool, carefully touch the outside of the tank. I remember being impatient once and tried draining it too soon. The water was still hot, and I ended up with a painful scald. Don’t rush this step; your safety comes first. By following these safety precautions, you can drain your RV water heater without any risks. What other safety tips do you follow during maintenance?Gather Necessary Tools
Gather essential tools like a wrench, a hose, and a bucket. These items help drain your RV water heater.
Draining your RV water heater is a crucial maintenance task that ensures your system runs smoothly and efficiently. Before you dive into this process, gathering the necessary tools is essential for a hassle-free experience. It’s always better to be prepared than to find yourself halfway through the job, scrambling for a tool you forgot.Required Tools List
To get started, you’ll need a few specific tools. These are must-haves for a successful water heater drain:- Adjustable Wrench: This will help you loosen and tighten the drain plug.
- Bucket: To catch the water and prevent a mess.
- Hose: To direct the water away from your RV.
- Safety Gloves: Protect your hands from hot surfaces and water.
- Teflon Tape: For sealing the drain plug when you reinstall it.
Optional Tools
While the required tools are essential, there are a few optional tools that can make the job even easier:- Water Pressure Regulator: Helps to control the water flow and prevent damage.
- Plumber’s Tape: Another option for sealing threads securely.
- Flashlight: Useful for better visibility if you’re working in a dimly lit area.
- Cleaning Brush: Handy for cleaning the heater’s interior after draining.
Locate The Water Heater
Draining your RV water heater is a crucial task. It helps maintain the system’s efficiency and extends its lifespan. Before you start, you need to locate the water heater. Knowing its exact location will make the draining process easier and faster.
Finding The Heater Compartment
The water heater in most RVs is located outside. Check the exterior panels on the side of your RV. Look for a small, square door with a vent. This door usually has a latch or screws to keep it secure. The water heater is behind this door.
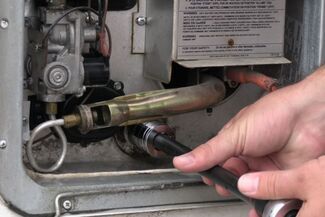
Accessing The Drain Valve
Once you open the compartment door, find the drain valve. It’s usually at the bottom of the water heater tank. The valve may have a handle or a plug. Remove any debris around the valve. This ensures you have clear access.
Use a wrench if the valve is tight. Turn it counterclockwise to open. Water will start to drain out. Make sure you have a bucket or hose to catch the draining water.
Credit: www.etrailer.com
Drain The Water Heater
Draining your RV water heater is an essential task to maintain the efficiency and longevity of your water system. If you’ve never done it before, it might seem intimidating. But don’t worry, it’s simpler than you think! Let’s break it down step-by-step.
Open The Pressure Relief Valve
First things first, you need to release the pressure in your water heater. The pressure relief valve is usually found at the top of the heater. Open it carefully.
This step is crucial to avoid hot water from spraying out when you remove the drain plug. I remember the first time I drained my RV water heater; I skipped this step and got a face full of hot water. Learn from my mistakes!
Remove The Drain Plug
Once the pressure is relieved, it’s time to remove the drain plug. You’ll find it at the bottom of the water heater. Use a wrench to unscrew it.
Make sure you have a bucket or hose ready to catch the draining water. It’s a good idea to wear gloves, as the water might still be hot. This is the moment when you realize how much water your heater holds!
By breaking down these steps and ensuring you take the necessary precautions, draining your RV water heater becomes a straightforward task. Have you ever had a close call with hot water while doing this? Share your experiences in the comments below!
Flush The Tank
Draining an RV water heater involves turning off the power supply and water source. Open the pressure relief valve and remove the drain plug. Allow the tank to empty completely.
Draining your RV water heater is a crucial maintenance task to ensure its longevity and efficiency. One important step in this process is to flush the tank. Flushing helps to remove any build-up of sediments and ensures that your water heater runs smoothly. Here’s a step-by-step guide on how to do it.Using Fresh Water
Start by turning off the water heater and letting it cool down. Safety first! Once it’s cool, connect a fresh water hose to the tank’s drain valve. Open the valve and turn on the hose. Fresh water will flow through the tank, pushing out sediments and debris. Let it run until the water coming out is clear. Clear water means the tank is flushed. Are you seeing any improvements in water flow? If not, you might need to repeat the process. It’s common to flush more than once.Removing Sediments
Sediments can cause major issues if left unchecked. They can block water flow and reduce heating efficiency. To remove them, use a tank flusher or wand. Insert the flusher into the drain valve and turn on the water. Move it around to dislodge any stubborn sediment. This step can take a few minutes, but it’s worth it. Have you ever noticed your hot water running out quickly? Sediments might be the culprit. Removing them can restore your water heater’s performance. After flushing and removing sediments, close the drain valve. Refill the tank with fresh water and check for leaks. Proper maintenance ensures a longer lifespan for your RV water heater. Why not make this a regular part of your RV maintenance routine? It saves you time and hassle in the long run. Happy camping!Inspect And Clean
Draining your RV water heater is essential for maintenance and longevity. Inspect and clean the heater regularly to ensure it operates efficiently. This process includes checking for damages and cleaning the anode rod. Follow these steps to keep your water heater in top condition.
Check For Damages
Before draining the water heater, inspect it thoroughly. Look for visible damages or leaks around the tank. Check the exterior for rust or corrosion. These signs indicate potential issues that need immediate attention. If you notice any serious damage, consult a professional. Regular inspections help prevent unexpected problems.
Clean The Anode Rod
The anode rod plays a crucial role in protecting your water heater. Remove the rod carefully and check its condition. If it appears corroded or worn out, replace it. To clean the rod, use a wire brush to remove any buildup. This simple step can extend the life of your water heater. Always ensure the rod is in good condition before reinstalling it.
Reassemble And Refill
Learn how to drain an RV water heater efficiently. Reassemble and refill it to ensure optimal performance on your travels. Keep your water heater in top condition with these simple steps.
Reassembling and refilling your RV water heater can seem daunting, but it’s simpler than you might think. After draining the water heater, the next critical steps are to replace the drain plug and refill the water heater. Follow these clear and straightforward steps to ensure your RV water heater is ready for your next adventure.Replace The Drain Plug
Replacing the drain plug is essential to prevent leaks. First, make sure the drain hole is clean and free of debris. This ensures a tight seal. Tip: Keep a few extra drain plugs on hand. They are inexpensive and convenient to have as spares. Screw the drain plug back into place firmly. Use a wrench to ensure it’s tight, but be careful not to over-tighten it. Over-tightening can strip the threads and cause damage.Refill The Water Heater
Refilling the water heater is the final step. Start by turning on the water supply to your RV. Open the hot water faucet inside your RV. This allows air to escape from the tank as it fills. Watch the faucet. When water flows steadily, the tank is full. This process can take a few minutes, so be patient. Close the faucet once the water flows smoothly. Double-check for any leaks around the drain plug. Pro Tip: If you hear gurgling noises, don’t panic. This is normal as air escapes the tank. With the tank full, your water heater is ready to be turned back on. Enjoy a warm shower after a long day of travel. Have you ever had a surprising issue while reassembling or refilling your water heater? Share your experience in the comments below.
Credit: www.youtube.com
Maintenance Tips
Regular maintenance of your RV water heater ensures its longevity and efficiency. Draining the water heater is a crucial part of this process. By following these maintenance tips, you can keep your RV water heater in good condition.
Regular Draining Schedule
Set a regular schedule to drain your RV water heater. Ideally, you should do this every six months. Regular draining helps to remove sediment buildup. Sediment can cause blockages and reduce efficiency. Consistent draining ensures your water heater runs smoothly.
Signs Of Potential Issues
Pay attention to signs of potential issues. Strange noises from the heater can indicate sediment buildup. Reduced water flow may also signal a problem. Check for rust-colored water, which could mean corrosion inside the tank. Address these issues promptly to prevent bigger problems.

Credit: www.truckcamperadventure.com
Frequently Asked Questions
How Do I Drain My Rv Water Heater?
Turn off the water heater. Release pressure by opening the pressure relief valve. Remove the drain plug and let water flow out.
How Do I Get Water Out Of My Rv Water Heater?
Drain your RV water heater by turning off the power, opening the pressure relief valve, and removing the drain plug.
Should You Drain Your Rv Water Heater For Winter?
Yes, you should drain your RV water heater for winter. This prevents freezing and potential damage.
How Do I Completely Empty My Rv Water Tank?
To completely empty your RV water tank, open the drain valve and let the water flow out. Flush the tank with fresh water, then drain again. Close the valve once empty.
Conclusion
Draining your RV water heater is simple and essential. Regular maintenance avoids problems. Follow the steps above to ensure smooth operation. Check connections and valves for leaks. Proper care extends the heater’s life. So, keep your RV’s water heater in top shape.
Happy travels and safe camping!